
How to Remove Watermark From Photo: 4 Easy Ways That Work
Remove unwanted watermarks from your photos with Photoshop, AI tools, and mobile solutions. Learn which method works best for different images and get cleaner results faster.

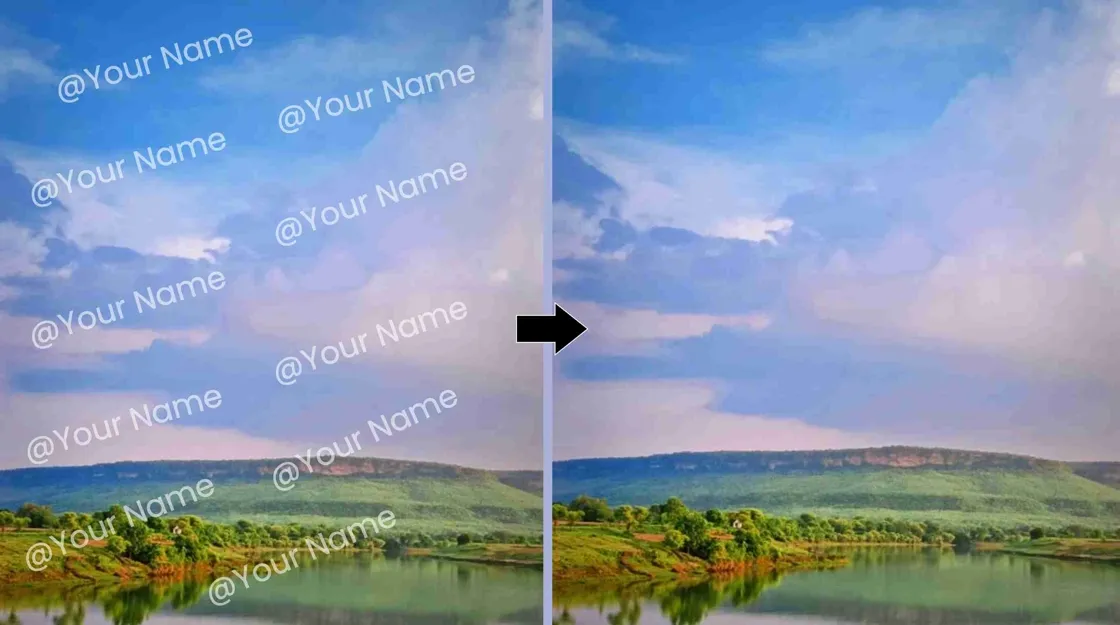
Removing a watermark can be useful when you own the photo, created the overlay yourself, or have permission to edit the image. Learning how to remove a watermark from a photo can help clean up unwanted marks without changing the rest of the image. The right approach depends on the watermark's size, placement, opacity, background complexity, and whether you prefer desktop, mobile, or AI-based editing. This guide covers practical options using Photoshop, online tools, iPhone features, and AI-powered solutions. Each approach works differently, so choosing the right one can help you achieve a cleaner result with less editing effort.
Before you remove a watermark: What's allowed
Before learning how to remove watermarks, make sure you have the right to edit the image.
-
Your own photos: You can remove watermarks from photos you own or created yourself.
-
Permission or a license: Editing is appropriate when the copyright holder has given you permission or your license allows modifications.
-
Company-owned assets: You can remove old watermarks when updating brand assets owned by your company.
-
Stock, proof, or portfolio images: Do not remove watermarks to avoid purchasing a license or obtaining permission.
-
Copyright and usage rights: Removing a watermark does not transfer copyright or give you new usage rights. If you're unsure, check the image license or ask the copyright holder.
Method 1: How to remove watermarks from photo in Photoshop
If you want to get really specific with the area around your watermark, Photoshop is helpful. Its Content-Aware Fill can fill in selected areas with nearby image information, and it's good for a lot of simple edits.
Step 1: Open the photo in Photoshop
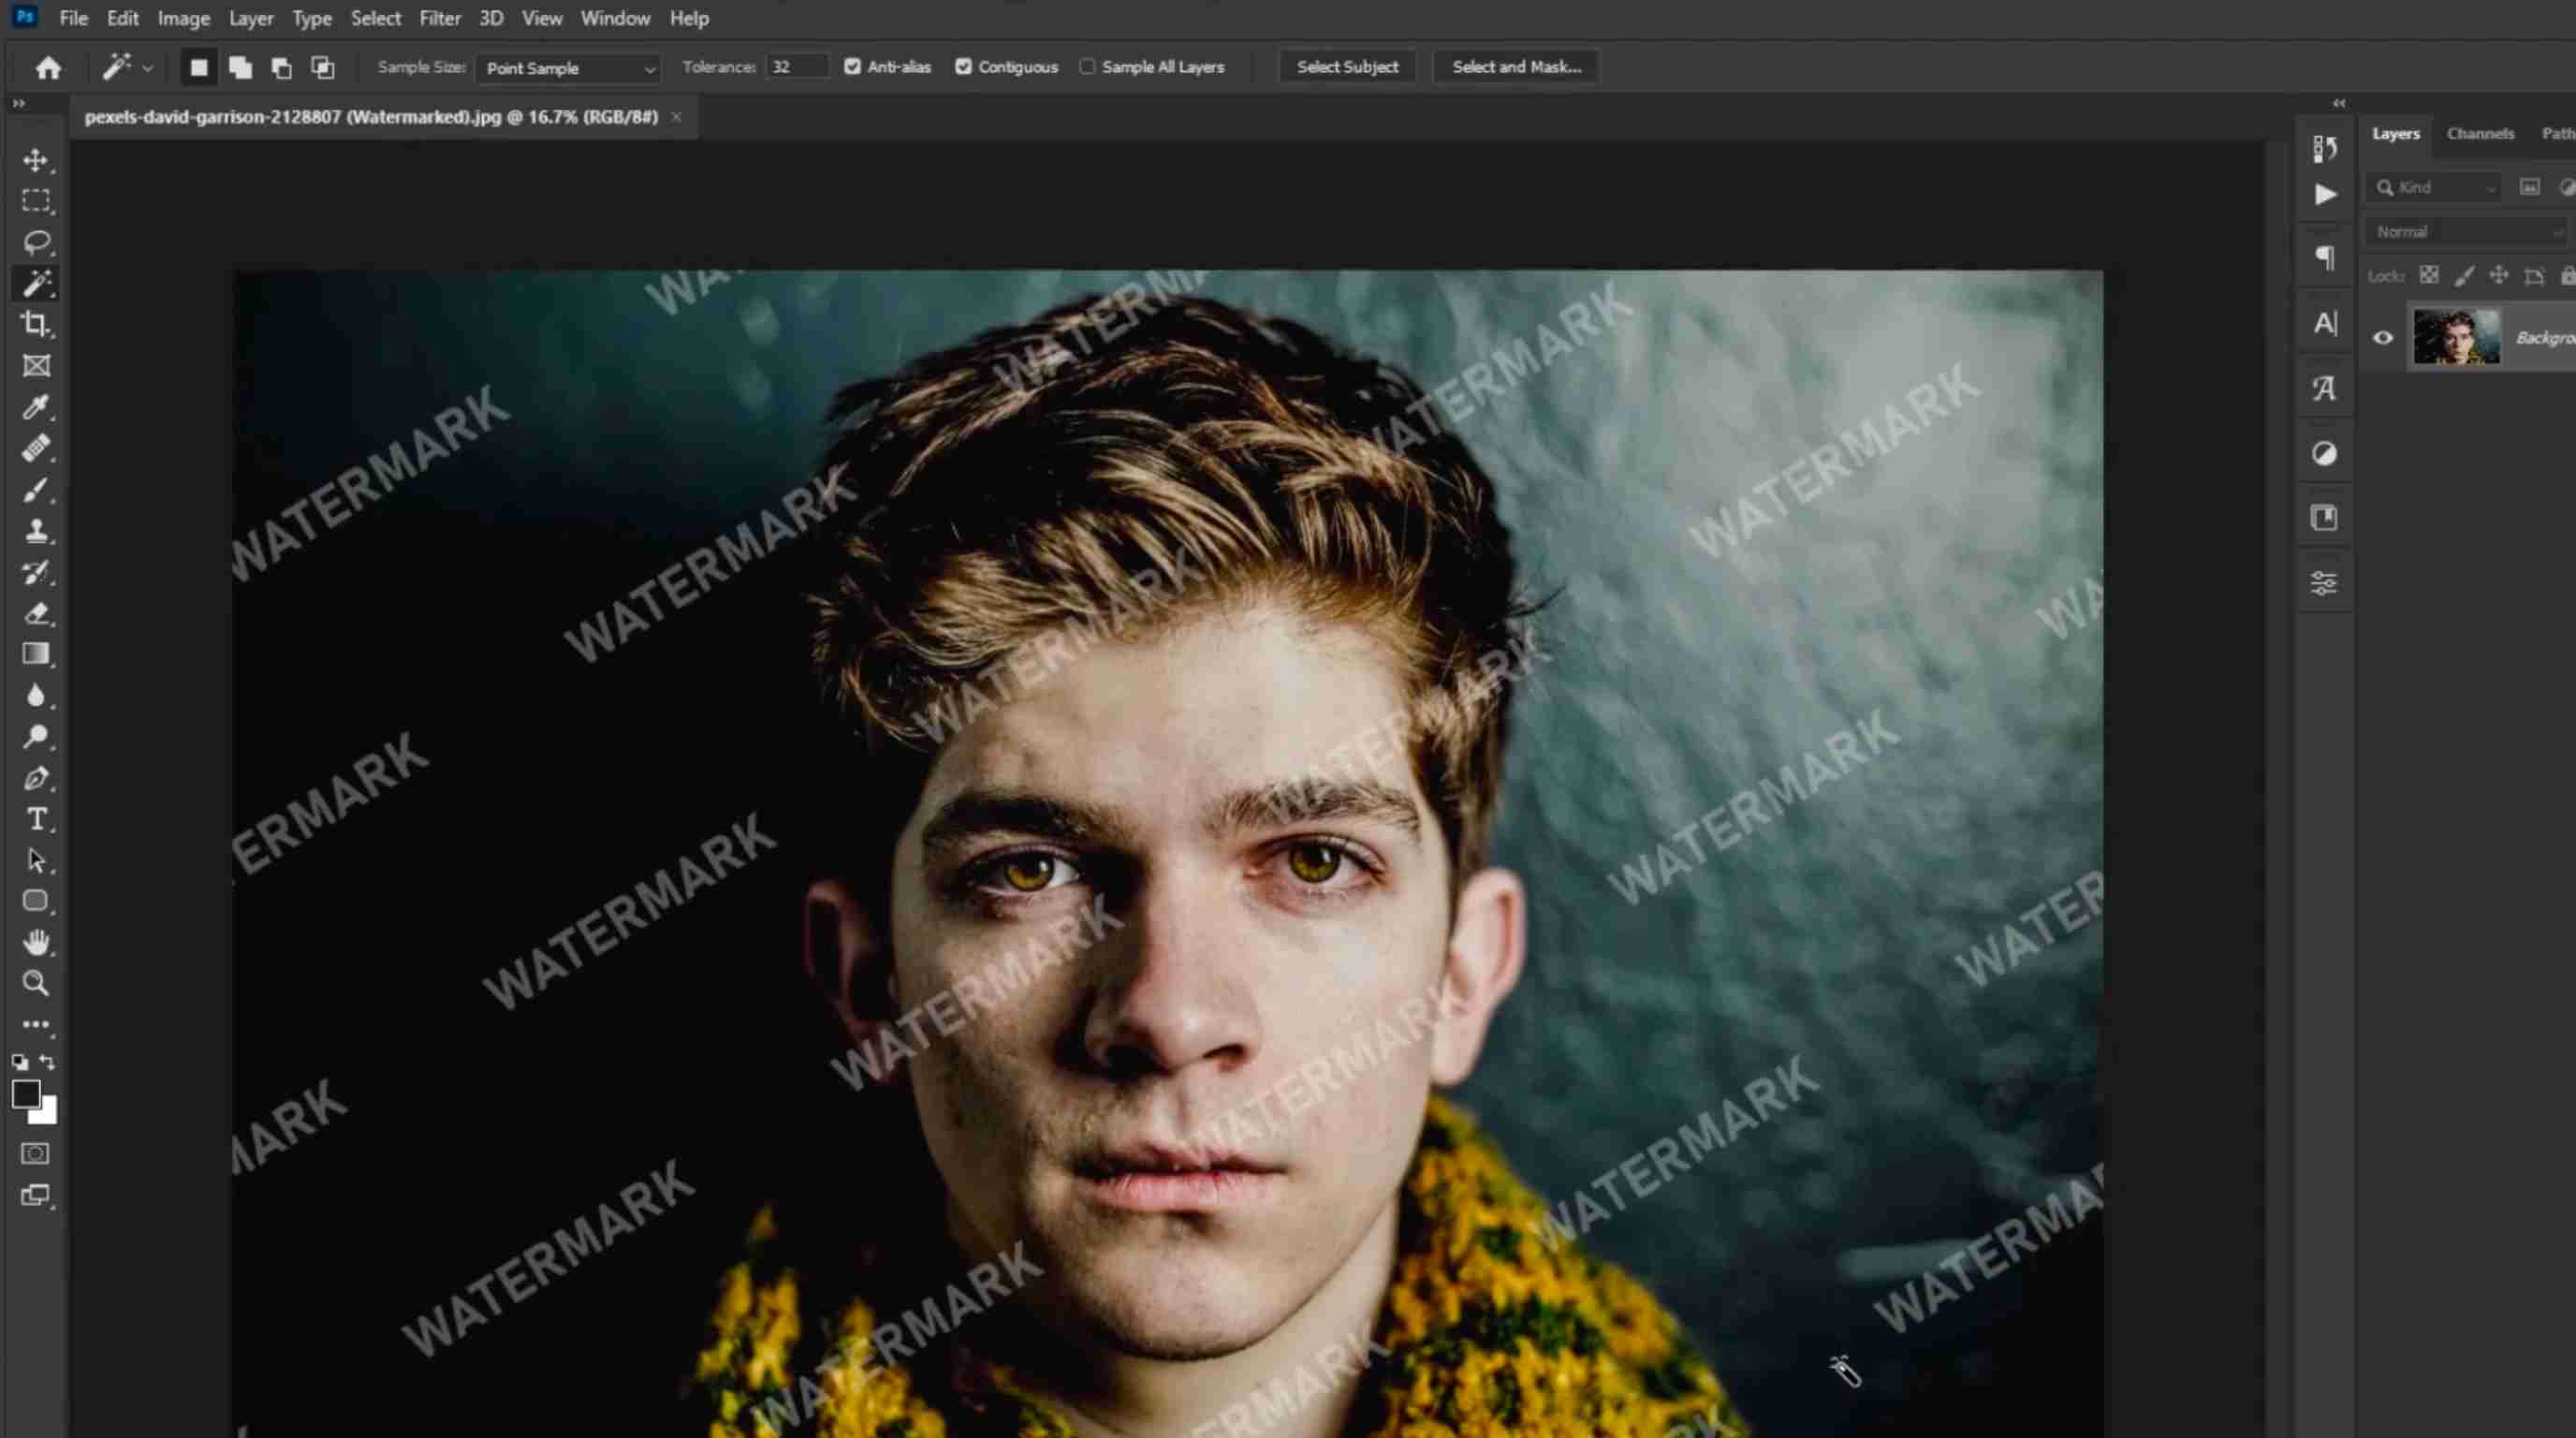
Open the original image in Photoshop and duplicate the layer before editing. That way, you have the unadulterated version to hand if you ever need to start again.
Step 2: Select the watermark
Use a selection tool to outline the watermark as closely as possible. Include the complete mark while avoiding unnecessary parts of the surrounding image.
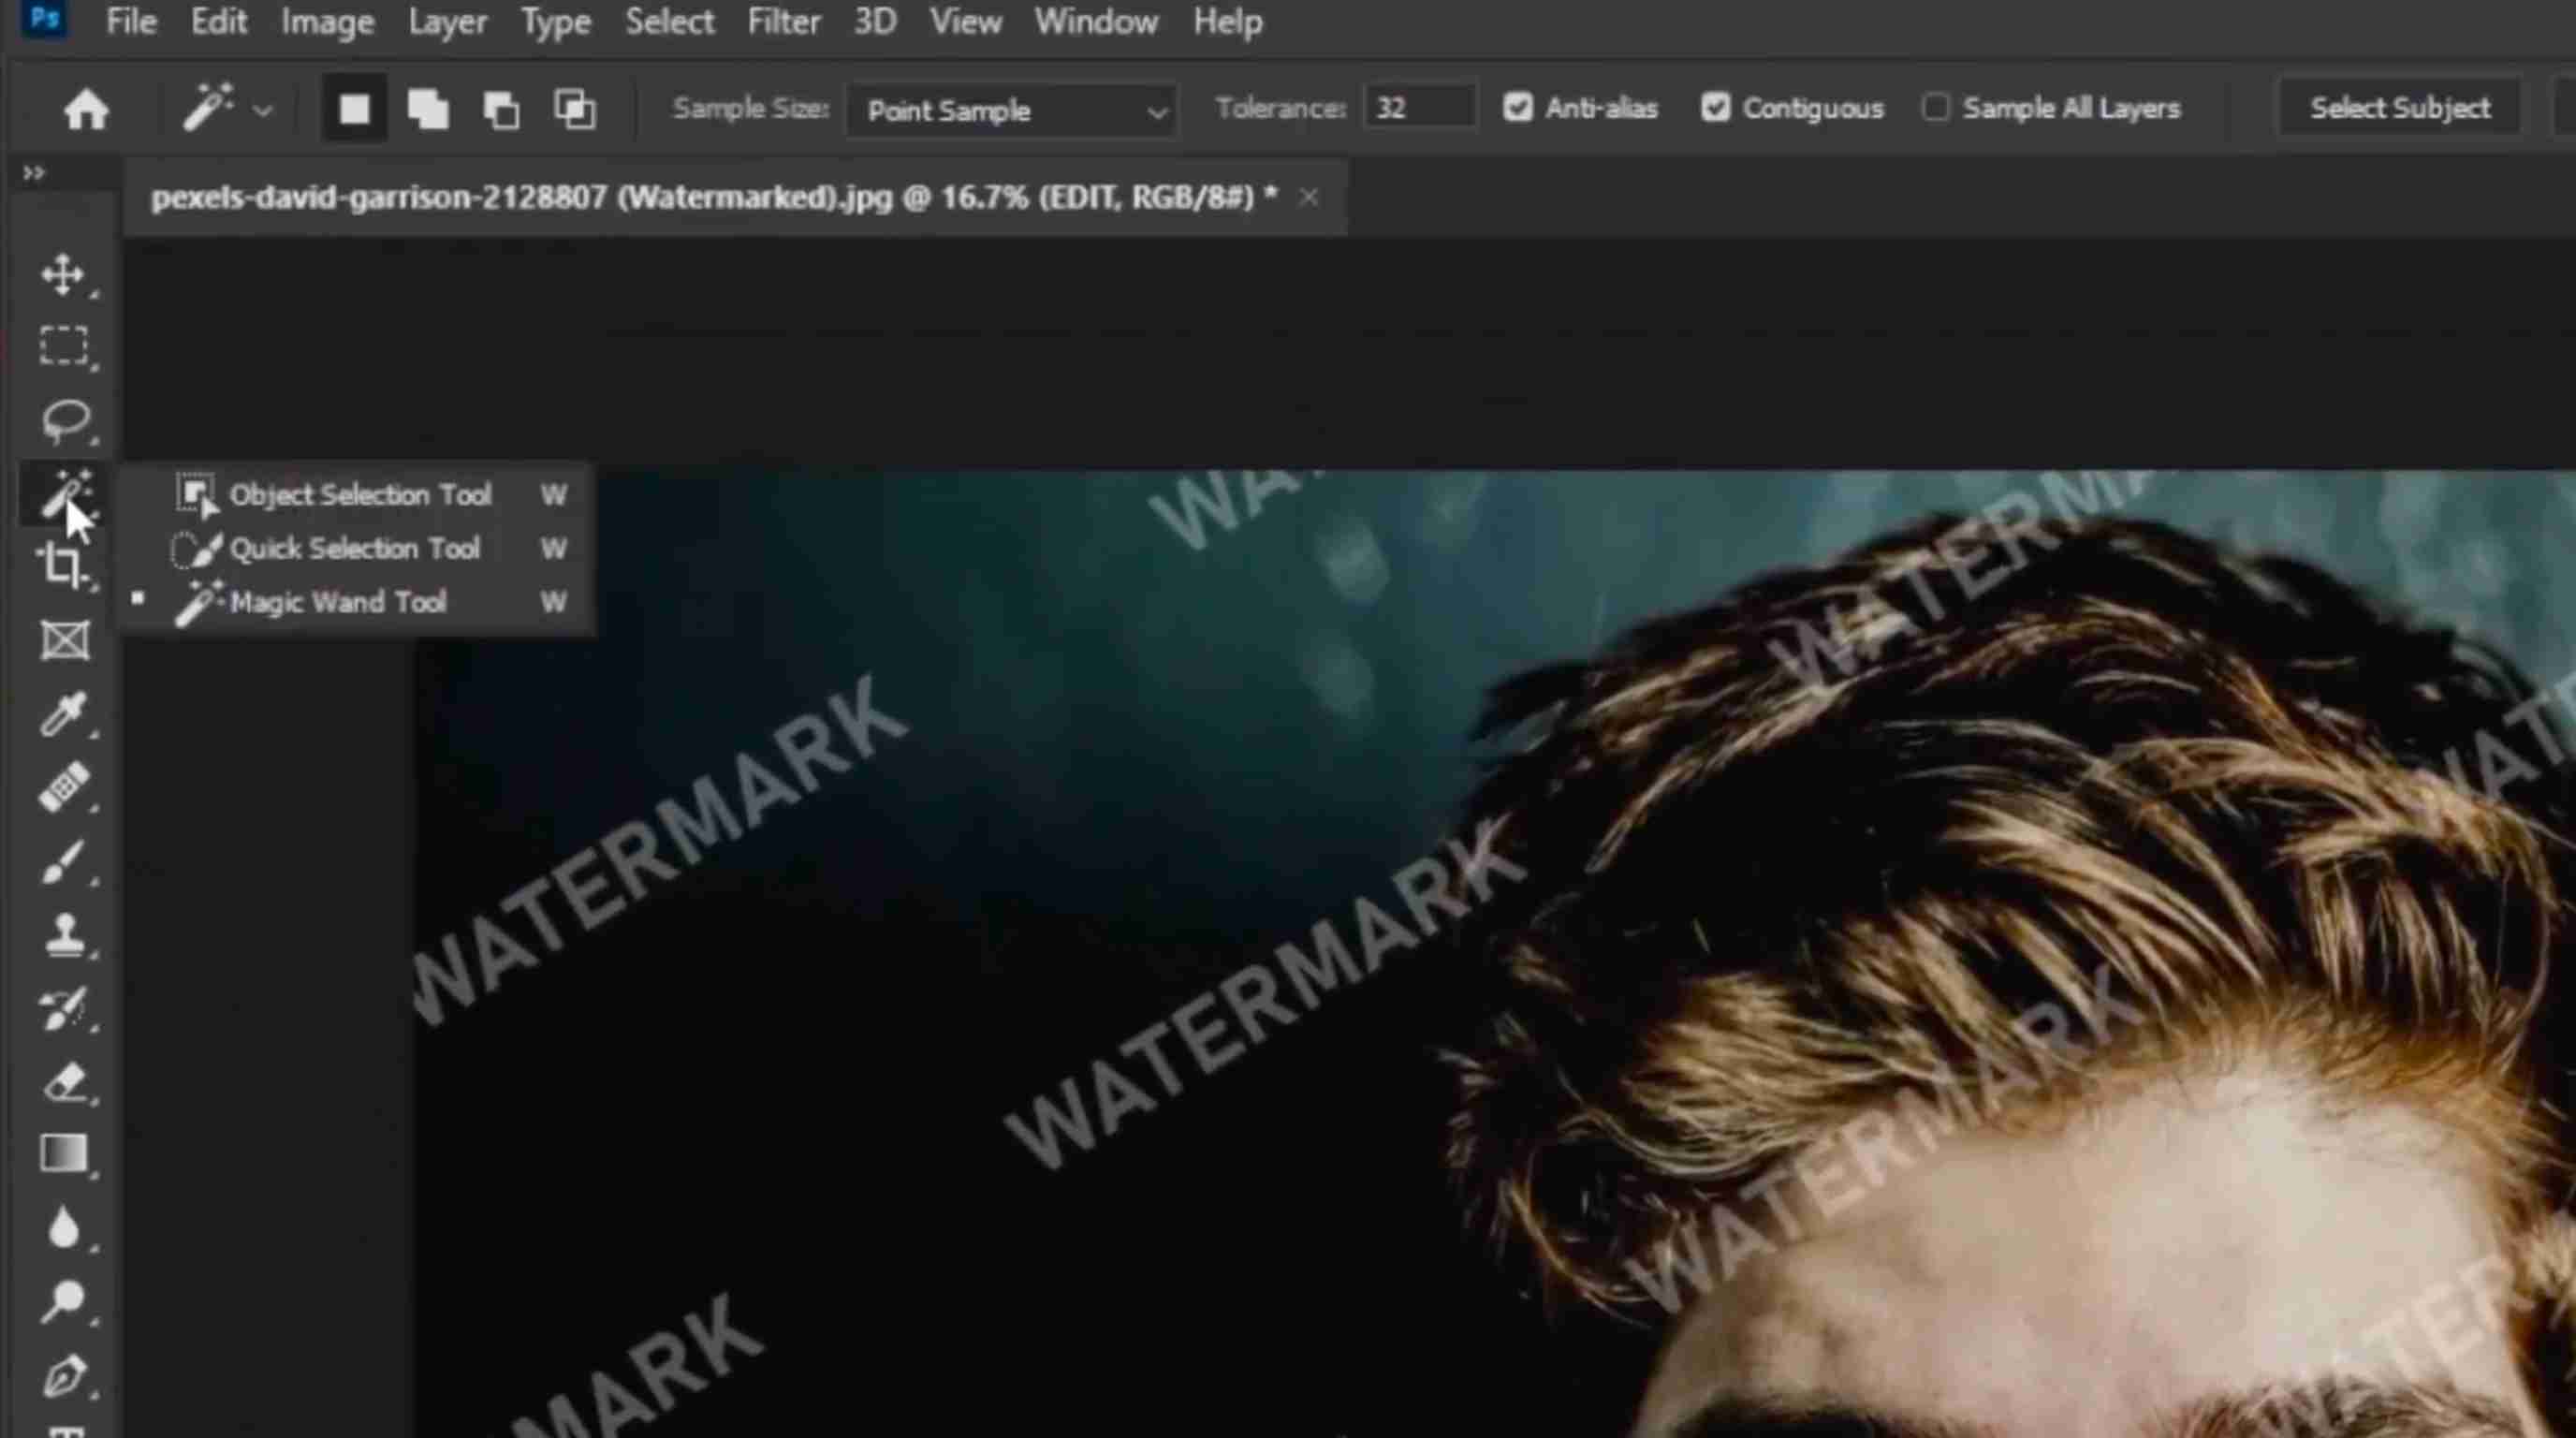
Step 3: Expand the selection slightly
Expand the selection a bit so that there is enough image info around to work with in Photoshop. Don't make the selection significantly larger than the watermark.
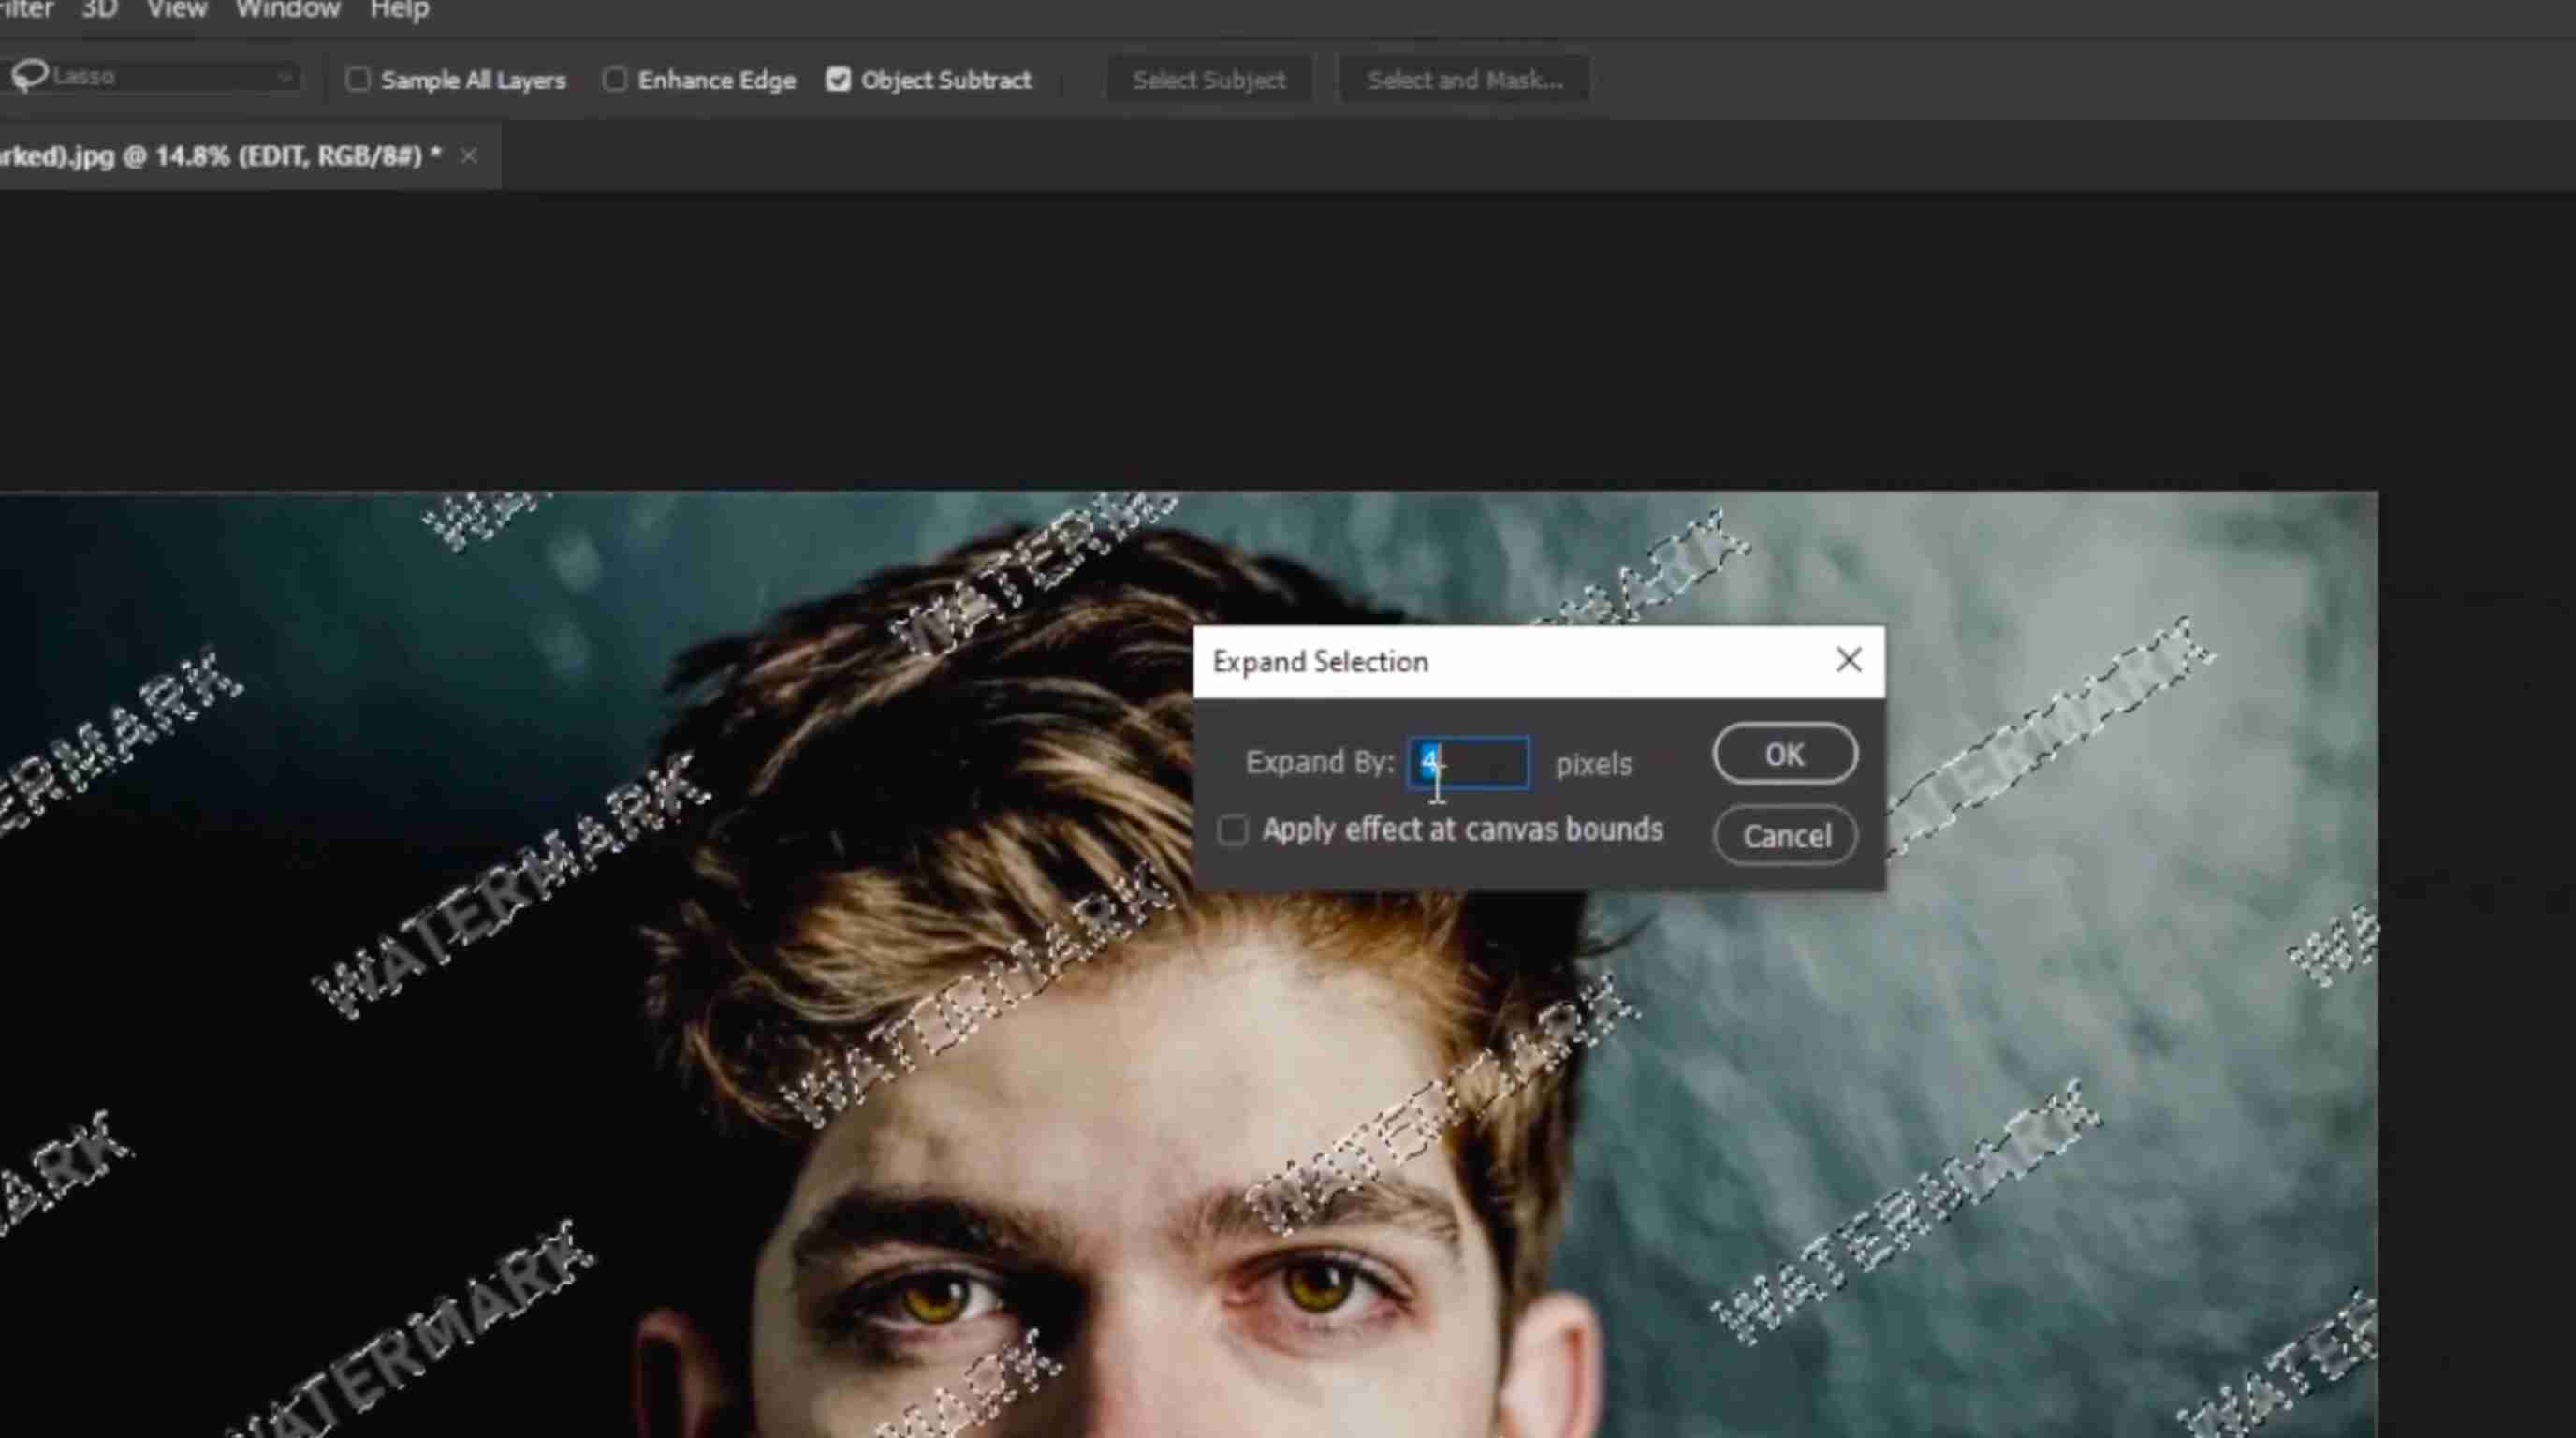
Step 4: Apply Content-Aware Fill
Open Content-Aware Fill and let Photoshop generate replacement pixels from the surrounding area. Check the preview and change the sampling area if needed.
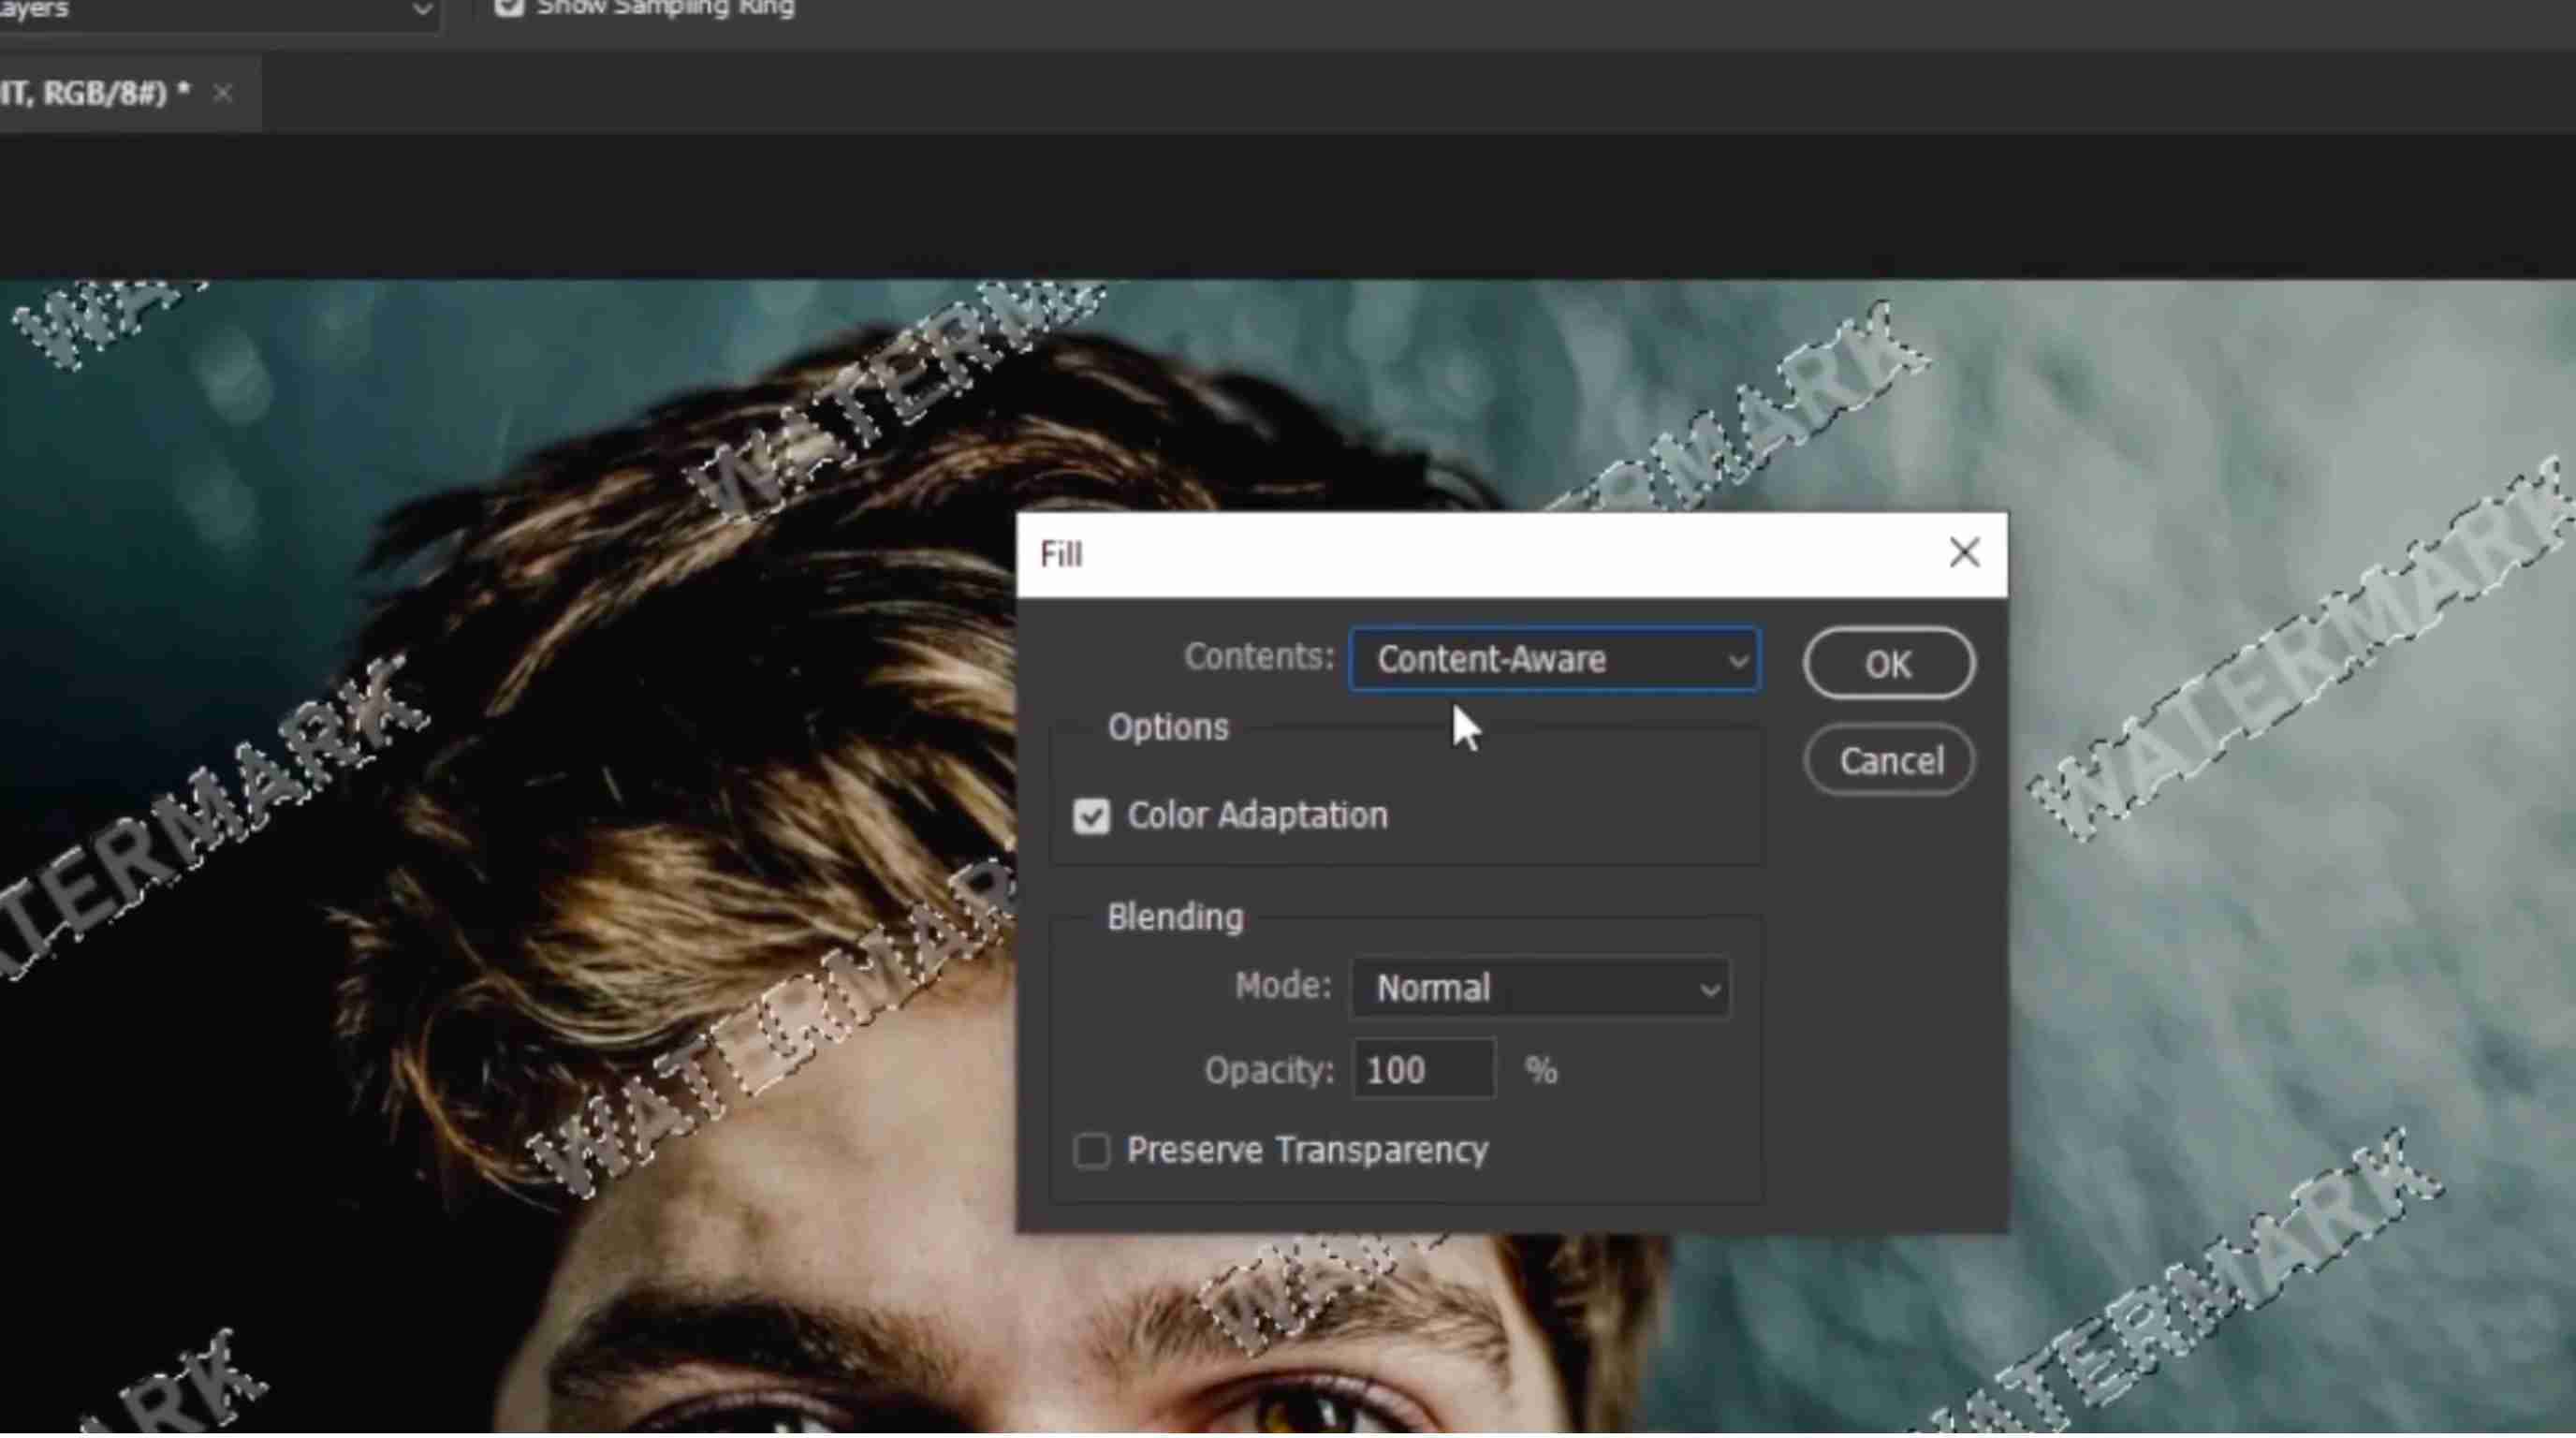
Step 5: Review and refine the result
Check the edited area at a higher zoom, then at normal size. Identify repeating patterns, blurry areas, visible edges, and improve the area before exporting.
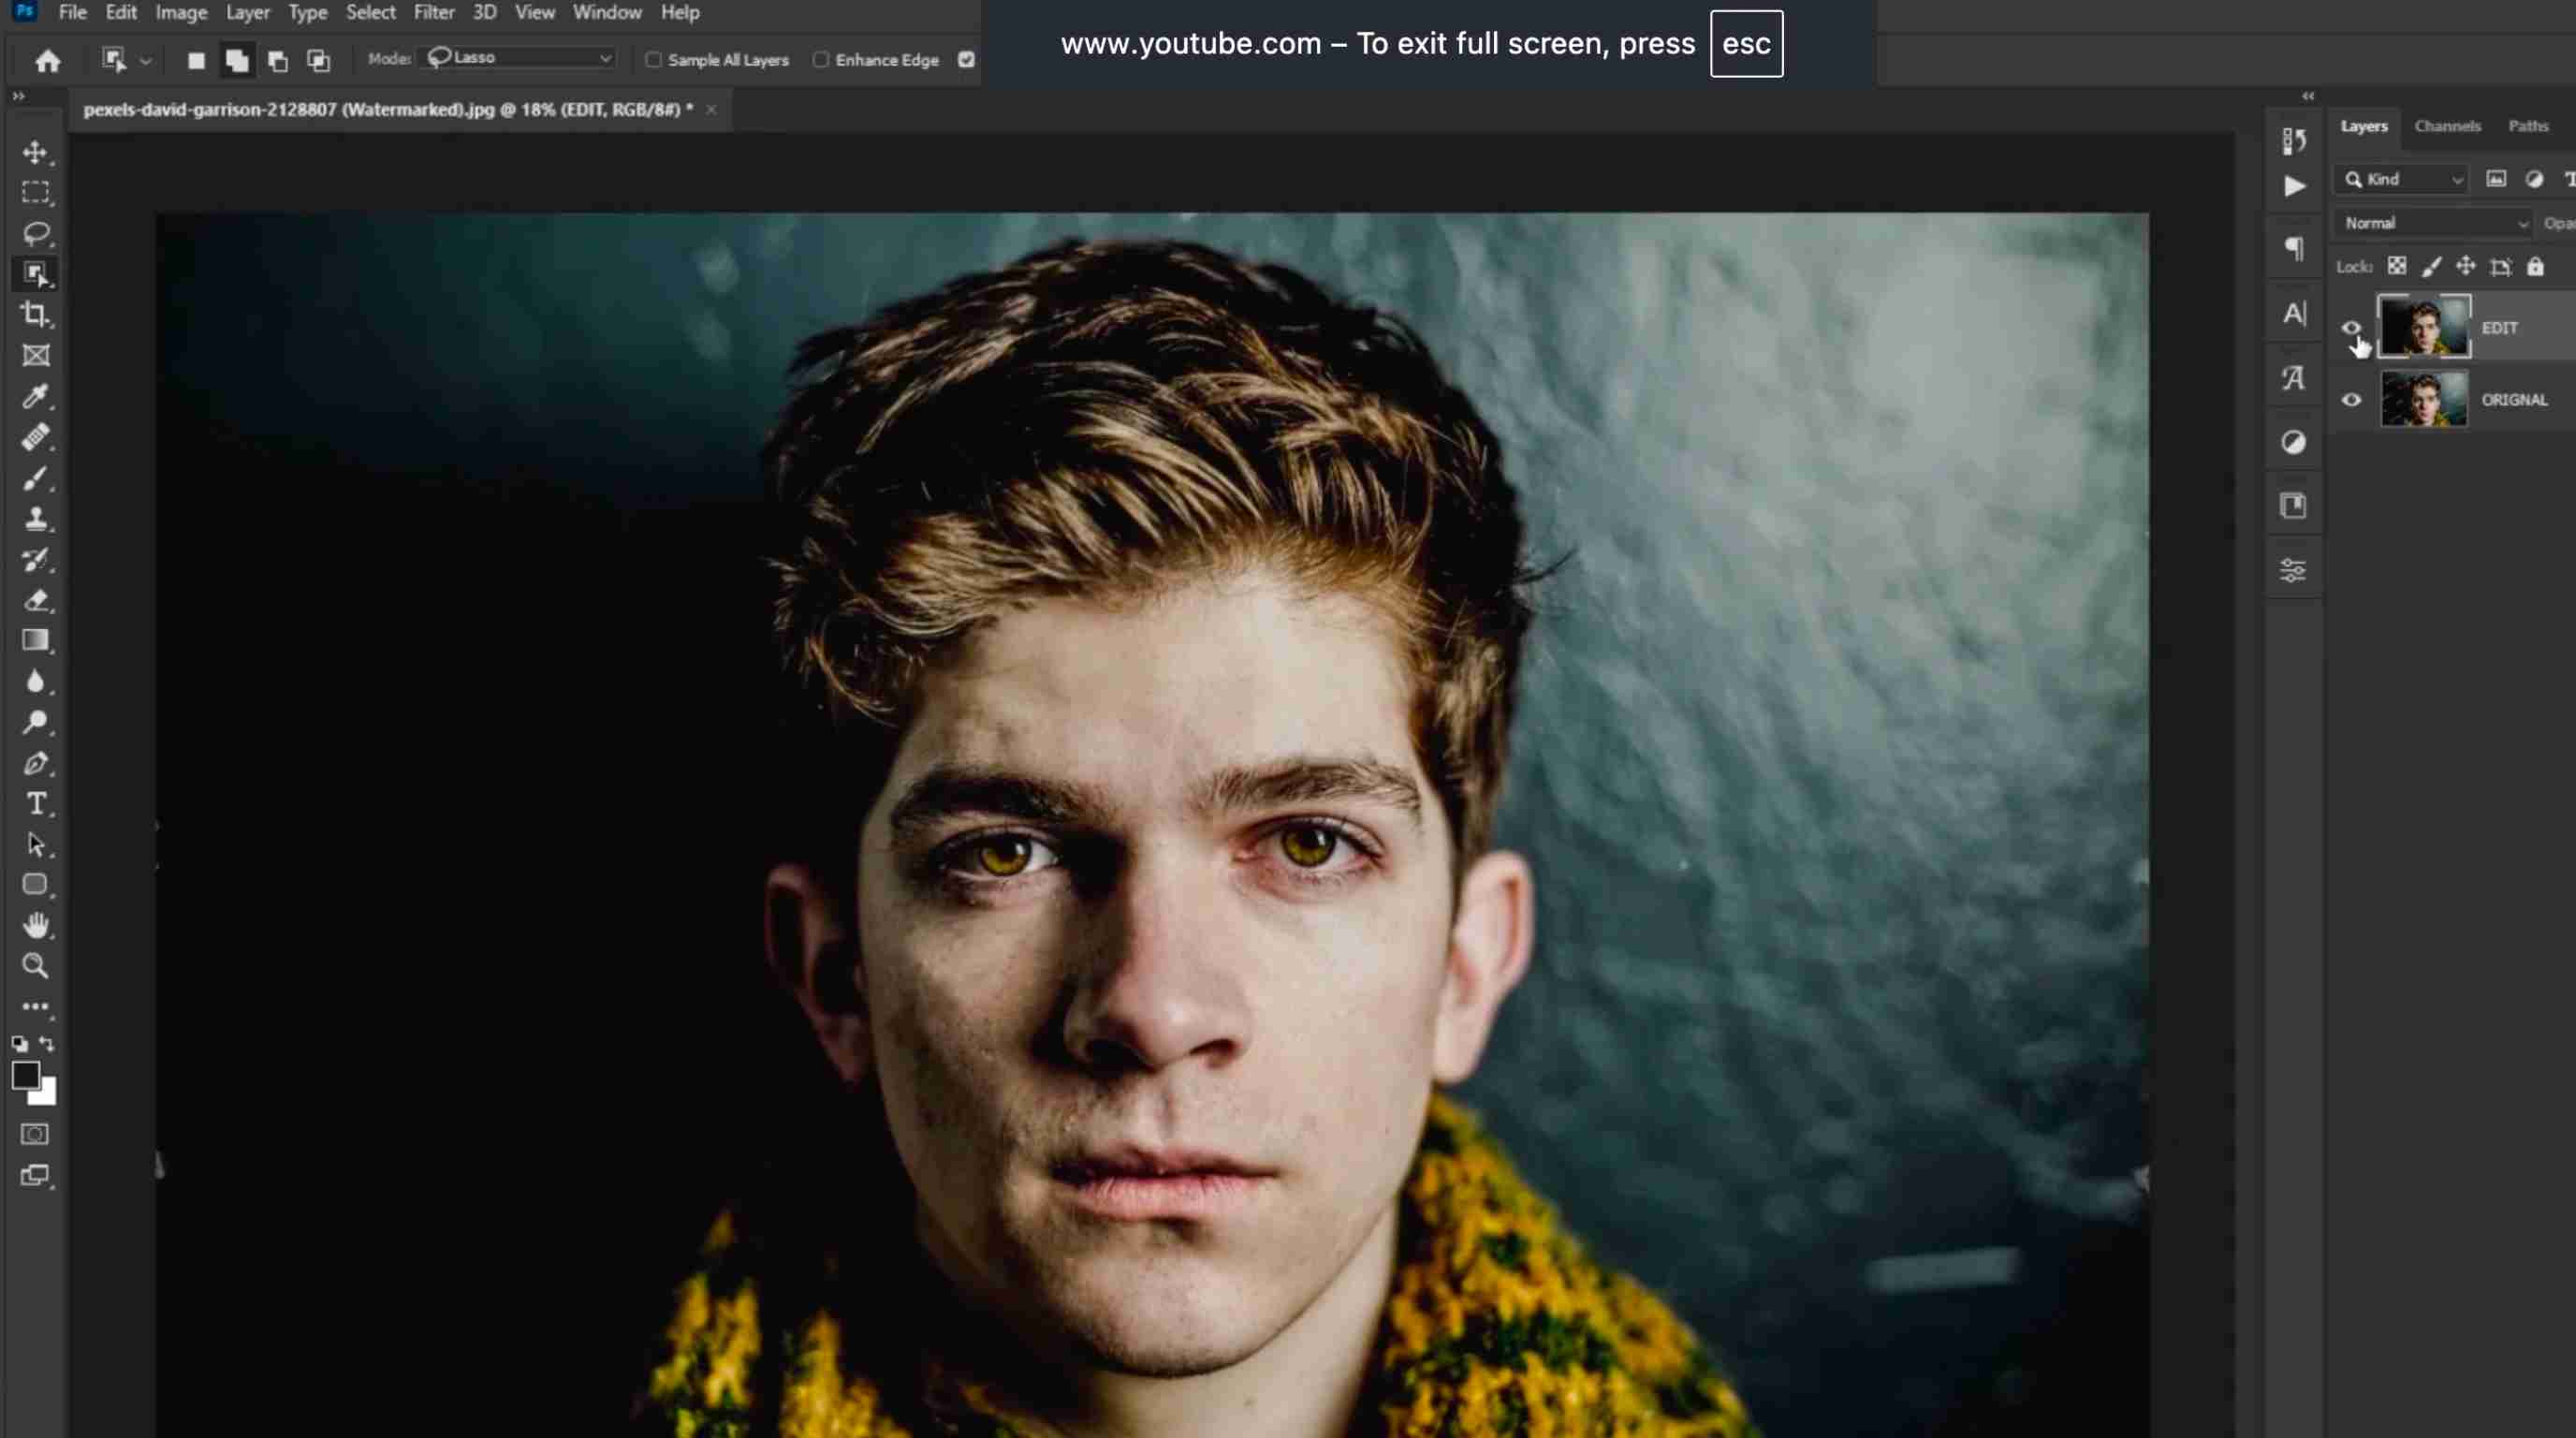
Tips for better Photoshop results
-
Work on a duplicate of the original image: Duplicate the original layer before deleting the watermark. Then you can compare the edit to the source and revert to the original if the result looks wrong.
-
Remove larger watermarks in smaller sections: Instead of selecting a large watermark all at once, work on smaller areas. This gives Photoshop more relevant surrounding details to sample and can produce a more natural result.
-
Use Clone Stamp or Healing tools for small areas that need additional cleanup: There may be small imperfections around edges or detailed areas when using Content-Aware Fill. Use these tools to blend small areas and fix visible artifacts without affecting the rest of the image.
-
Small corner watermarks on plain backgrounds are generally easier to retouch manually: For a small area with a simple background, it is easier to match the nearby pixels when the watermark is present. This makes manual clean-up faster and less visible.
-
Zoom in around faces, text, hair, and detailed areas before finalizing the edit: Take a close look at these areas for anything that looks distorted, text that is broken, textures that are repeated, or areas that are blurry. Then zoom out to see if the edited area looks right in relation to the whole picture.
Method 2: How to remove watermarks with an online tool
Online watermark removers allow you to edit a photo in your web browser without the need to install any image editing software. The majority rely on AI inpainting to reconstruct the region hidden by a watermark, useful for fast edits. This type of browser-based solution is exemplified by tools such as Cleanup Pictures.
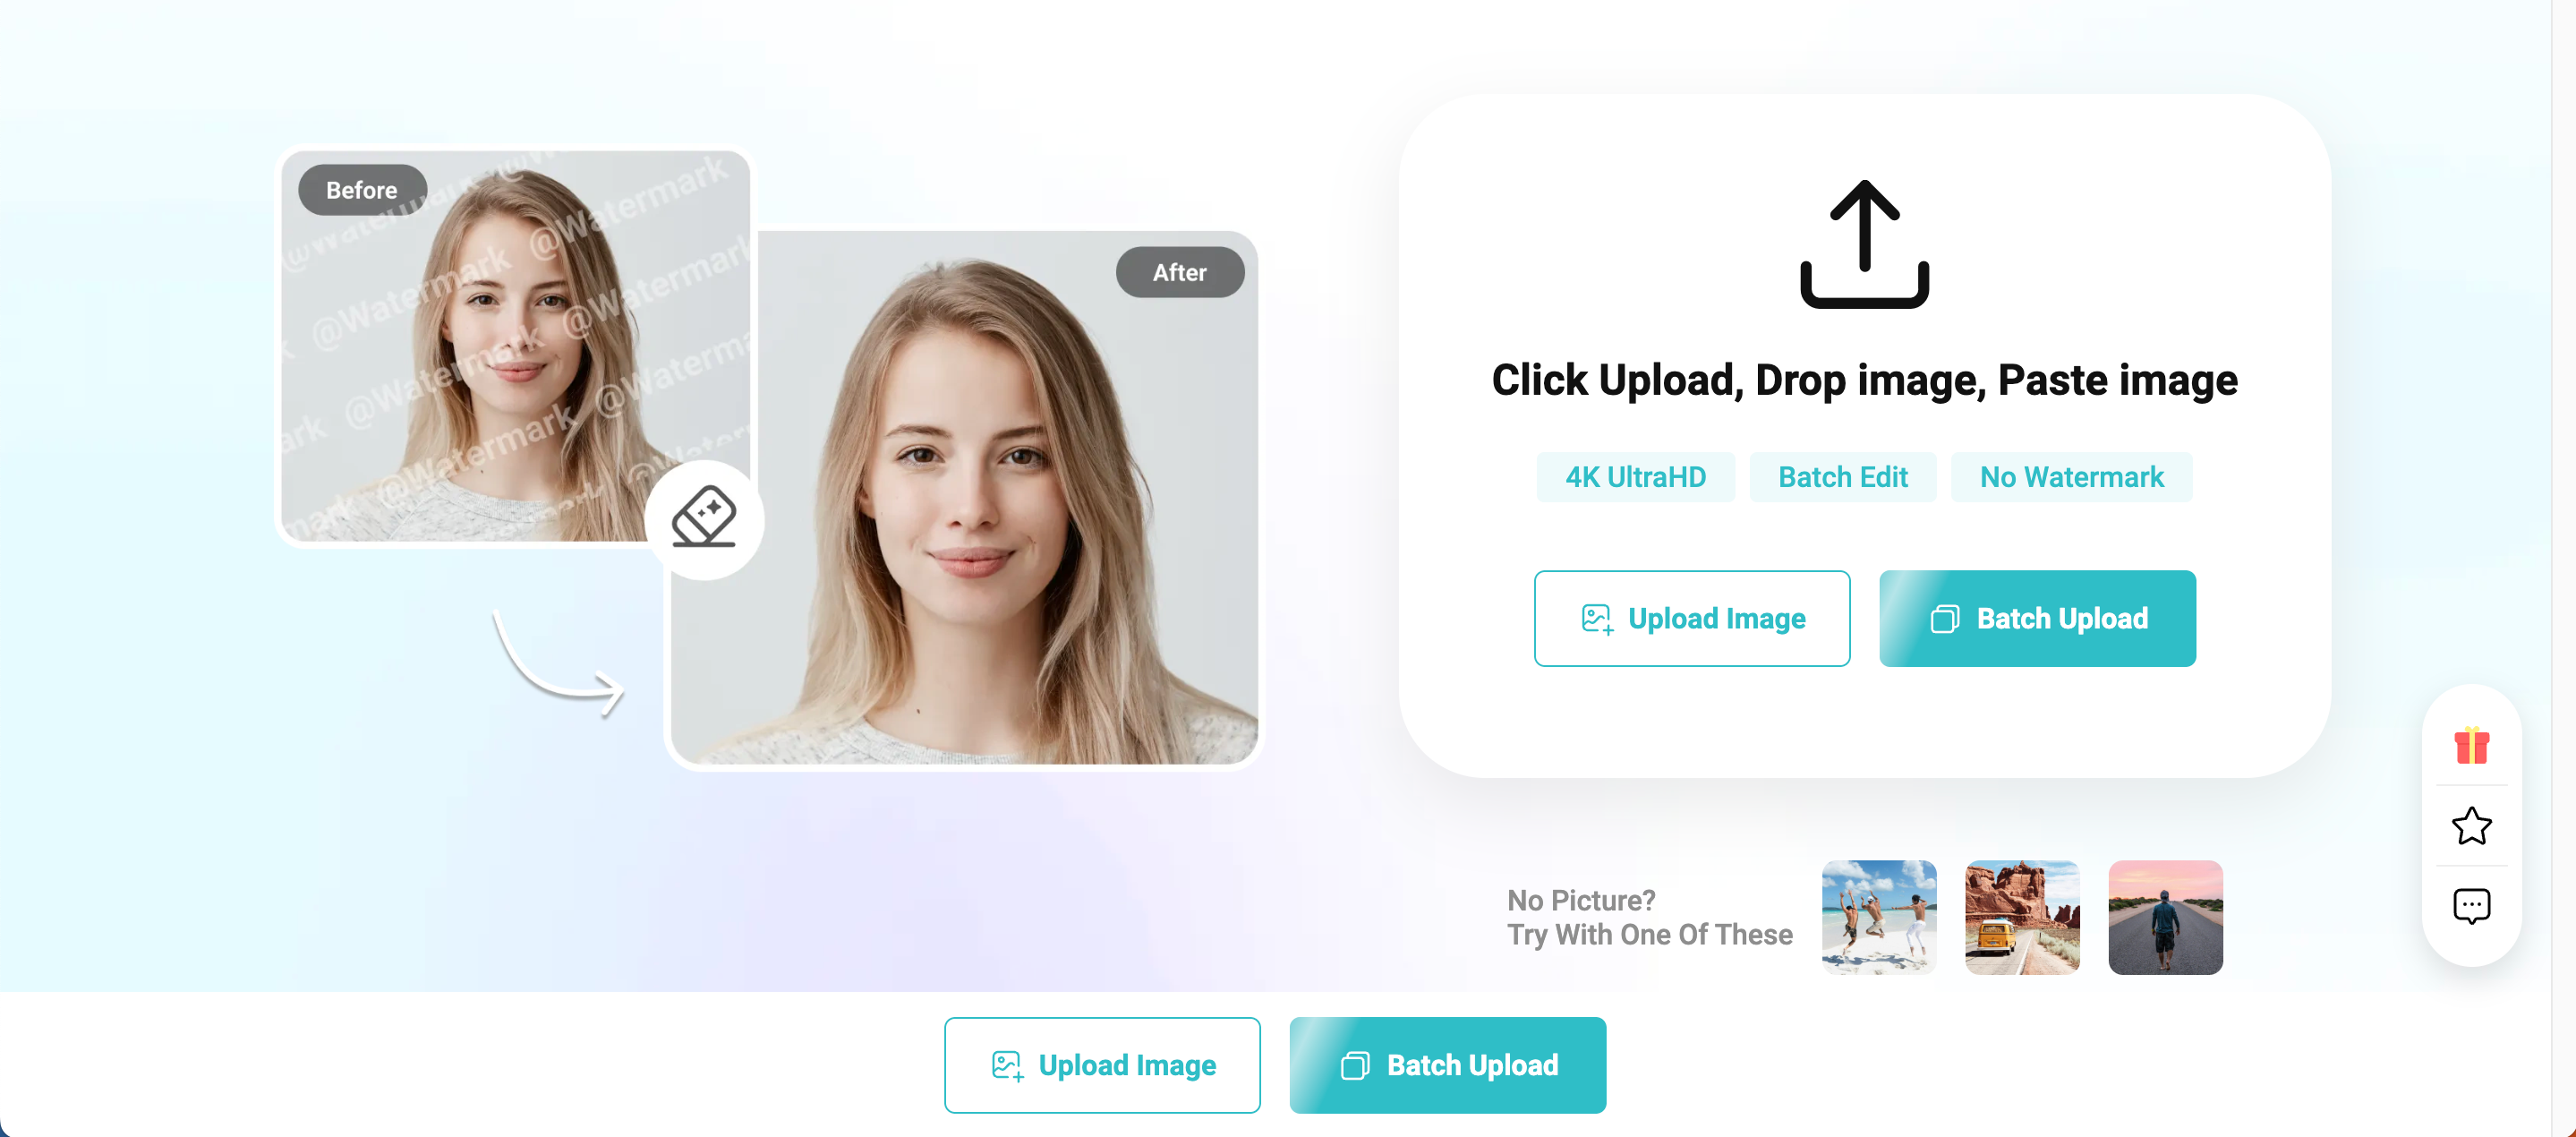
Step 1: Open an online watermark removal tool
Choose an online watermark removal tool and check its file, privacy, and export policies before uploading your image.
Step 2: Upload your photo
Upload the image containing the unwanted watermark. Use the highest-quality version available to give the tool more detail to work with.
Step 3: Select or brush over the watermark
Use the selection or brush tool to identify the watermark. Keep the selected area focused on the unwanted mark to avoid unnecessary changes.
Step 4: Process the image and review the result
Start the removal process and inspect the reconstructed area. Check edges, textures, faces, and text for noticeable artifacts.
Step 5: Download the edited photo
Once the result looks satisfactory, download the edited image. Keep the original file separately so you can make another attempt if necessary.
What to look for in an online watermark remover
-
Removal accuracy: Evaluate the tool's ability to remove the watermark without leaving obvious patches, repetitive patterns, or distortions in the edited area.
-
Output quality: Look for tools that preserve the original image's resolution and details rather than producing a noticeably compressed or blurry result.
-
Processing speed: Faster processing is useful when you need to remove watermarks from several images or want to make multiple attempts.
-
Supported formats: Verify that the tool supports your image format and can provide the output format you need.
-
Privacy and upload policies: Review how the service handles uploaded images, particularly when working with private, commercial, or sensitive photos.
-
Export limitations: Check for restrictions on downloads, resolution, file size, watermarks on the exported result, or the number of images you can process.
Method 3: How to remove a watermark from a photo on iPhone
If you want to remove a watermark from a photo on iPhone, you may not need a desktop editor. Recent iPhone models with supported software versions may offer Apple's built-in Cleanup feature, while third-party apps can provide alternatives for older devices.
The best results usually come from small watermarks placed on simple backgrounds. Large watermarks covering faces, products, or detailed areas may still require AI enhancement or more advanced editing.
Option 1: Use the "Cleanup" feature on iPhone
On supported iPhone devices, the Photos app includes Cleanup tools that can remove unwanted objects from images using AI assistance.
Step 1: Open the photo in Photos app
Open the image you want to edit in the Photos app. Use the original photo whenever possible instead of a screenshot or downloaded compressed version.
Step 2: Select "Cleanup" tool
Open the editing options and choose Cleanup if the feature is available on your device. The tool will help identify and remove selected unwanted areas.
Step 3: Highlight the watermark
Brush over the watermark carefully. Keep the selection limited to the unwanted mark so the tool does not modify nearby details unnecessarily.
Step 4: Review the result
Check the edited area closely, especially around faces, text, product details, and textured backgrounds. If the result looks incorrect, undo the change and try selecting a smaller area.
Option 2: Use Snapseed as an alternative
If your iPhone does not support built-in AI cleanup tools, apps such as Snapseed can provide a simple manual approach.
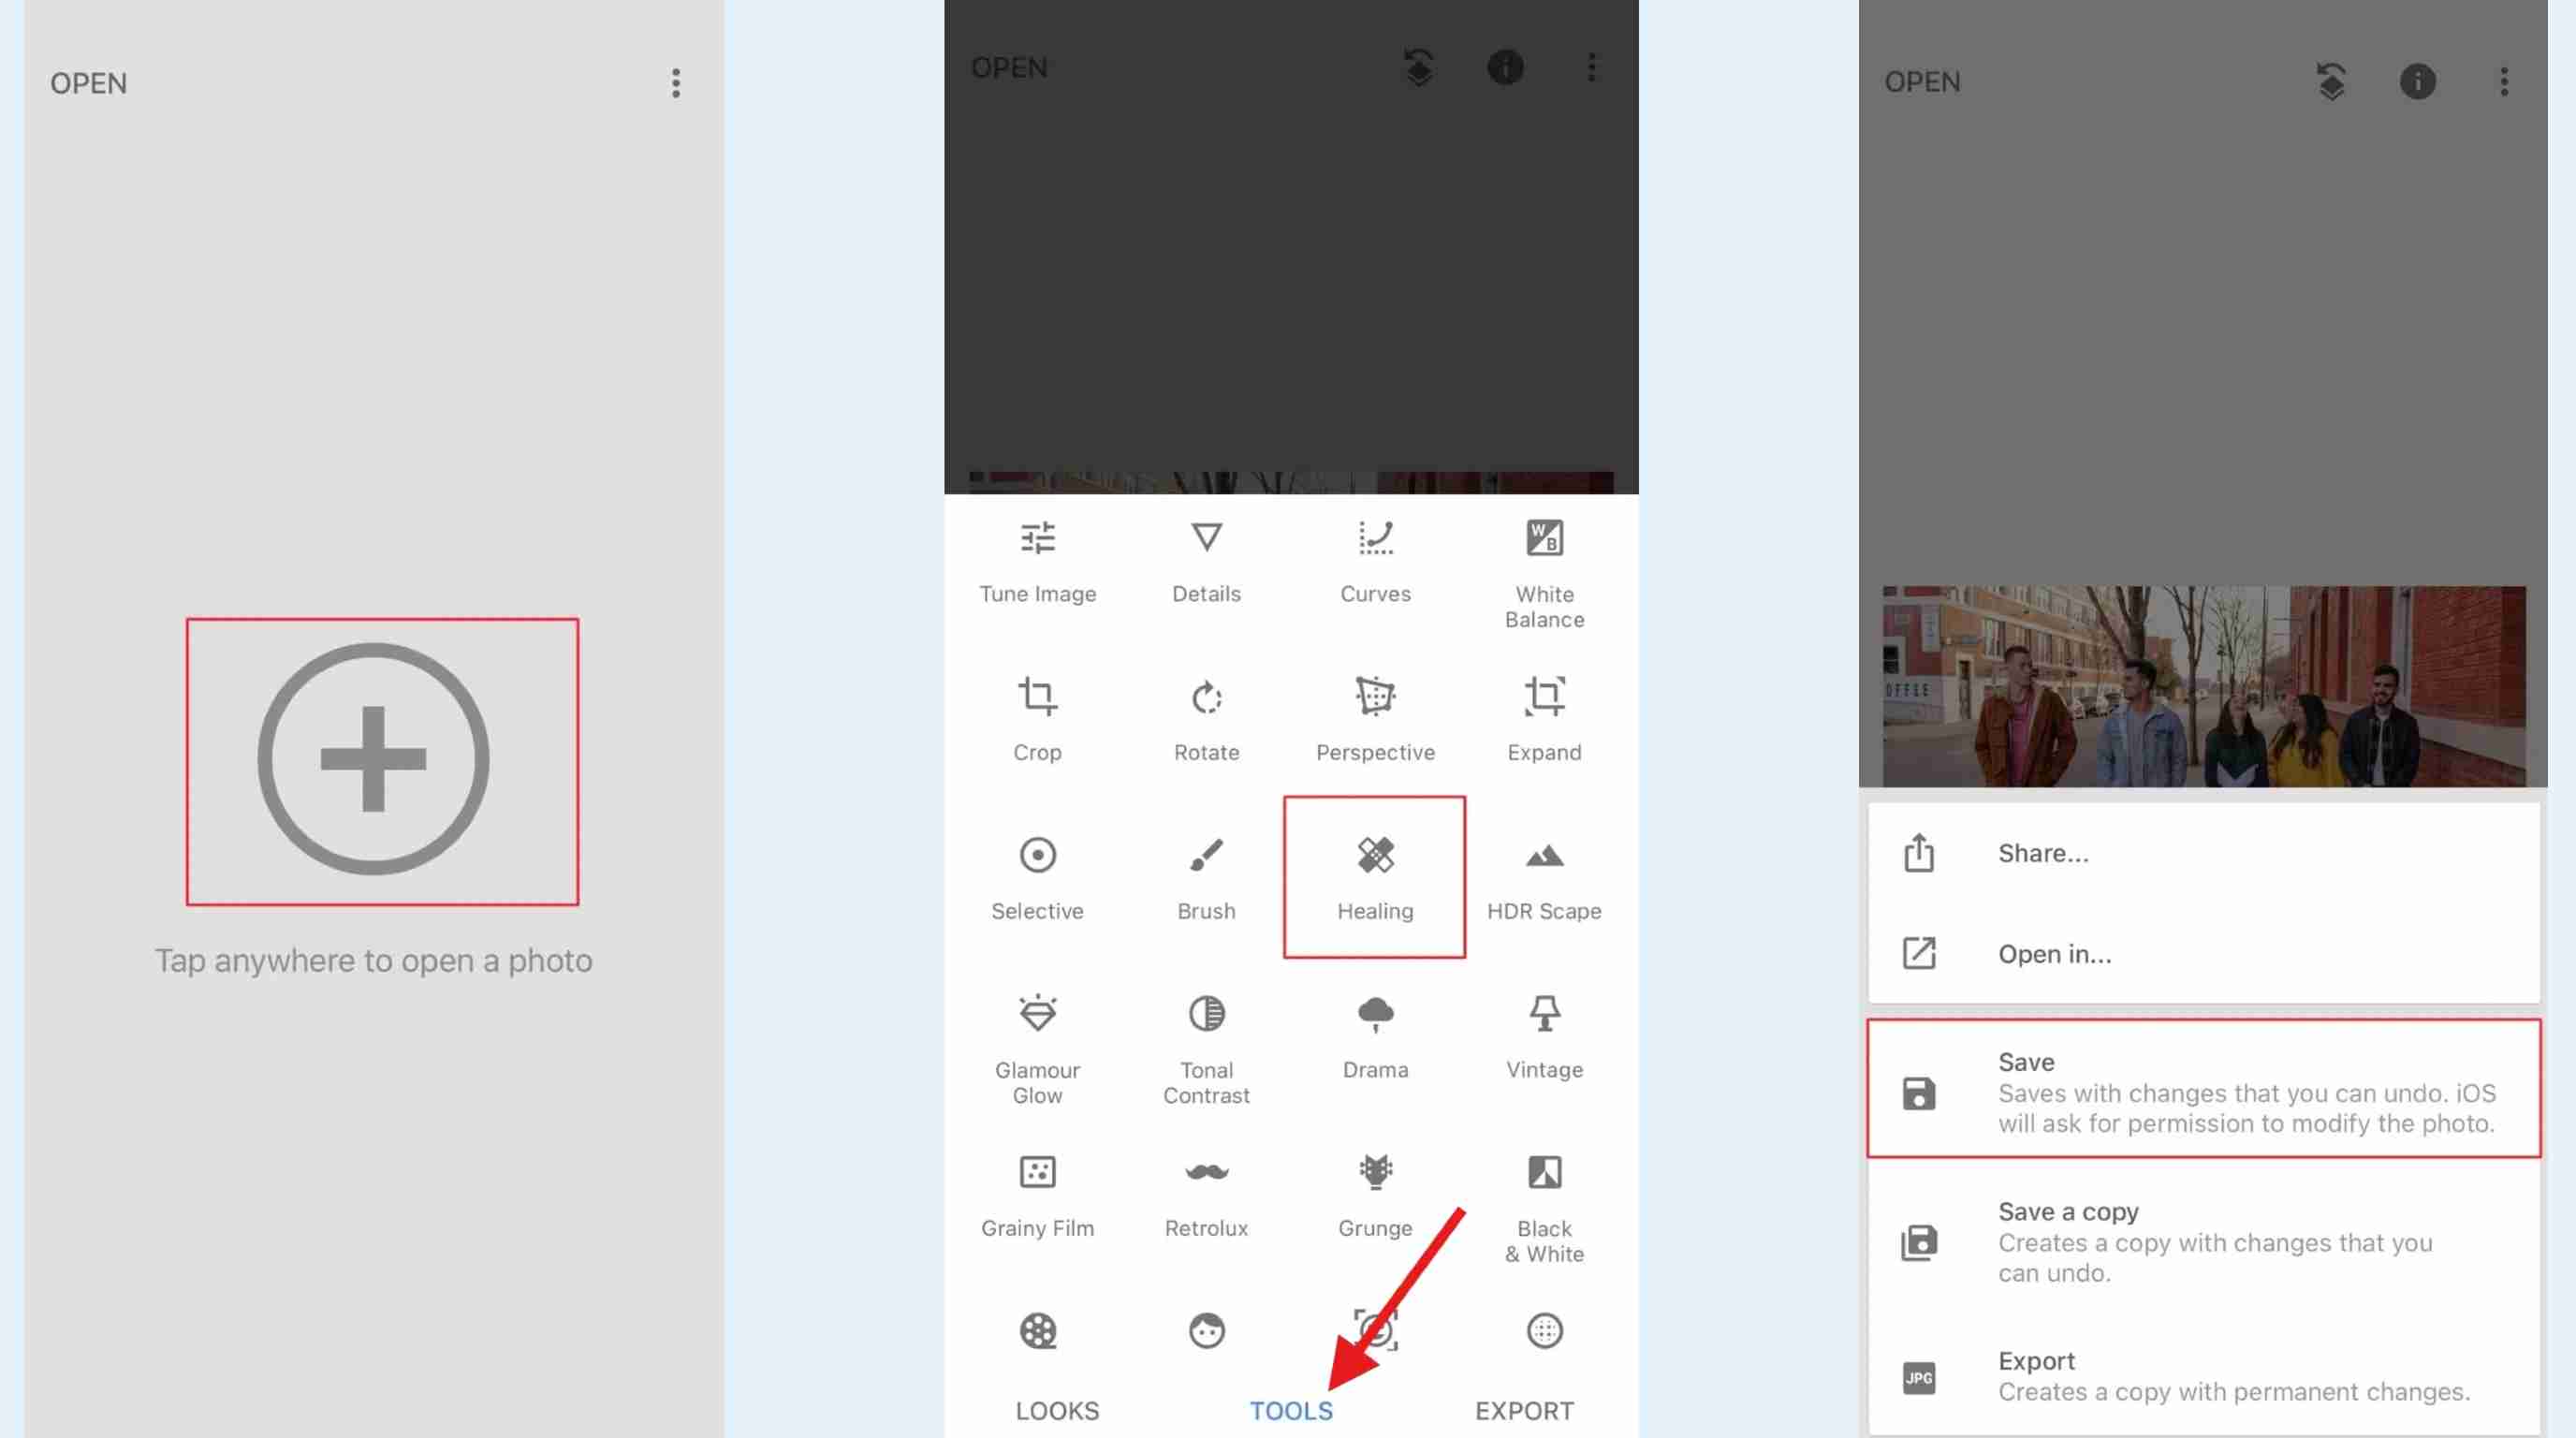
Step 1: Open the image in Snapseed
Import the highest-quality version of your photo into Snapseed.
Step 2: Use the "Healing" tool
Choose the Healing tool and brush over the watermark area. Work with smaller strokes instead of removing a large watermark in one attempt.
Step 3: Export a copy
Save the edited image as a new file instead of replacing the original. This keeps your source photo available if you need another editing method later.
Tips for cleaner iPhone results
-
Use the highest-quality original image available: Start with the original photo rather than a screenshot or compressed copy. A higher-quality source gives the editing tool more detail to work with.
-
Zoom in when selecting small watermarks for better precision: If you zoom in the picture, you will be able to choose the watermark more accurately and not to change the details around it by chance.
-
Work in small areas rather than removing large marks at once: If the watermark covers a larger area, edit it in smaller sections. This can help reduce smearing and preserve surrounding textures.
-
Check faces, text, and detailed backgrounds after processing: Carefully inspect areas where the watermark overlaps important details. Look for distorted facial features, broken text, blurry edges, or unnatural textures.
-
Keep an untouched copy of the original image: Save the edited version separately instead of overwriting the original. This gives you a backup if you need to try another removal approach.
Remove Watermarks Faster With Designkit's AI Watermark Remover
Manual editing works well when you need precise control, but it can become time-consuming when you have many images or complex backgrounds. Designkit provides an AI-powered editing workflow that helps remove unwanted marks from images without requiring advanced retouching skills. Instead of manually cloning pixels or repairing areas step by step, you can highlight the unwanted watermark and let AI help rebuild the surrounding image.
For creators, marketers, and ecommerce sellers who regularly edit product photos, Designkit reduces repetitive cleanup work and helps prepare images faster.
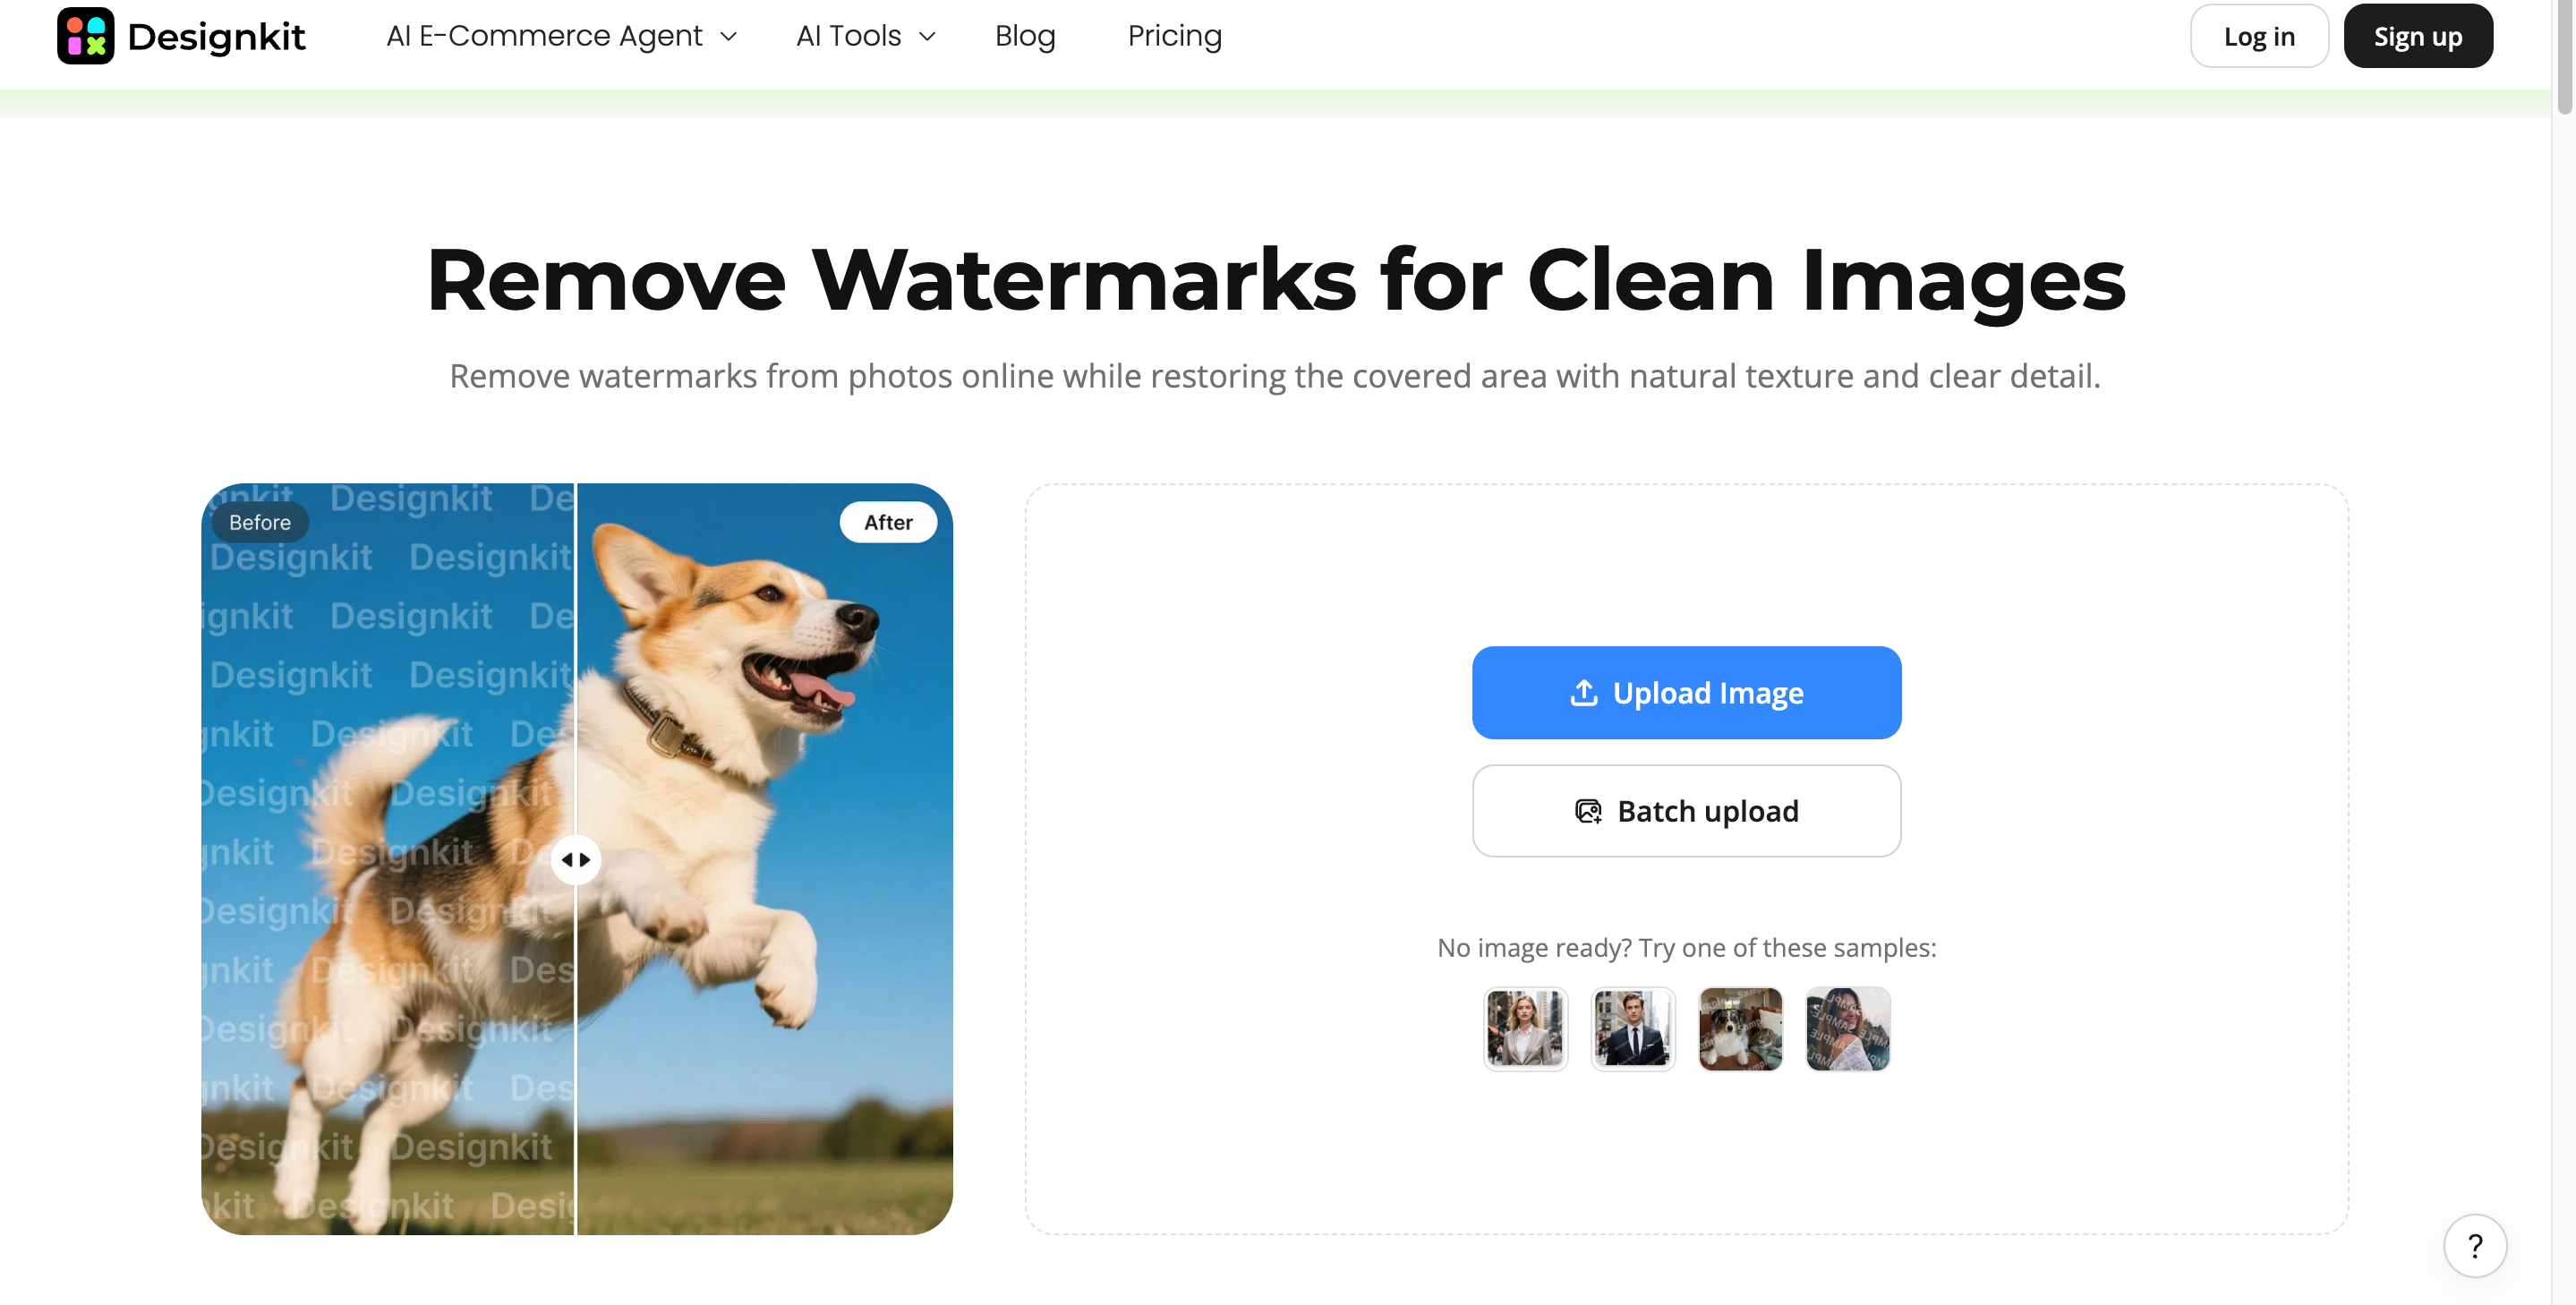
How to remove a watermark with Designkit
Step 1: Upload your image
Upload your photo to Designkit and choose the image containing the unwanted watermark. For better results, use the highest-quality version available.

Step 2: Remove photo watermarks automatically
Click Watermarks under the Eraser tool to automatically remove photo watermarks. You can also highlight the watermark or unwanted mark you want to remove. Designkit analyzes the selected area and reconstructs the surrounding details to create a cleaner image.

Step 3: Review and export the result
Check the edited area carefully before exporting. Make sure important details such as product edges, text, faces, and textures remain natural. Once satisfied, export the cleaned image and continue using it for your website, ecommerce listing, or marketing content.

Remove Watermark from My Image
Why use Designkit for watermark removal?
-
AI-assisted removal: Use AI to identify and reconstruct the area covered by the watermark, reducing the need for detailed manual editing.
-
Simple workflow: Upload the image, select the unwanted watermark, and let Designkit process the selected area without requiring advanced editing skills.
-
Faster editing: Remove larger or more difficult watermarks without spending as much time manually cloning, healing, or rebuilding the affected area.
-
Works with different images: Use the workflow for product photos, marketing images, portraits and other visual assets that need unwanted marks removed.
-
Less manual work: No more jumping between a dozen retouching tools when you just need a simple way to clean up an image.
-
Beginner-friendly: If you don't need the more powerful editing features of Photoshop for what you're doing, go with the simpler option.
Final thoughts
The optimal solution depends on the image with the watermark. Photoshop provides precise control, online tools offer the convenience of editing on the fly in your browser, and if you're working from your iPhone, there are options for that too. If the damaged area is harder to repair manually, AI-driven workflows can save you time. Designkit is a sensible choice if you want AI to do the removal faster and you want to do less manual editing. Always work on images that you own or have permission to edit.
Frequently Asked Questions
Can I remove a watermark from a photo without losing quality?
What is the easiest way to remove a watermark from a photo?
The easiest method depends on the image. For small watermarks on simple backgrounds, mobile or online tools may be enough. If you want a faster workflow without manually repairing pixels, an AI watermark remover like Designkit can help clean up unwanted marks with fewer editing steps.
How do I remove a watermark from a photo in Photoshop?
In Photoshop, you can use Content-Aware Fill, Healing Brush, and Clone Stamp tools. Select the watermark area, let Photoshop rebuild the surrounding pixels, then refine any areas that look unnatural. Complex backgrounds may require more manual adjustment.
Can AI remove watermarks automatically?
AI tools can locate a selected area with a watermark and generate the image surrounding it. Designkit has an AI-assisted workflow that can make this process easier by eliminating the need to manually clone or heal. Results may differ depending on the watermark, background and details it covers.
Is it possible to remove a watermark from a complex background?
Yes, but complex backgrounds can make removal more difficult. Patterns, hair, faces, text, and detailed textures may require additional refinement. An AI-based tool such as Designkit can be useful when manually reconstructing these areas would take more time.
Can I remove watermarks from multiple photos at once?
Some AI-powered workflows are better suited to handling multiple images than manual editing. If you have a larger batch, Designkit can be considered when you want a faster, more automated approach instead of editing each photo individually. Always check the available processing and export limits before starting.
You May Also Like

Remove.bg Shutting Down Dec 1, 2026: What Users Are Saying

7 Best Remove.bg Alternatives in 2026: Free & Paid Tools

Instagram Carousel: What It Is, How to Post & Create One

Nano Banana Prompts: 20+ Examples for Better AI Images

Ideogram AI Review 2026: Features, Pricing & Alternatives

Free Mac Photo Editor: 5 Tools Compared for Mac Users

How to Crop a Photo Into a Circle Online (Keep Quality)

How to Make an Image Transparent Online (AI Guide)

Pixlr Background Remover Review 2026: Features, Pricing & Alternatives

How to Fix Overexposed Photos: Recover Highlights Fast

OpenArt AI Review 2026: Features, Pricing & Alternatives

Best AI Headshot Generator: 9 Tools Compared for 2026

Best Stencil Maker Tools 2026: Turn Photos Into Stencils

Pixelbin Watermark Remover Review: Image & Video Results Tested

How to Make a Sticker on iPhone: Easy Step by Step Guide

Best AI Logo Generator in 2026: 10 Tools Compared

How to Turn a Photo Into a Cartoon: A Beginner-Friendly Guide

Landscape vs Portrait: Key Differences & Best Uses in 2026

How to Remove Watermark From Photo: AI, Photoshop & More

How to Fix Pixelated Photos: Photoshop, AI Tools & Tips

Bing Image Creator: How It Works, Features, Uses & Alternatives

How to Remove People from Photos with AI: A Step-by-Step Guide

How to Increase Image Resolution: AI, Photoshop & PPI

How to Add Text to a Photo: 8 Tips for Better Results

How to Fix Grainy Photos: Easy Ways to Clear Images

Creative Profile Picture Ideas for Every Style and Platform

Evoto AI Review 2026: Features, Pricing, Pros & Cons

Pixlr Photo Editor Review: Features, Pricing & Alternatives

Best AI Image Extender Tools in 2026: Expand Photos with AI

How to Make a Collage on iPhone: Easy Guide for 2026

How to Sharpen an Image in Photoshop (Smart Sharpen and Unsharp Mask)

Best Image Background Remover Tools in 2026: AI Tools Compared

How to Make Transparent Background in Paint: Step-by-Step Guide

How to Resize an Image: Best Methods, Tools & Quality Tips

Best AI Image Generator Tools in 2026: Top AI Platforms Compared

Remove.bg Review 2026: Features, Pricing & Is It Worth It?

Luminar Neo Photo Editor Review 2026: AI Features, Price & Pros

How to Post Multiple Photos on Instagram (2026 Guide)

25 Facebook Cover Photo Ideas for Personal & Business Pages

What Is a PFP? Meaning, Examples & How to Create One

Can You Edit an Instagram Post After Posting?

11 Best Canva Alternatives in 2026 for AI Design & Marketing

8 Best Midjourney Alternatives in 2026: Features, Pricing & Comparison

How to Restore Old Photos: AI Tools, Tips & Best Methods

Pixelcut AI Review 2026: Features, Pricing, Pros, Cons & Alternatives

How to Apply Watermark to Photos: Methods, Tips & AI Tools

How to Remove a Background in Illustrator: 4 Easy Methods

How to Change Background Color on Instagram Story (Easy Guide)

8 Best AI Poster Generators in 2026: Create Posters Faster with AI

10 Best AI Image Enhancers in 2026: Tested & Compared

10 Best AI Image Editors in 2026: Features, Pricing & Comparison

7 Best AI Background Changer in 2026: Remove & Replace Photo Backgrounds

Luminar Neo vs Lightroom: Features, Pricing & Comparison 2026

Kittl Review 2026: Is It Worth It? Features & Pricing

How to Make a Blurry Image Clear: 5 AI & Manual Ways

How to Remove Background on iPhone: 5 Easy Methods (2026)

Photoroom Background Remover Review 2026: Features & Alternatives

How to Remove Background in Canva: A Step-by-Step Guide

How to Remove Background in GIMP: Beginner-Friendly Guide

Funny Dog Memes to Try: Doge Meaning and 10 Original Ideas

Back to School Checklist 2026: Supplies, Timeline, and Planning

Recraft AI Review 2026: Features, Pricing, Pros, Cons & Alternatives

How to Make an Image Transparent in Google Slides: Opacity & Background Removal

VanceAI Photo Enhancer Review: Features, Pricing & Alternatives in 2026

What Does Emojify Mean? Text, Photos, & Emoji Art Explained

Top 8 Online Background Removers for Ecommerce Photos (2026)

How to Remove Background in Photoshop: 7 Easy Methods

6 Best AI Image Upscalers 2026: Tools Tested & Compared

Project Indigo Review: Is It Better Than iPhone Camera?

How Big Is an 8x10 Photo? Size, Pixels & Frame Guide

How Big Is a 4x6 Photo? Dimensions, Pixels & Printing Tips

Picsart AI Review: Features, Pricing, Pros, Cons & Alternatives

Lovart AI Review: AI Design Agent Features, Pricing & Alternatives

Fotor AI Image Generator Review: Features, Pricing & Alternatives

How to Add Emoji to Photo Online for Free

Emoji Wallpaper Ideas & How to Make One Online (2026)

Minimalist Poster Design: How to Make a Clean Poster (2026)

How to Make a Custom Poster That Is Ready to Print

Instagram Image Size Guide 2026: Post, Reel, Story & Carousel Specs

LinkedIn Image Size Guide: Profile, Post & Banner Dimensions

YouTube Profile Image Size: Best Dimensions & Safe Area 2026

How to Edit Amazon Product Photos That Boost Sales Fast
Remove Unwanted Marks From Images Fast
Clean up unwanted watermarks with Designkit's AI-powered image editing tools. Quickly edit your photos and create clean results with less manual work.
