
How to Remove Background on iPhone: 5 Easy Methods That Work
Learn how to remove background on iPhone with built-in features, free apps, and online tools. Create clean cutout images for ecommerce, social media, and design projects.

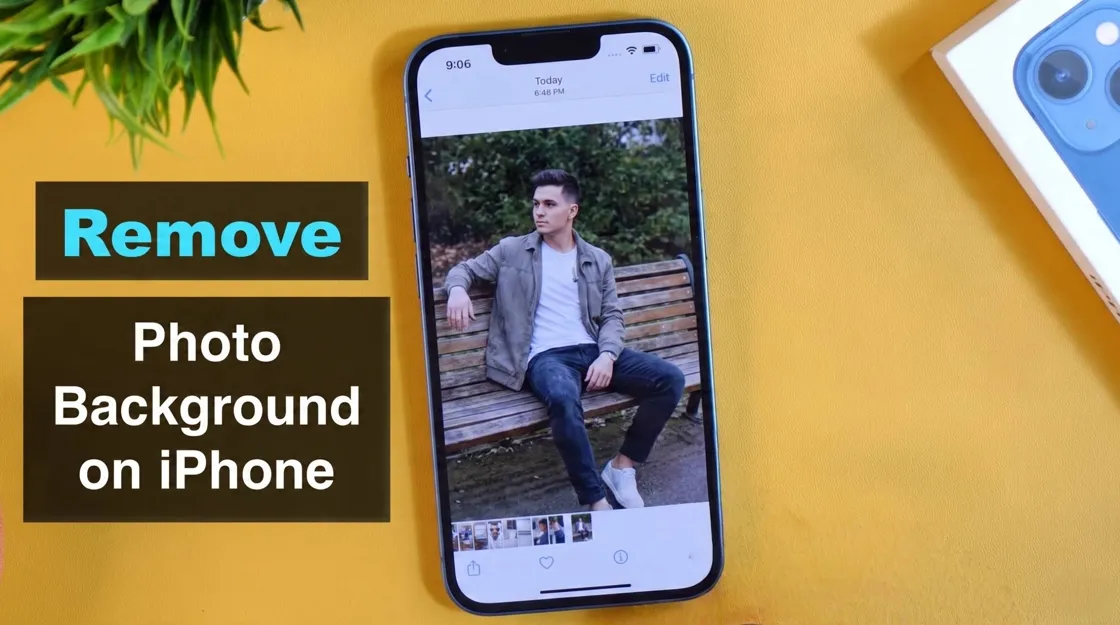
Removing a background from an iPhone photo is now a simple editing task. You do not need professional software to create clean cutouts. iPhone’s built-in features, free editing apps, and online background remover tools can help you separate people, products, and objects in just a few steps.
The right method depends on what you need. The Photos app is useful for quick edits, while dedicated background remover tools offer more control for detailed images, product photos, and creative projects.
In this guide, you will learn how to remove background on iPhone using different methods, compare the pros and cons of each option, and find the best way to create transparent images for your needs.
Can You Remove Background on iPhone?
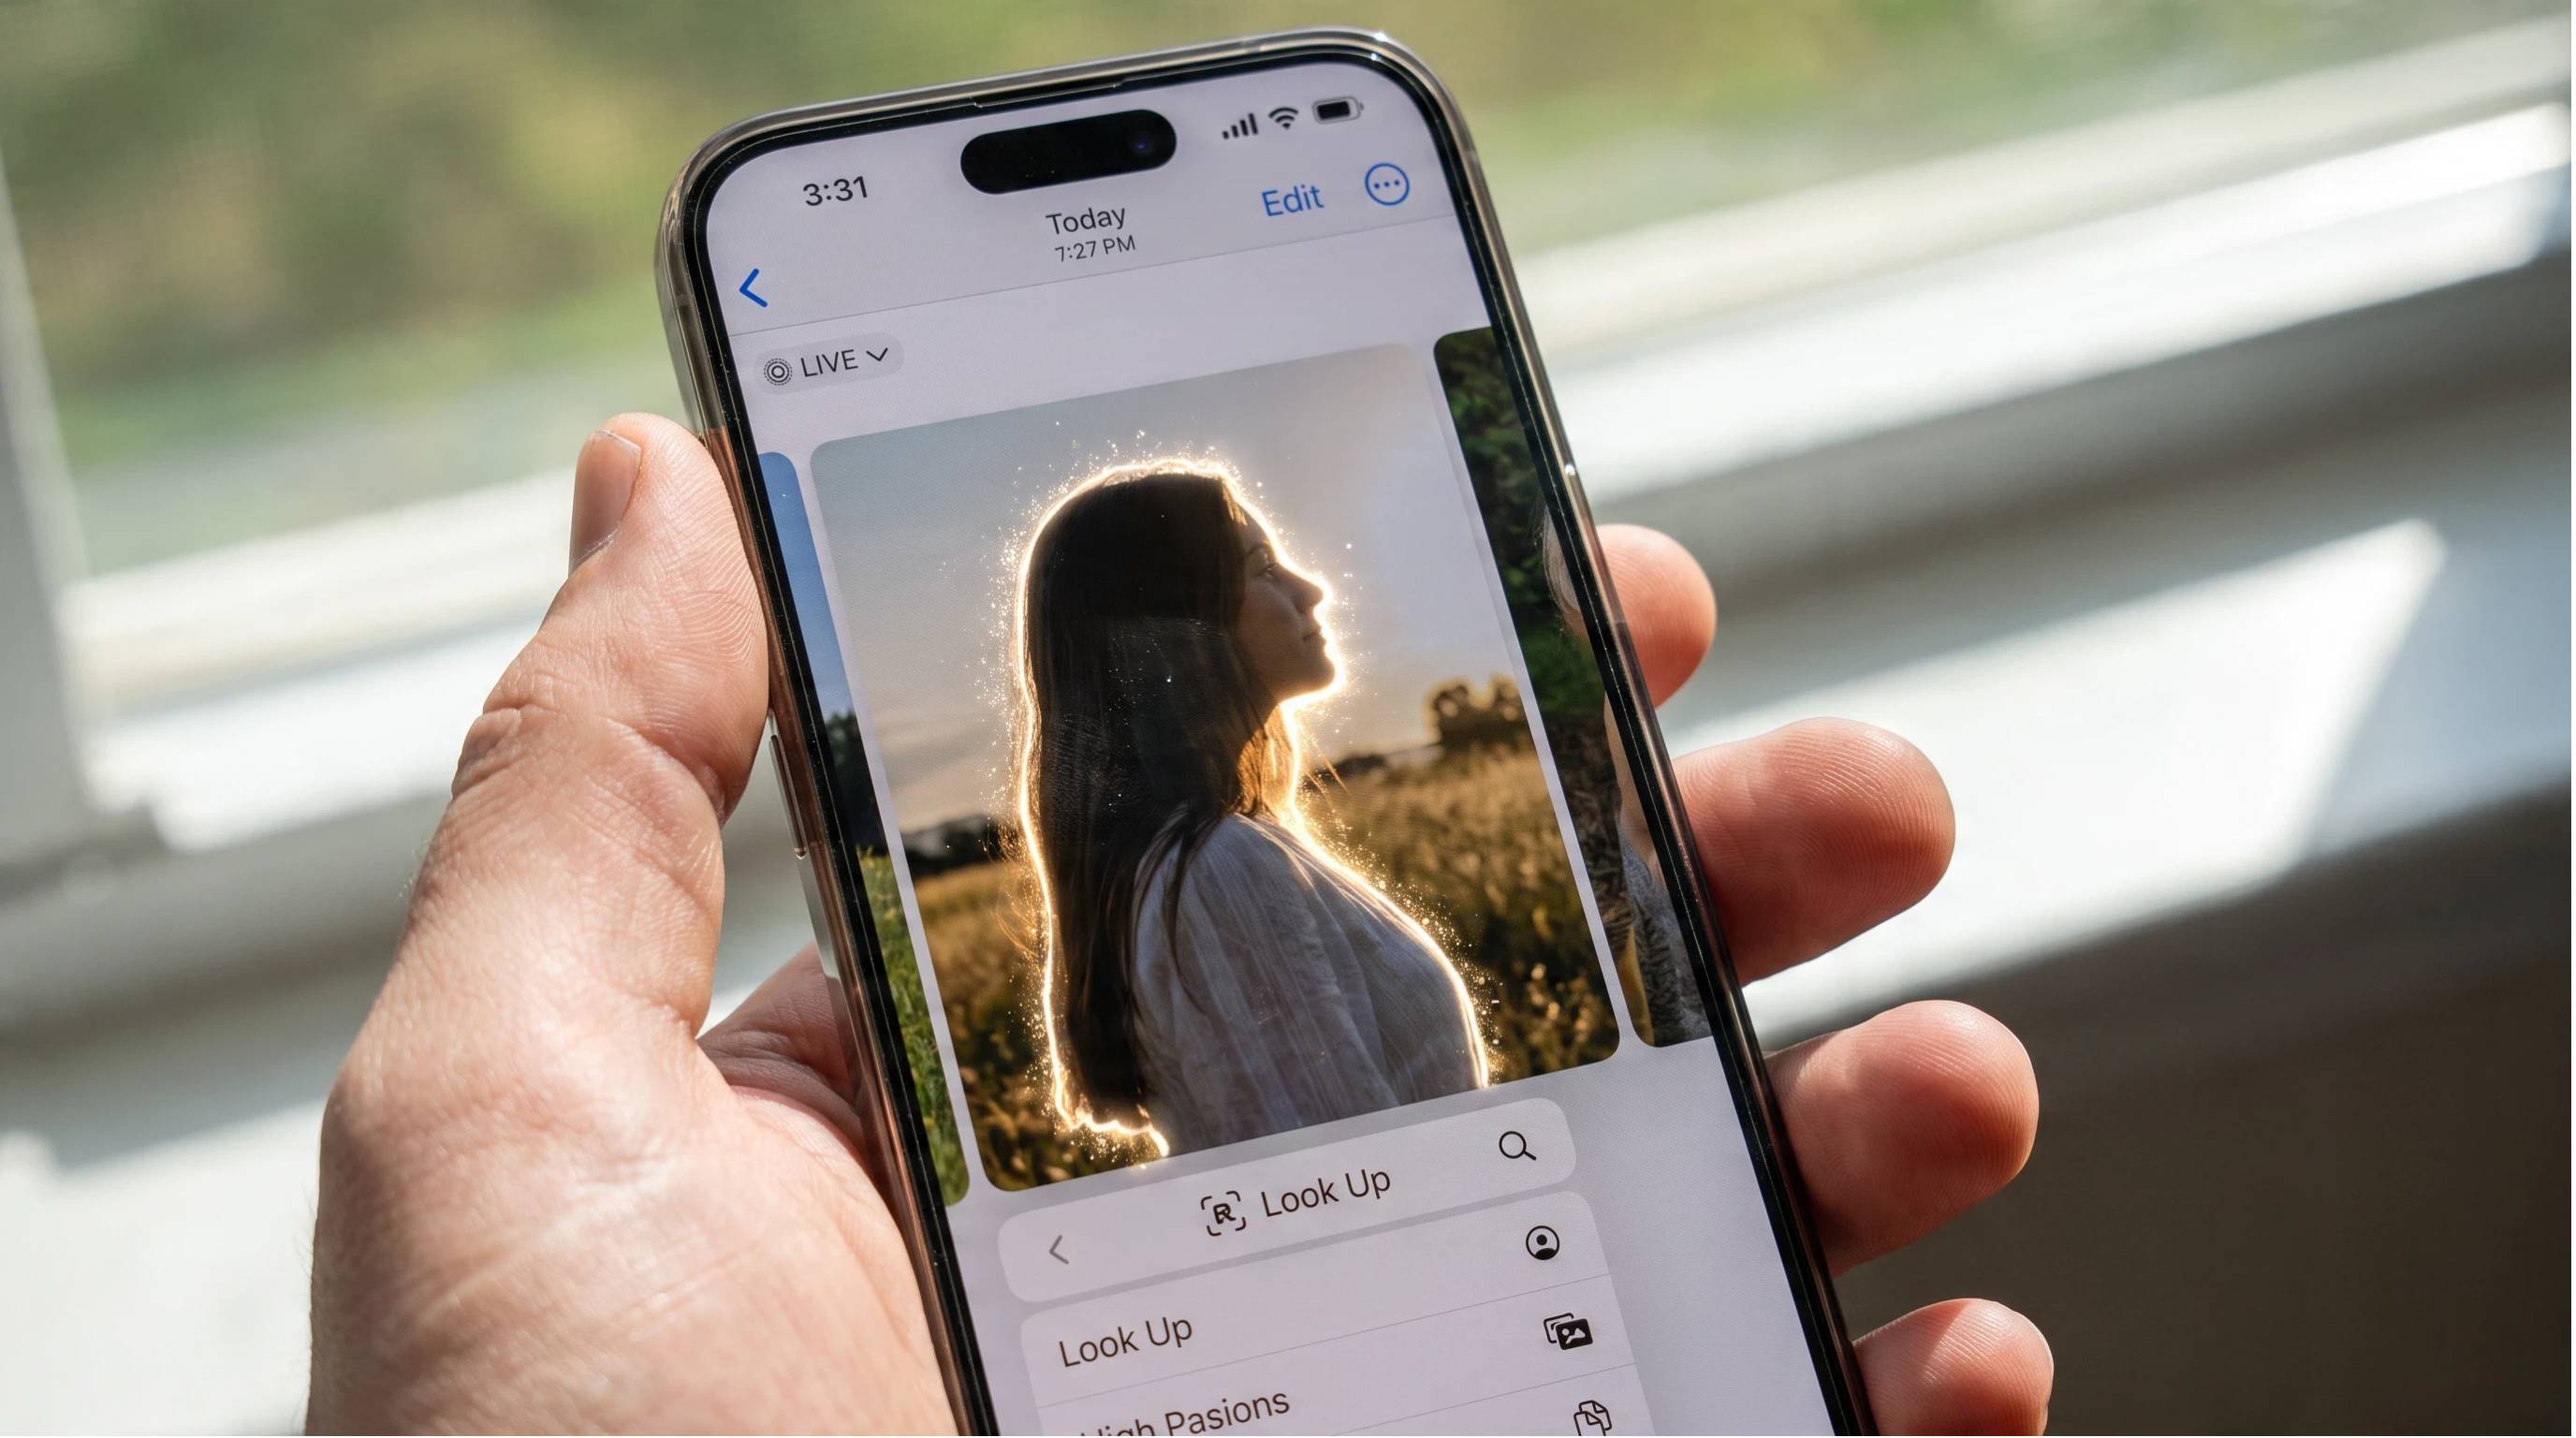
Yes, modern iPhones can automatically detect a subject and separate it from the background without installing any third-party apps. If you're wondering if you can remove background on iPhone, the answer is yes—as long as you're using a supported version of iOS (iOS 16 or later). Apple's built-in Visual Look Up feature makes it easy to lift a person, pet, or object from an image in just a few taps.
The built-in tool works best when the subject has clear, well-defined edges and stands out from the background. It's ideal for creating quick cutouts that you can share, copy, or use in other apps.
It Works Best for:
-
People and portraits
-
Pets
-
Products or everyday objects with clear outlines
Keep in Mind These Limitations:
-
Busy or cluttered backgrounds may reduce accuracy.
-
Transparent or reflective objects, such as glass, can be difficult to detect.
-
Fine details like hair, fur, lace, or thin branches may not be extracted perfectly.
For simple edits, Apple's built-in tools work well. However, if you need precise edge refinement, bulk editing, or advanced customization, an AI-powered editor offers greater control than the default background remover iPhone features.
How to Remove Background on iPhone Using Built-in Tools
Apple includes two simple methods for removing backgrounds without downloading extra software. Depending on where your image is stored and what you plan to do with it afterward, you can use either the Photos app or the Files app.
Method 1: Remove Background from the Photos App
Best for: Portraits, pets, and simple objects
The Photos app provides the quickest way to remove the iPhone background from a picture. It automatically detects the main subject and lets you copy or share it with a transparent background.
Step 1: Open Your Photo
Launch the Photos app and select the image you want to edit. Choose a photo where the subject is clearly separated from the background for the most accurate results.
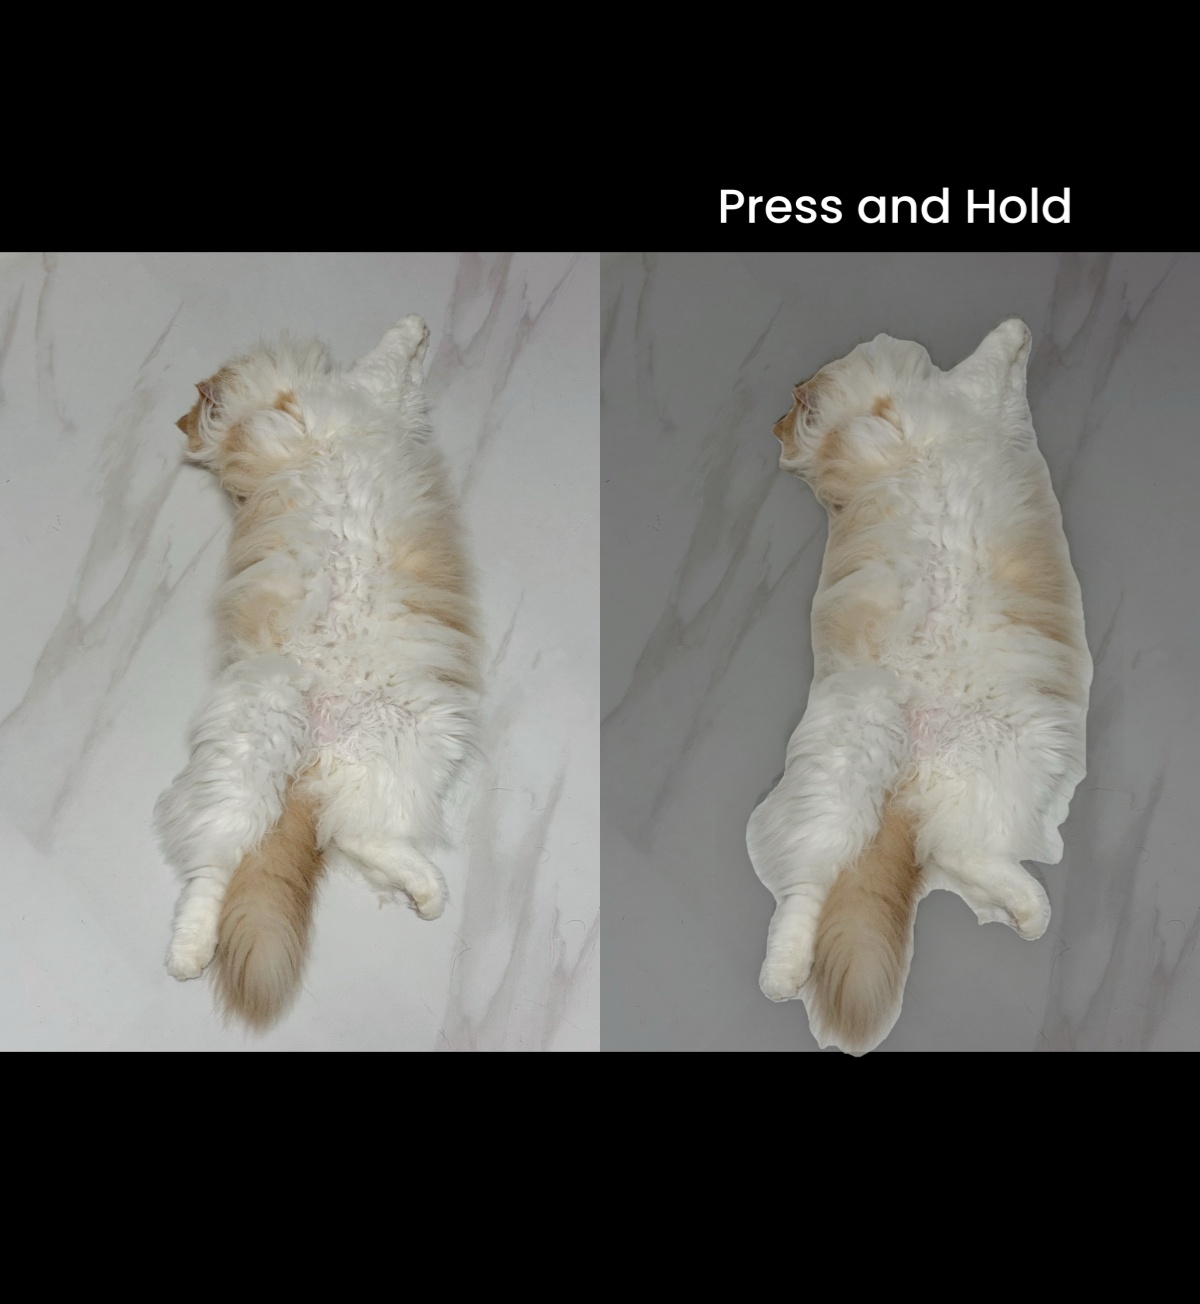
Step 2: Press and Hold the Subject
Touch and hold the main subject for a second or two. Your iPhone analyzes the image, highlights the subject with a glowing outline, and lifts it from the background automatically.
Step 3: Copy or Share the Transparent Image
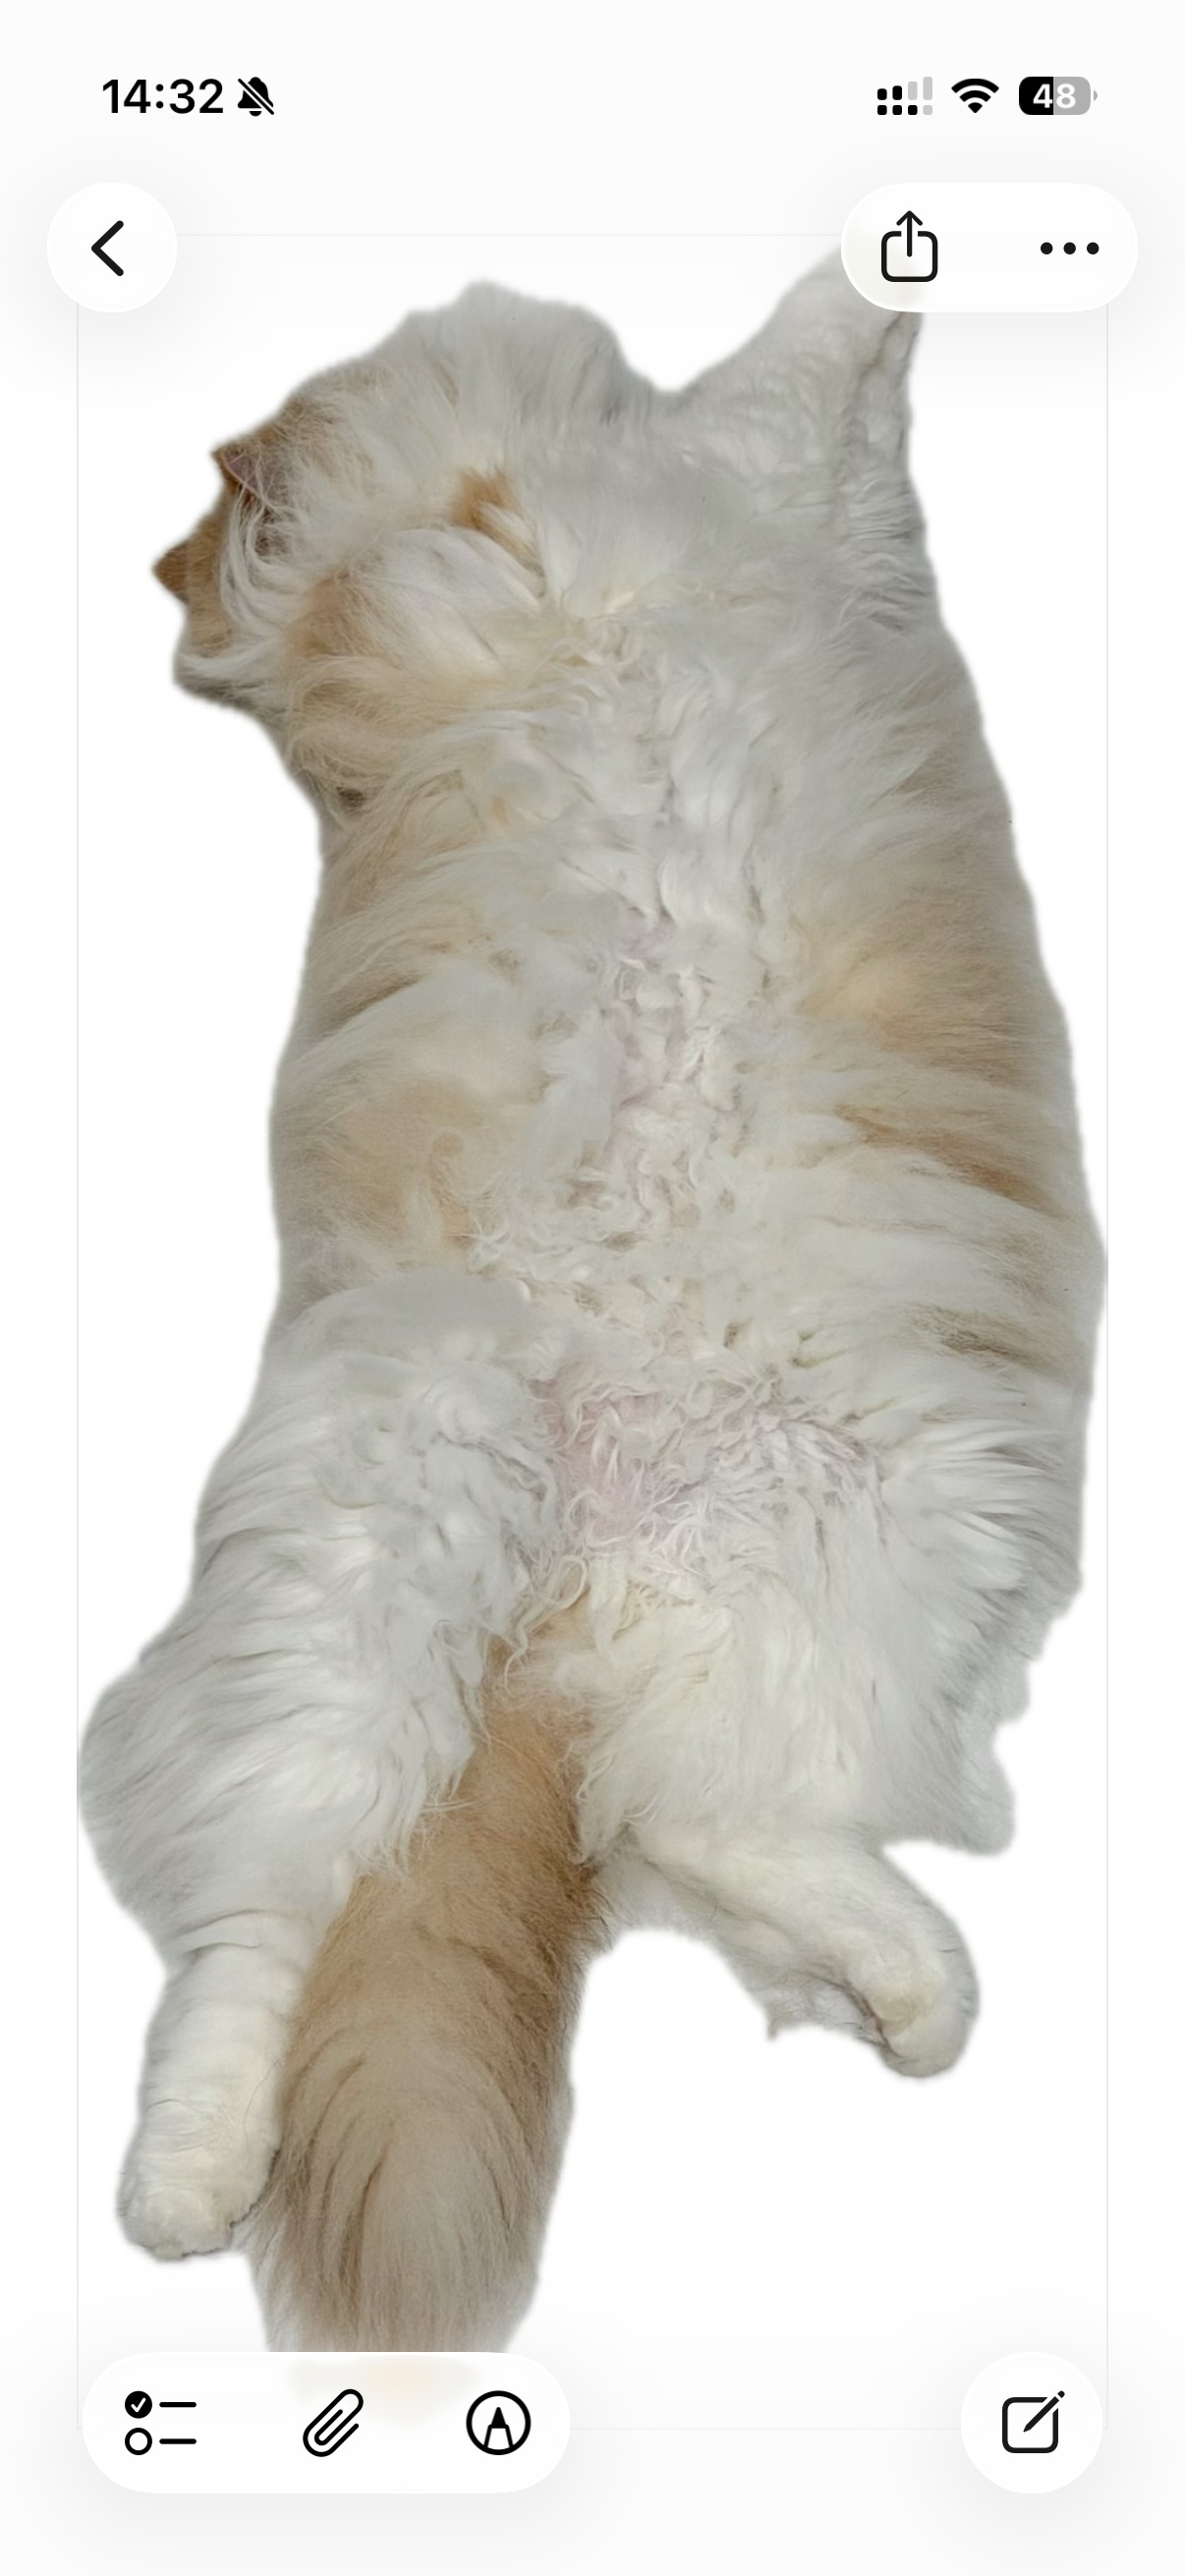
After the subject is selected, choose Copy or Share from the menu. You can paste it into Messages, Notes, Pages, presentation software, or design apps that support transparent images.
Advantages
-
No additional apps required
-
Extremely fast and beginner-friendly
-
Perfect for everyday editing and sharing
Limitations
-
Limited control over the cutout edges
-
Less accurate with complex scenes
-
Doesn't support batch editing or advanced refinements
Method 2: Remove Background Using the Files App
Best for: Creating transparent PNG images
The Files app offers another built-in option that's especially useful if you want to save an image with transparency. If you're looking for an iPhone photo background remover that preserves a transparent PNG automatically, this method is the better choice.
Step 1: Open the Files App
Open the Files app and locate the image you want to edit. This works well for downloading pictures or images stored in iCloud Drive or other folders outside your Photos library.
Step 2: Long Press the Image
Press and hold the image thumbnail until the quick actions menu appears.
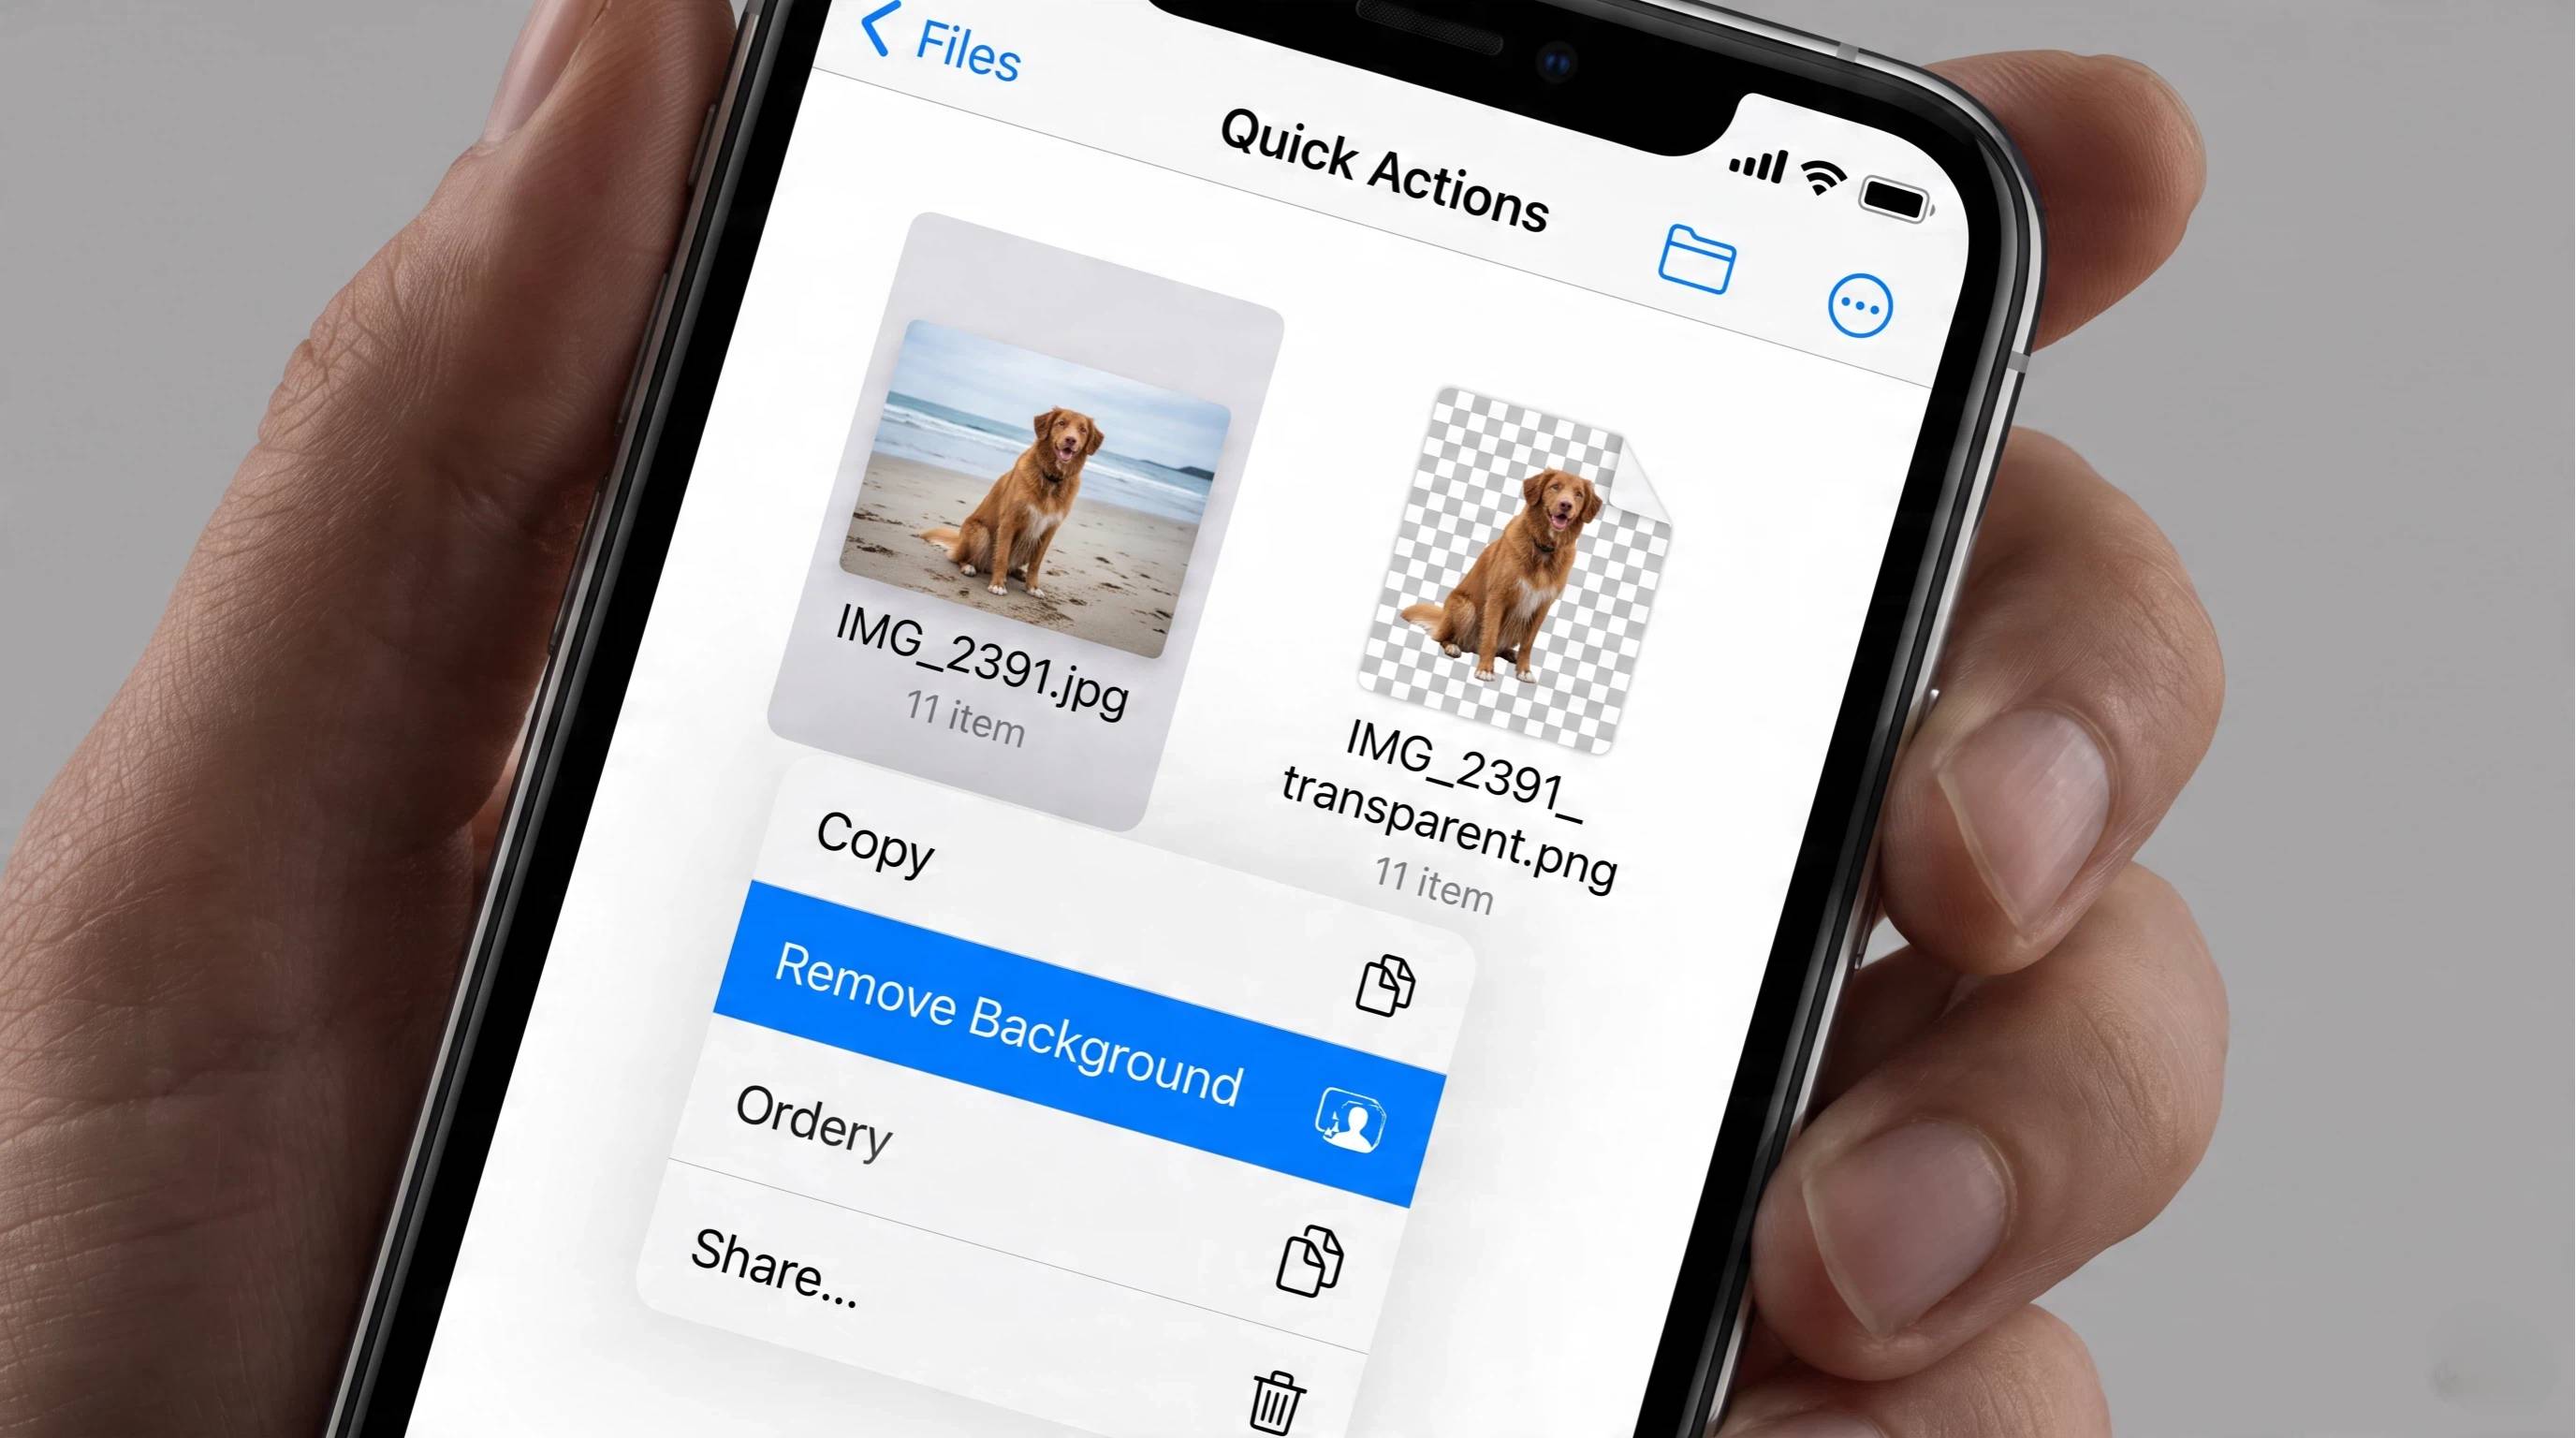
Step 3: Select Remove Background
Tap Quick Actions > Remove Background. Your iPhone processes the image automatically and creates a new transparent PNG file in the same folder.
Advantages
-
Creates transparent PNG files automatically
-
Easy to save, organize, and reuse
-
Great for presentations, graphics, and design projects
Tip:If you need to keep the transparent background intact, store and share your cutouts from the Files app whenever possible. Some apps or photo workflows may replace transparency with a solid background after exporting.
How to Remove Background on iPhone with Background Remover Apps
Apple's built-in tools are convenient for quick edits, but they aren't always the best choice for every image. Photos with messy backgrounds, fine hair, transparent objects, or products often require more accurate subject detection. If you need cleaner cutouts, higher-quality exports, or editing features beyond basic background removal, dedicated apps offer more flexibility. Whether you're creating social media content, product listings, or marketing materials, these tools can help you achieve more professional results.
Method 3: Remove Background with CapCut
Best for: Social media creators, short-form videos, and content editing
CapCut includes an AI-powered background removal tool that makes it easy to isolate subjects for videos and photos. It's a popular option for creators producing content for TikTok, Instagram Reels, and YouTube Shorts.
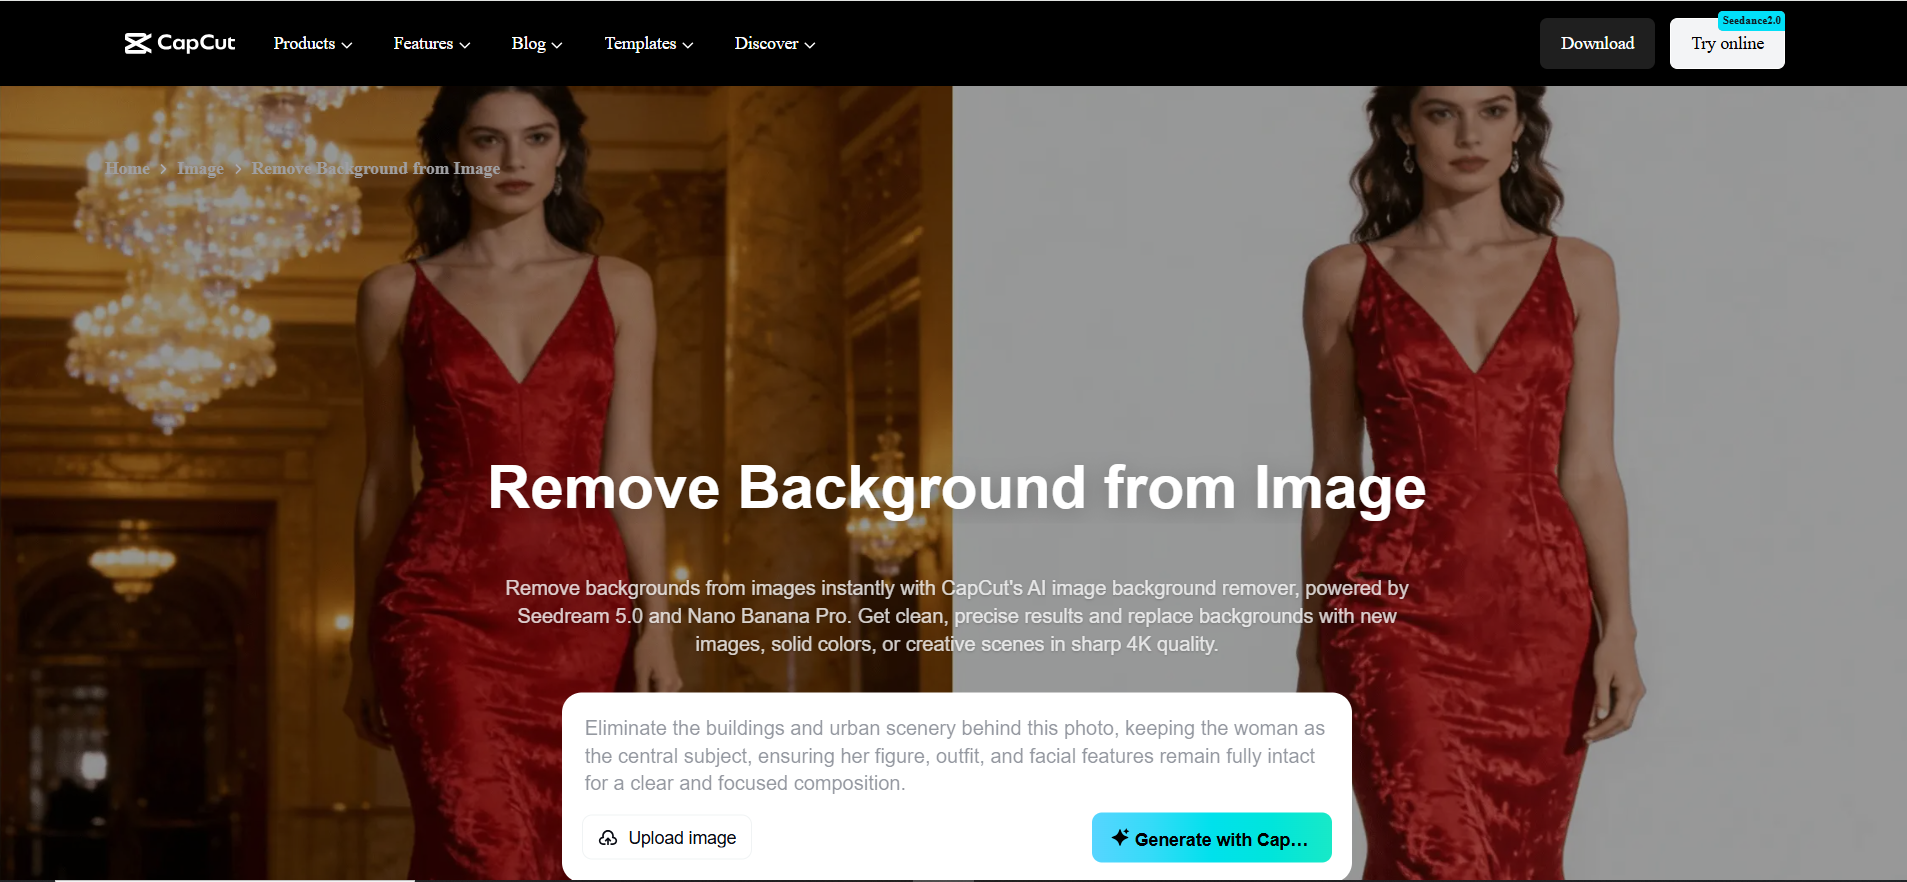
Step 1: Upload Your Image
Open CapCut on your iPhone and create a new project. Import the image you want to edit from your photo library.
Step 2: Use the Remove Background Tool
Select your image and choose the Remove Background feature. CapCut automatically identifies the subject and separates it from the background without requiring manual selection.
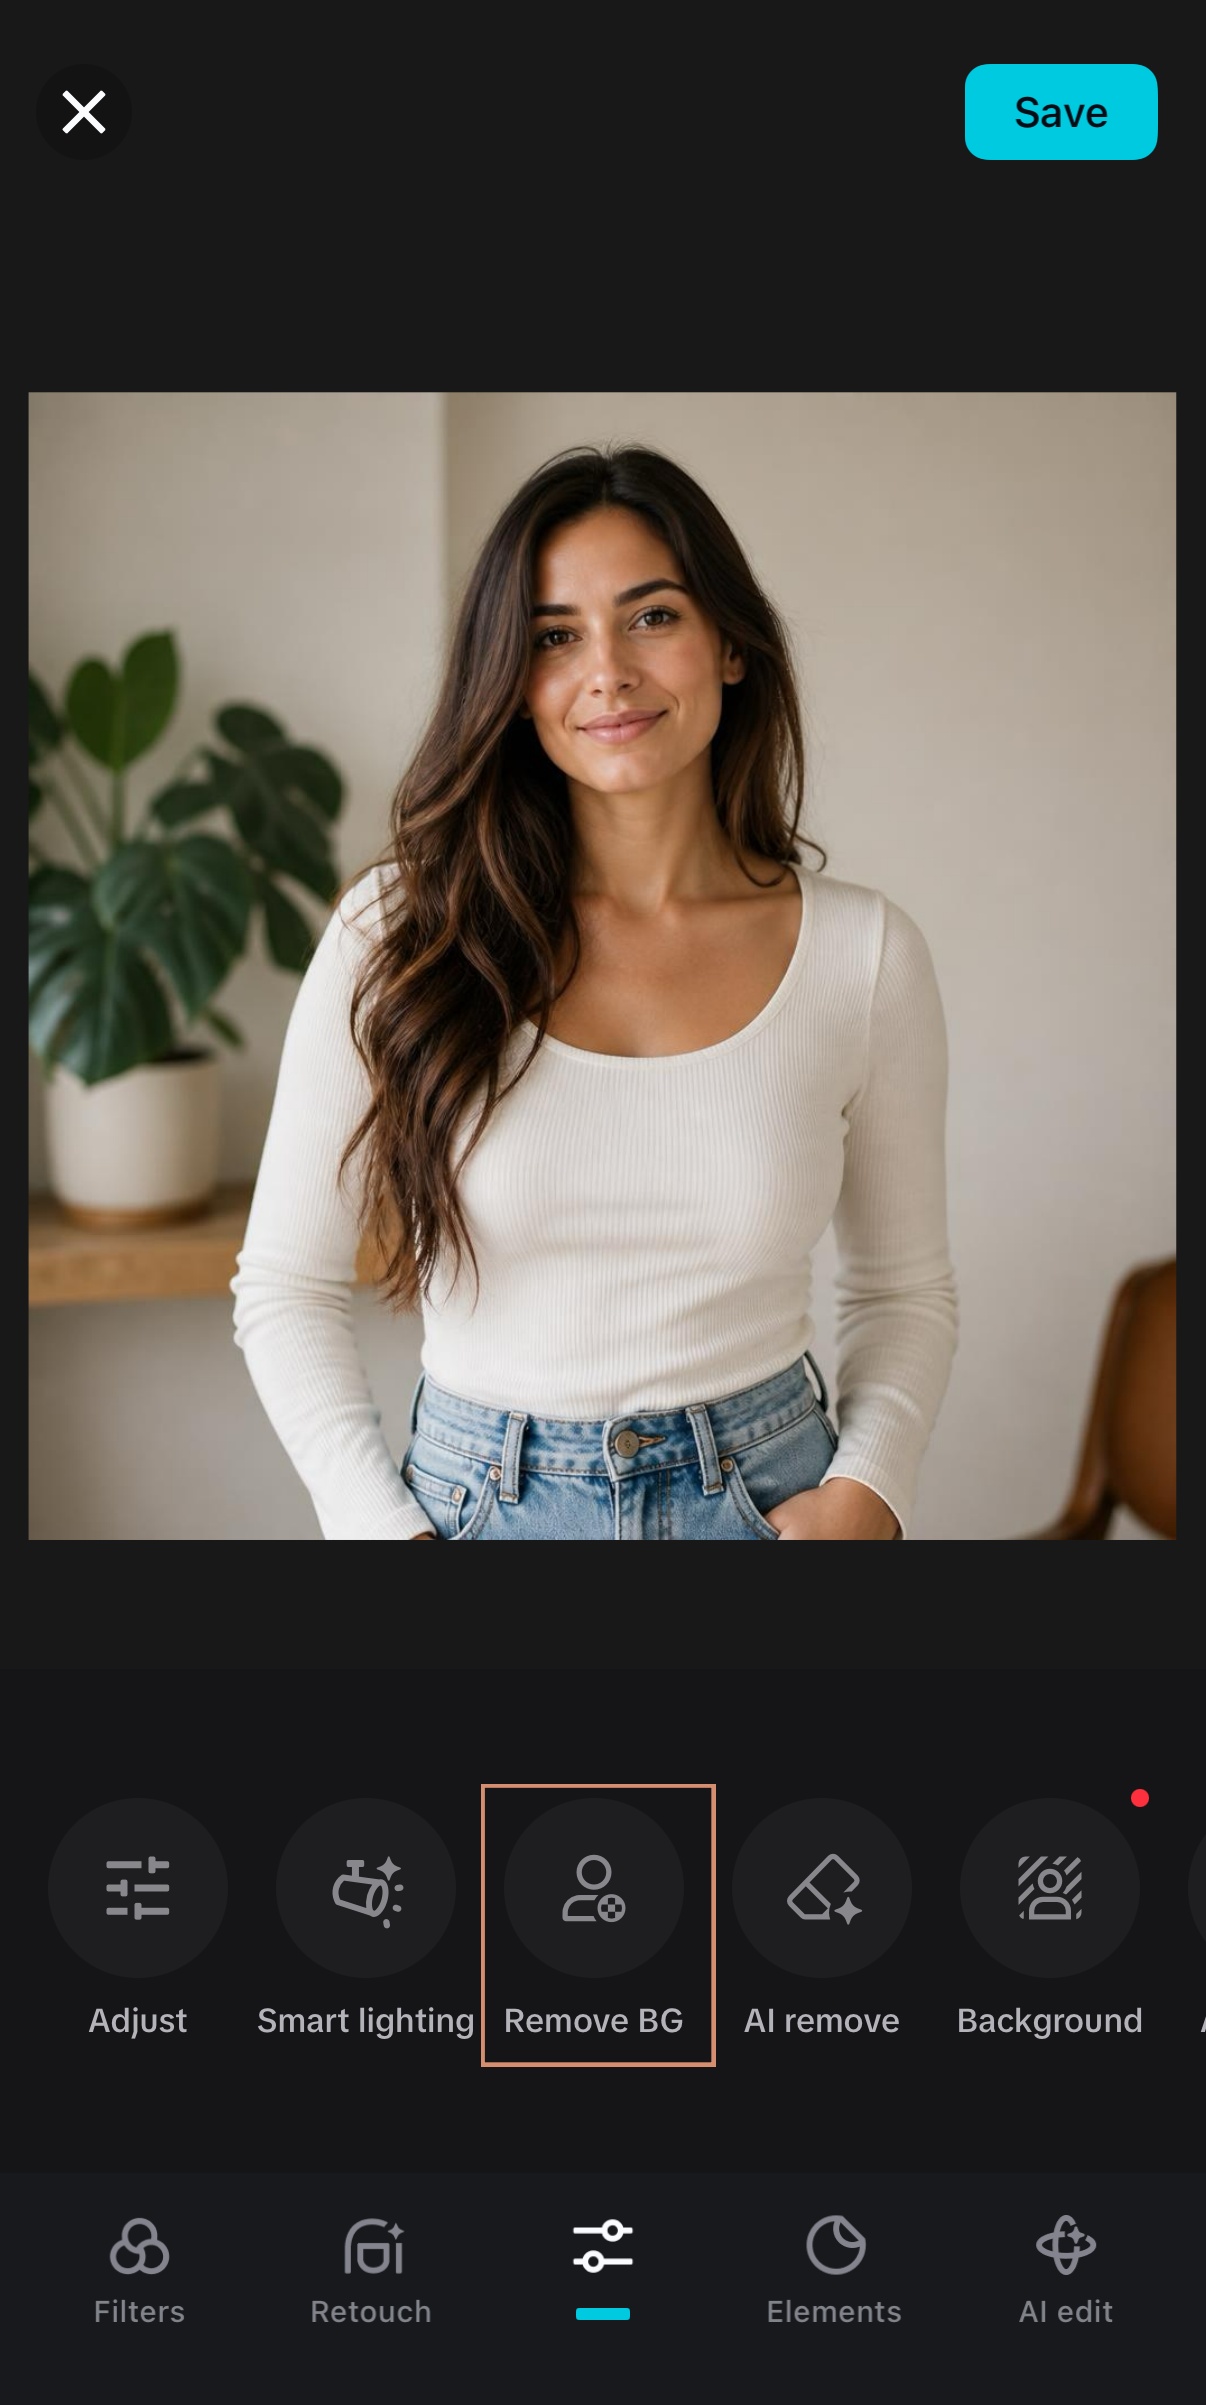
Step 3: Export Your Image
Preview the cutout to make sure it looks clean, then export the edited image or continue adding effects, text, or backgrounds before saving it to your iPhone.
Advantages
-
Beginner-friendly interface
-
Supports both image and video editing
-
Great for social media content creation
Limitations
-
Limited tools for ecommerce product workflows
-
Fewer options for bulk image editing
Method 4: Remove Background with Pixelcut
Best for: Ecommerce sellers, online stores, and product photography
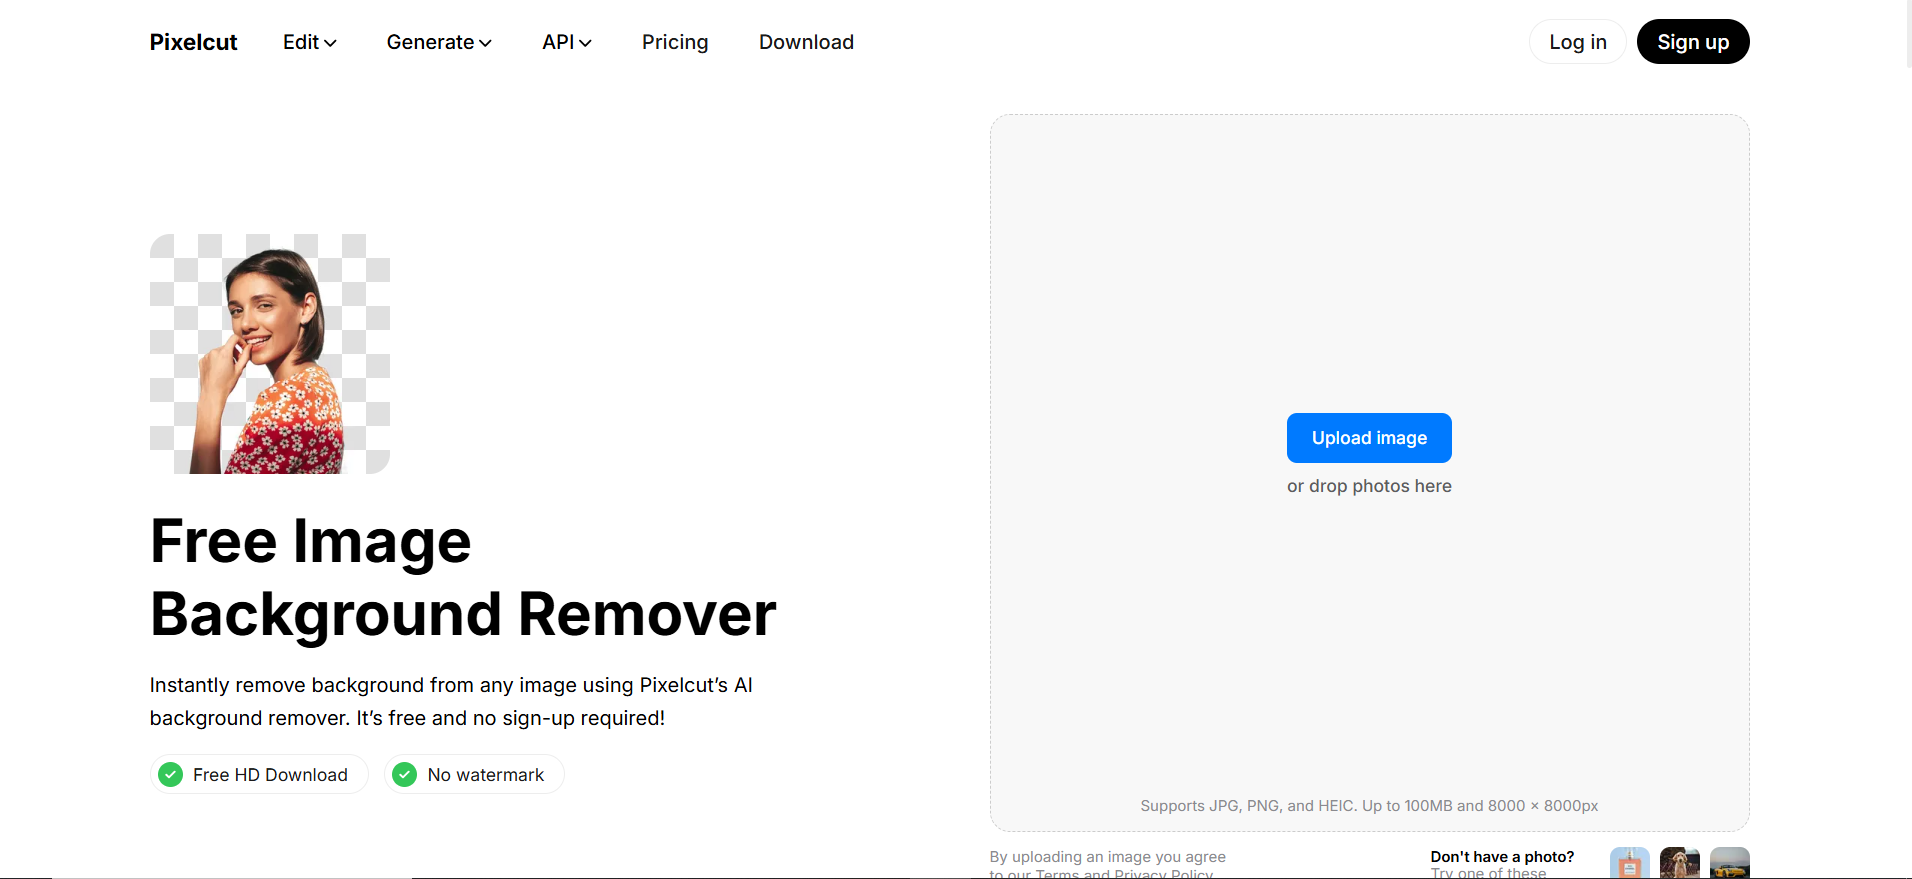
Pixelcut is designed for businesses that need professional-looking product images. Its AI helps create clean cutouts that are ready for marketplaces, advertisements, and catalogs.
Step 1: Upload Your Image
Open Pixelcut and import a product photo from your iPhone gallery.
Step 2: Apply Automatic Background Removal
Choose the automatic background removal feature. The AI detects your product and removes the background while preserving important edges.

Step 3: Export the Transparent Image
Review the result, then download transparent PNG for use in online stores, product listings, advertisements, or promotional graphics.
Advantages
-
Built specifically for product photography
-
Produces clean object cutouts
-
Suitable for ecommerce marketplaces
Limitations
-
Primarily focused on image editing
-
Fewer creative design features beyond product images
Method 5: Remove Background with Designkit
Best for: Ecommerce brands, online sellers, marketers, designers, and content creators who need professional-quality images
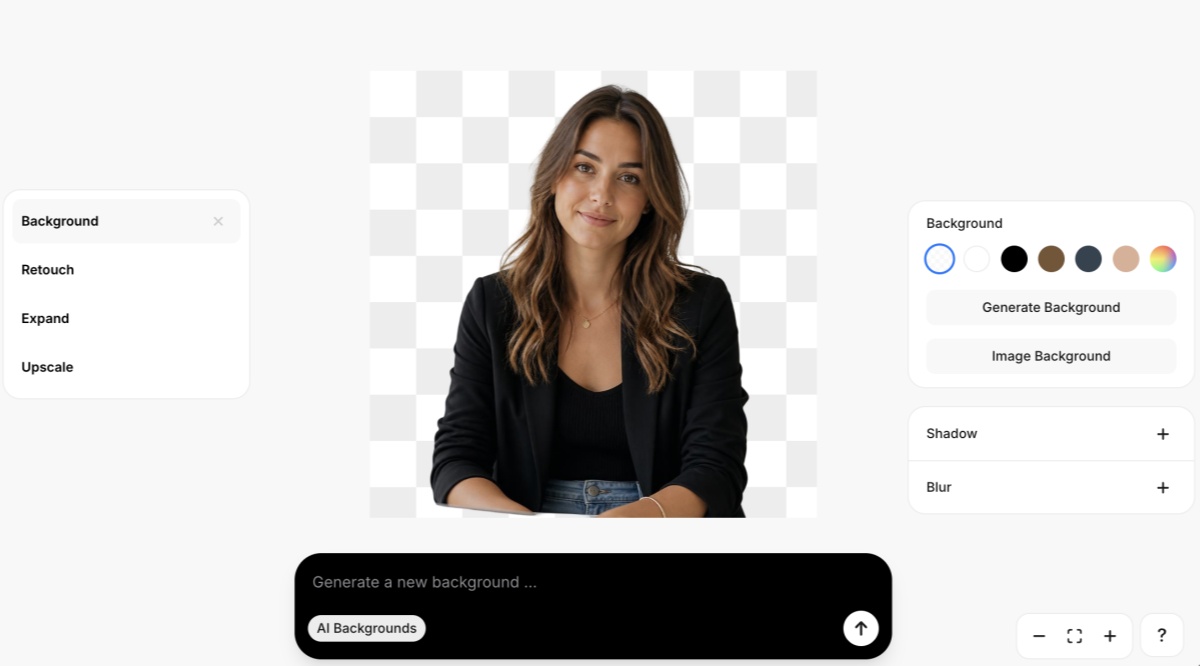
Designkit combines AI-powered background removal with advanced editing tools, making it suitable for everything from product photography to marketing campaigns. Instead of simply removing a background, you can continue editing, enhance image quality, replace backgrounds, and prepare visuals for multiple platforms in one workflow.
Step 1: Upload Your Product Image
Open the Designkit workspace and upload your raw product photo.
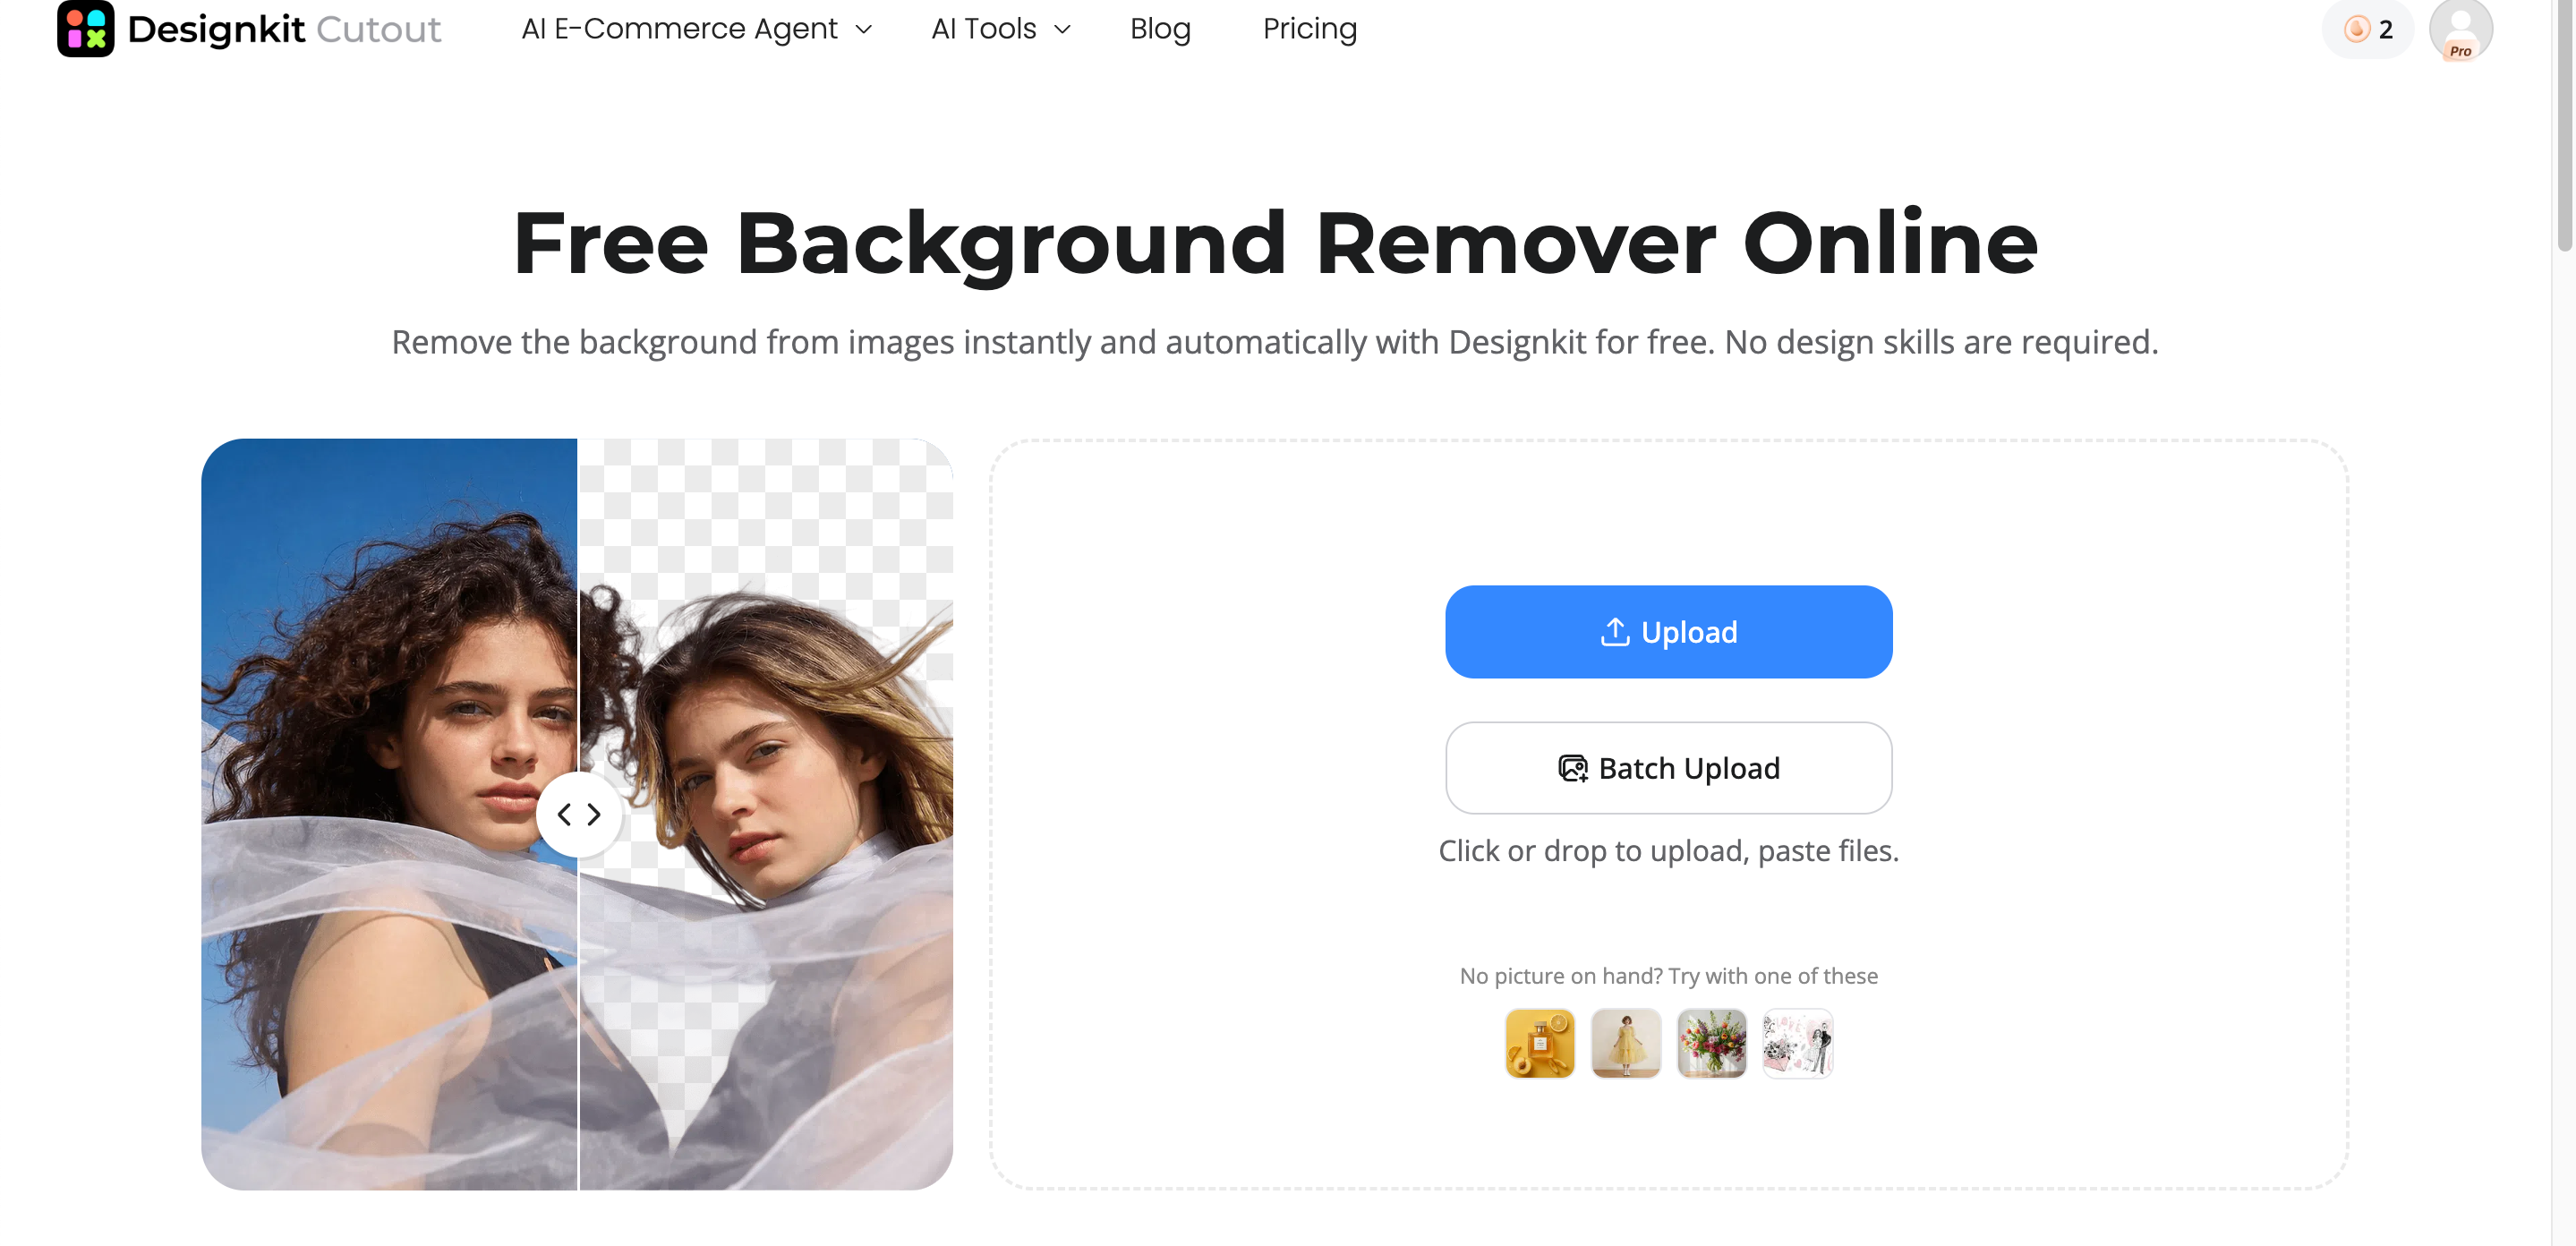
Step 2: Remove Your Image Background
Click the background removal tool to let the AI instantly detect the subject, extracting it perfectly even if it has complex edges like glass or fur.
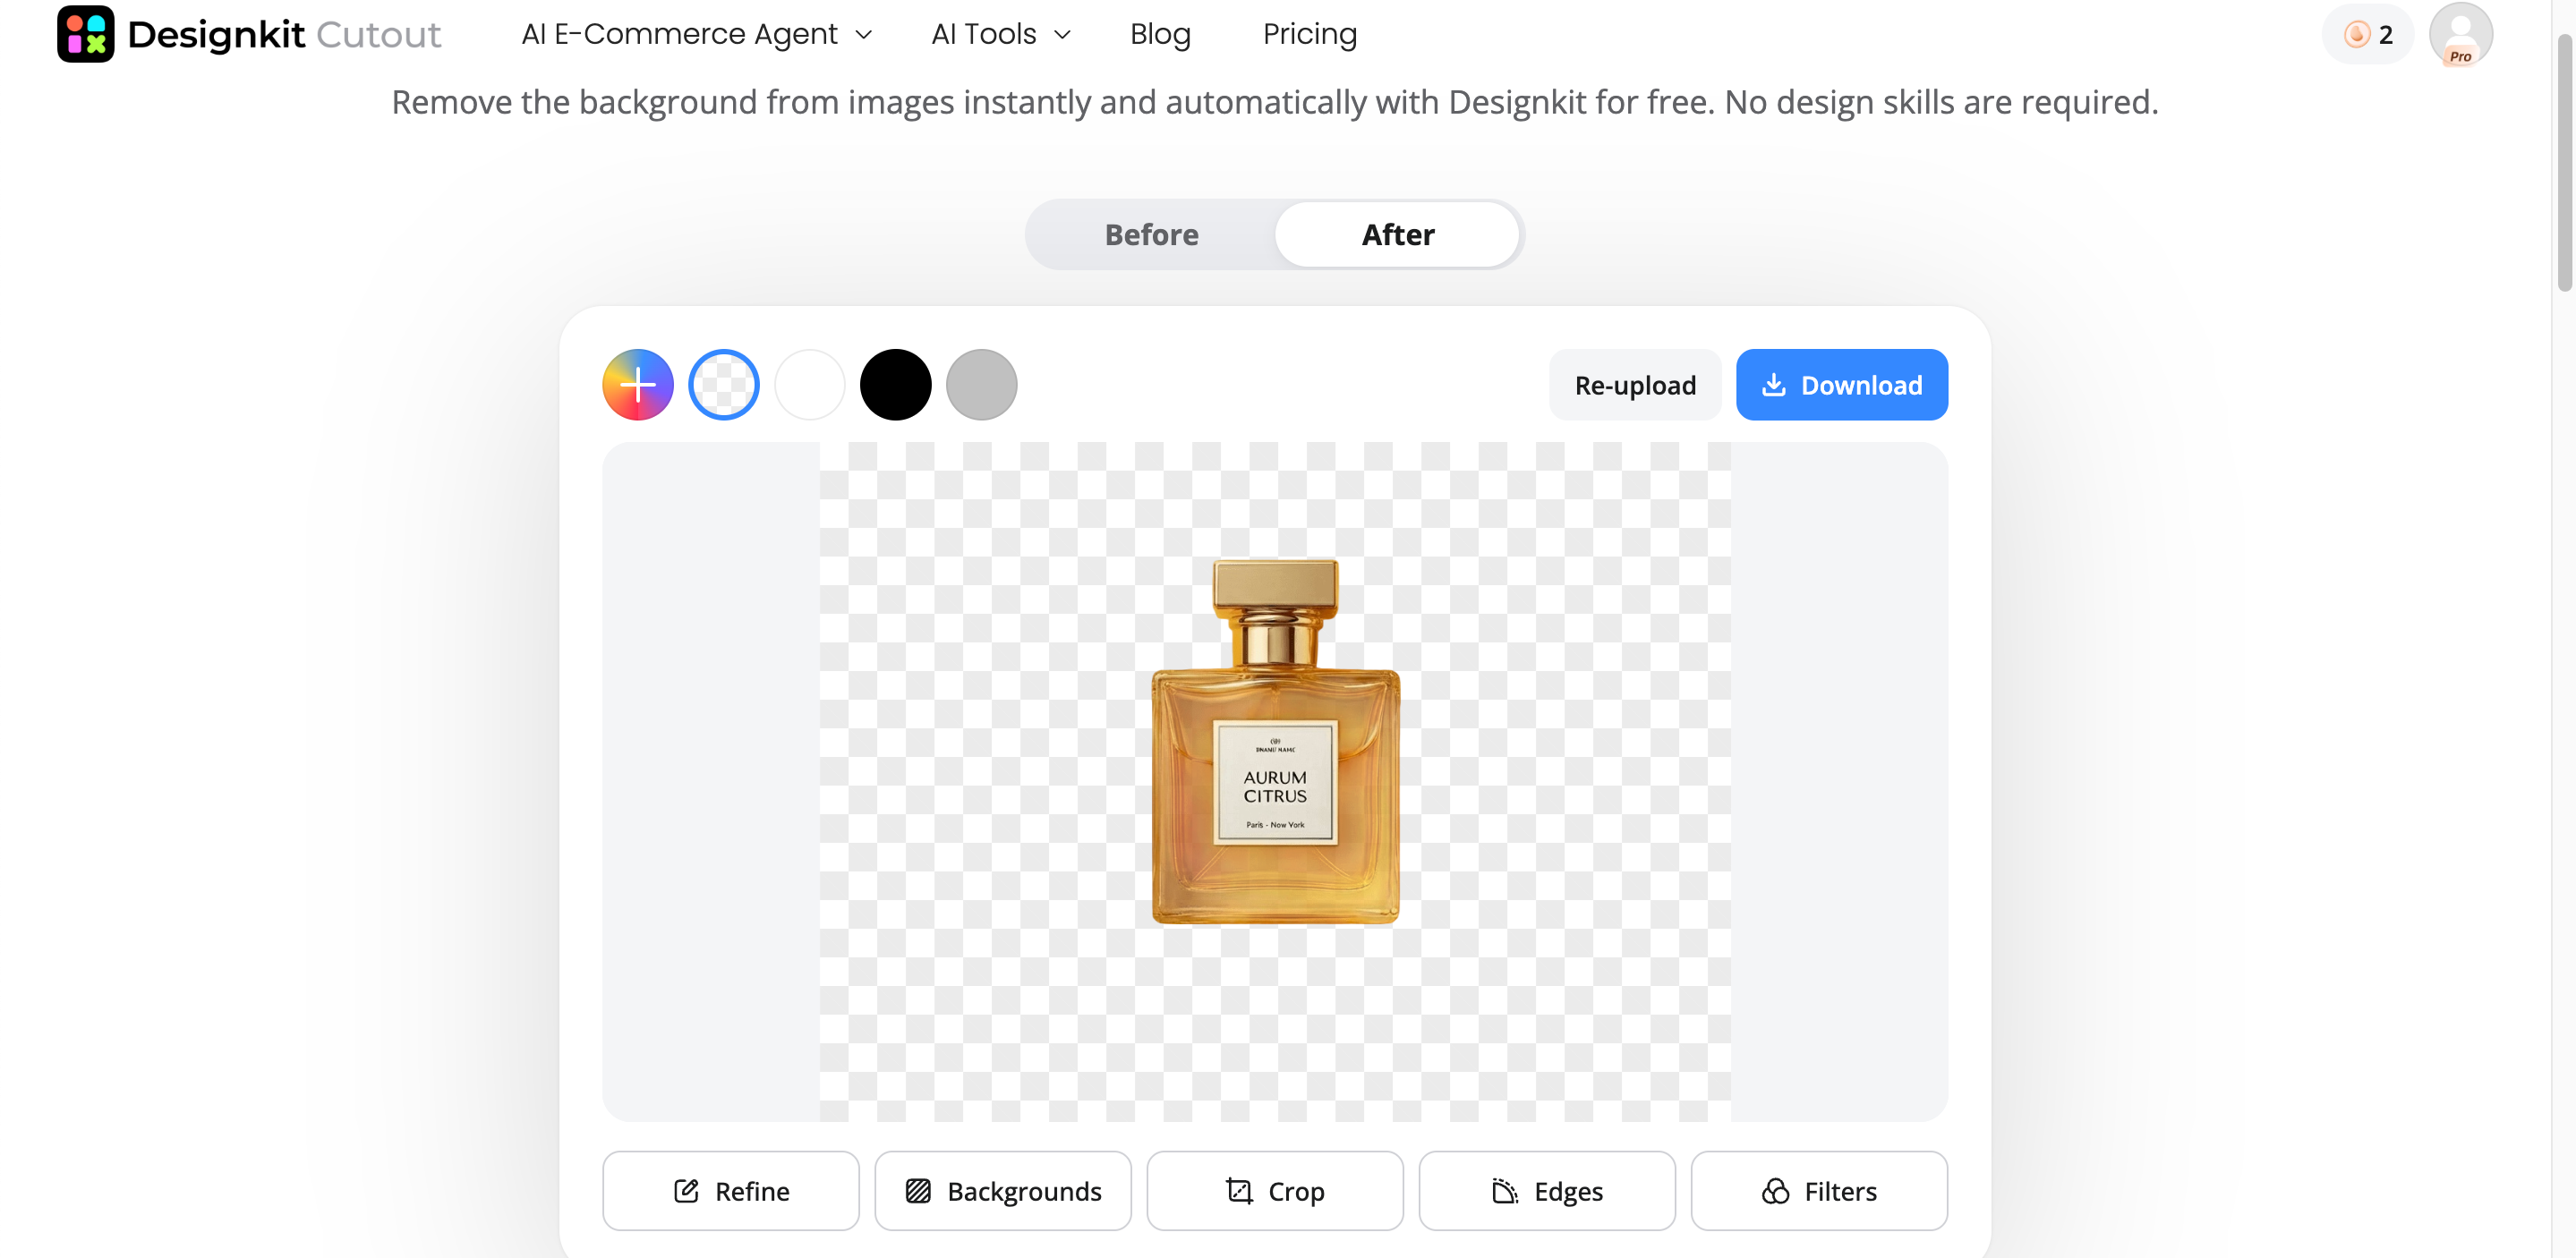
Remove Backgrounds Online Free
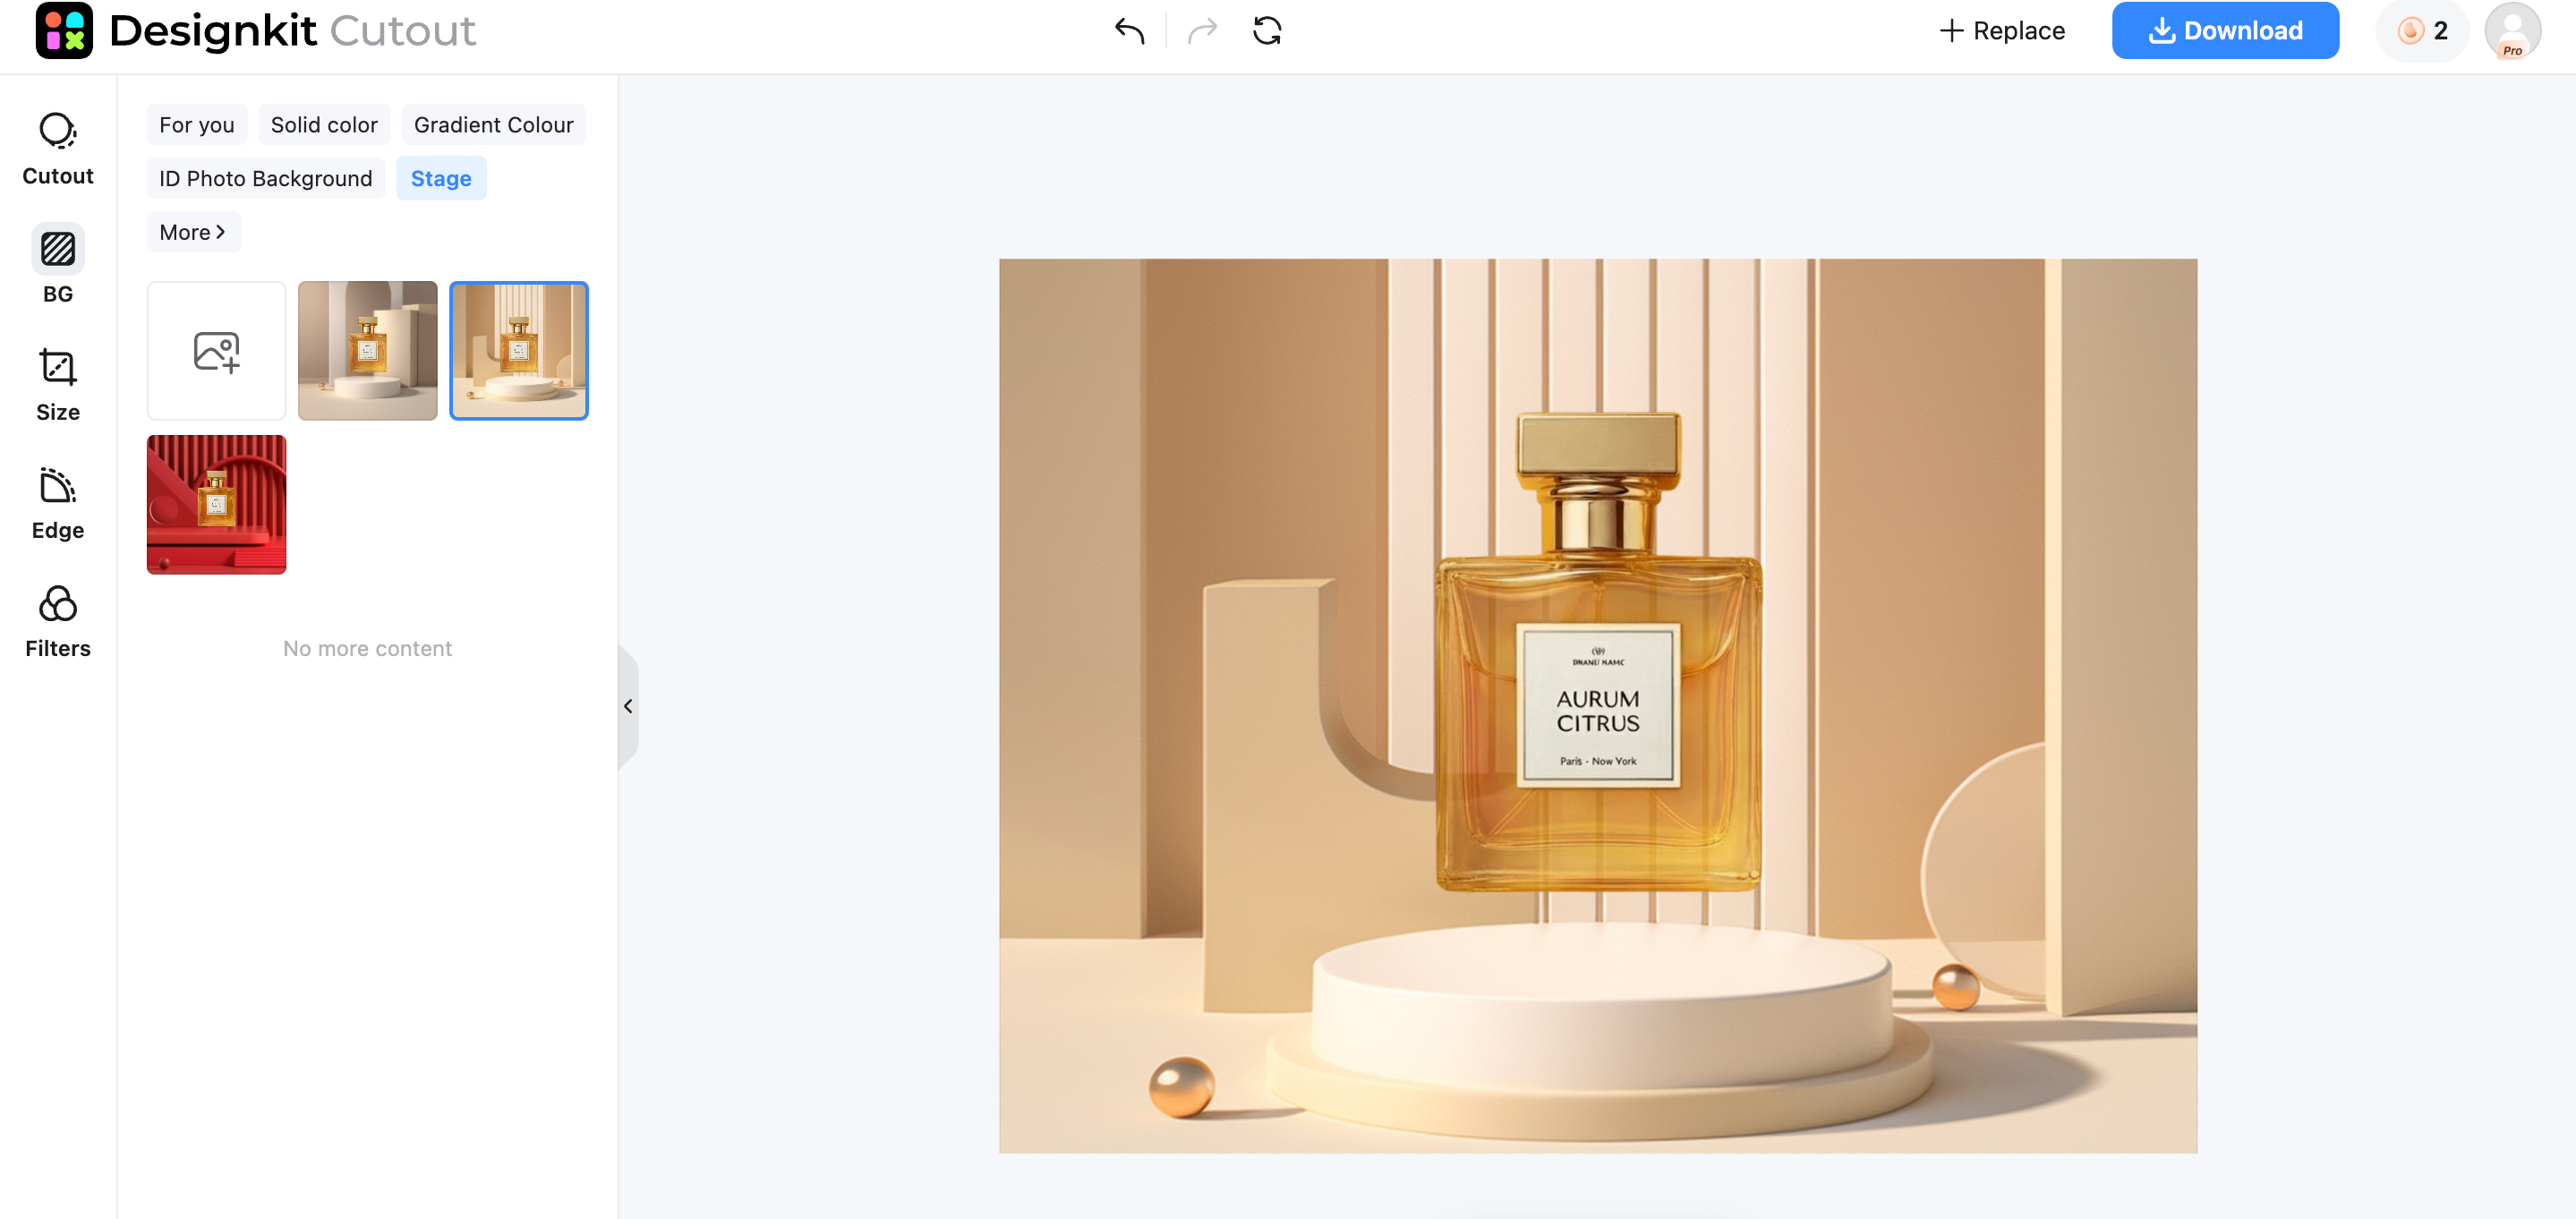
Step 3: Export or Generate a New Scene
Instantly download your transparent image, or use the AI tools to generate a highly converting lifestyle setting around your product.
What You Can Do After Background Removal
Removing the background is often just the beginning of the editing process. A transparent cutout becomes much more valuable when you can enhance it for different marketing and business needs. Instead of switching between multiple apps, Designkit lets you complete your workflow in one place.
After removing the background, you can:
-
Create professional product images with clean, marketplace-ready visuals.
-
Replace plain backgrounds with realistic scenes, studio setups, or branded environments.
-
Enhance image quality using AI to sharpen details and improve overall resolution.
-
Generate multiple creative versions for seasonal promotions, ads, or marketing campaigns.
-
Prepare optimized visuals for ecommerce platforms, websites, online marketplaces, and social media channels.
This all-in-one workflow helps transform simple iPhone photos into polished, high-quality visuals that are ready for both personal projects and professional use.
iPhone Background Remover Methods Compared
Choosing the right tool depends on what you're editing and how you plan to use the final image. Here's a quick comparison of the most popular options.
|
Method |
Best For |
Strength |
Limitation |
|---|---|---|---|
|
Photos App |
Quick personal edits |
No app installation required |
Limited editing control |
|
Files App |
Transparent PNG exports |
Fast, built-in background removal |
Basic editing features only |
|
CapCut |
Social media content |
Easy creative editing for photos and videos |
Less suitable for ecommerce workflows |
|
Pixelcut |
Product photography |
Accurate cutouts for products |
Primarily focused on image editing |
|
Designkit |
Marketing assets and ecommerce |
Complete AI editing workflow with enhancement tools |
Includes more advanced features than basic editors |
If you're only learning how to remove background in iPhone photos, Apple's built-in tools are a great place to start. For professional-quality visuals, advanced AI editors offer greater precision and more editing capabilities.
Tips for Better Background Removal Results
Even the best AI tools perform better when the original image is clear and well-composed. These simple practices can significantly improve your editing results.
Use High-Quality Photos
Start with the highest-resolution image available. Sharp photos allow AI to detect subject boundaries more accurately, resulting in cleaner cutouts and fewer editing errors.
Choose Photos with Clear Subjects
Images where the subject clearly stands apart from the background are much easier to process. Whether you're removing background from photo iPhone images or editing product shots, strong contrast between the subject and background produces better results.
Avoid Busy Backgrounds
Crowded scenes with overlapping people, objects, or patterns can confuse automatic background detection. Whenever possible, capture photos against a simple or uncluttered background.
Check Small Details
After background removal, zoom in and inspect areas that commonly need refinement, including:
-
Hair and loose strands
-
Fingers and hands
-
Transparent or reflective objects
-
Product edges and corners
A quick review helps ensure your final image looks clean and natural.
Export as PNG
If you need a transparent background, always export your image as a PNG. This preserves transparency, making the cutout ready for websites, presentations, ecommerce listings, and graphic design projects. Many users searching for a phone photo background remover specifically need PNG files for this reason.
Common Mistakes When Removing Backgrounds on iPhone
Even the best background removal tools can produce poor results if the original image isn't suitable. Avoid these common mistakes to get cleaner cutouts and more professional-looking edits.
Using Blurry or Low-Resolution Images
Low-quality photos don't provide enough detail for AI to accurately detect the subject's edges. Always start with the highest-resolution image possible for cleaner and more precise background removal.
Choosing Photos with Poor Lighting
Dark or uneven lighting makes it difficult to distinguish the subject from the background. Good natural or well-balanced lighting improves edge detection and delivers smoother results.
Removing Backgrounds from Complex Scenes
Images with crowded backgrounds, overlapping objects, or multiple people are harder for AI to process. If possible, choose photos where the subject clearly stands out from the background to simplify removing the background from the iPhone photo.
Not Checking the Edges After Editing
Automatic background removal isn't always perfect. Zoom in and inspect areas such as hair, fingers, transparent objects, and product edges to ensure no unwanted background remains and no important details have been removed.
Expecting Basic Tools to Handle Professional Images
Built-in iPhone tools work well for everyday edits, but they have limitations when working with e-commerce products, marketing materials, or images containing fine details. If you're learning how to delete background photos on iPhone for professional use, consider using an advanced AI editor that offers better edge refinement, higher-resolution exports, and additional editing features.
Conclusion
Removing a background on iPhone is easier than ever, thanks to Apple's built-in Photos and Files apps and AI-powered editing tools. For quick personal edits, the free built-in methods are usually enough. If you need cleaner cutouts, better edge detection, or transparent PNGs for product photos and content creation, apps like CapCut and Pixelcut offer additional capabilities. For a complete workflow, Designkit goes beyond simple background removal by letting you enhance images, replace backgrounds, improve quality, and create polished marketing visuals for ecommerce, branding, and social media, all from a single AI-powered platform.
Frequently Asked Questions
Can I remove the background on iPhone without an app?
Does the iPhone have a built-in background remover?
Yes. Apple includes built-in background removal features through Visual Look Up in the Photos app and Quick Actions in the Files app. They automatically detect the main subject and separate it from the background for quick edits. For more precise cutouts, batch editing, background replacement, and image enhancement, Designkit offers a complete AI editing workflow.
How do I remove the background from a photo on my iPhone for free?
You can remove a background for free by opening your photo in the Photos app, pressing and holding the subject, then copying or sharing the cutout. You can also use the Files app to create a transparent PNG at no cost. When you need higher accuracy or additional editing tools, Designkit helps create polished images for ecommerce, branding, and social media.
How do I make a transparent PNG on my iPhone?
The easiest method is to use the Files app. Long-press an image, choose Quick Actions, and select Remove Background. Your iPhone automatically creates a transparent PNG that you can save or share. If you want to enhance the image, replace backgrounds, or prepare it for professional use, Designkit lets you edit and export high-quality transparent PNG files.
What is the best background remover app for iPhone?
The best app depends on your needs. Apple's built-in tools are ideal for quick edits, CapCut works well for social media, and Pixelcut is popular for product photos. If you need an all-in-one solution with AI background removal, image enhancement, background replacement, and marketing design features, Designkit is a strong choice for creators and businesses.
Can I remove people from the background of an iPhone photo?
Yes, but the method depends on what you mean. Apple's built-in tools can isolate a person from the background, while newer editing features can remove unwanted people in certain situations. For more accurate object removal, cleaner edits, and AI-powered image refinement, Designkit provides advanced tools that help create natural-looking results with minimal effort.
Why did my transparent background turn white after saving it?
This usually happens because the image was saved as a JPG, which doesn't support transparency. To keep the background transparent, export the image as a PNG and use apps that preserve transparency. Designkit automatically exports high-quality transparent PNG files, making them ready for ecommerce listings, presentations, graphic design, and social media projects.
You May Also Like

7 Best Remove.bg Alternatives in 2026: Free & Paid Tools

Instagram Carousel: What It Is, How to Post & Create One

Nano Banana Prompts: 20+ Examples for Better AI Images

Ideogram AI Review 2026: Features, Pricing & Alternatives

Free Mac Photo Editor: 5 Tools Compared for Mac Users

How to Crop a Photo Into a Circle Online (Keep Quality)

How to Make an Image Transparent Online (AI Guide)

Pixlr Background Remover Review 2026: Features, Pricing & Alternatives

How to Fix Overexposed Photos: Recover Highlights Fast

OpenArt AI Review 2026: Features, Pricing & Alternatives

Best AI Headshot Generator: 9 Tools Compared for 2026

Best Stencil Maker Tools 2026: Turn Photos Into Stencils

Pixelbin Watermark Remover Review: Image & Video Results Tested

How to Make a Sticker on iPhone: Easy Step by Step Guide

Best AI Logo Generator in 2026: 10 Tools Compared

How to Turn a Photo Into a Cartoon: A Beginner-Friendly Guide

Landscape vs Portrait: Key Differences & Best Uses in 2026

How to Remove Watermark From Photo: AI, Photoshop & More

How to Fix Pixelated Photos: Photoshop, AI Tools & Tips

Bing Image Creator: How It Works, Features, Uses & Alternatives

How to Remove People from Photos with AI: A Step-by-Step Guide

How to Increase Image Resolution: AI, Photoshop & PPI

How to Add Text to a Photo: 8 Tips for Better Results

How to Fix Grainy Photos: Easy Ways to Clear Images

Creative Profile Picture Ideas for Every Style and Platform

Evoto AI Review 2026: Features, Pricing, Pros & Cons

Pixlr Photo Editor Review: Features, Pricing & Alternatives

Best AI Image Extender Tools in 2026: Expand Photos with AI

How to Make a Collage on iPhone: Easy Guide for 2026

How to Sharpen an Image in Photoshop (Smart Sharpen and Unsharp Mask)

Best Image Background Remover Tools in 2026: AI Tools Compared

How to Make Transparent Background in Paint: Step-by-Step Guide

How to Resize an Image: Best Methods, Tools & Quality Tips

Best AI Image Generator Tools in 2026: Top AI Platforms Compared

Remove.bg Review 2026: Features, Pricing & Is It Worth It?

Luminar Neo Photo Editor Review 2026: AI Features, Price & Pros

How to Post Multiple Photos on Instagram (2026 Guide)

25 Facebook Cover Photo Ideas for Personal & Business Pages

What Is a PFP? Meaning, Examples & How to Create One

Can You Edit an Instagram Post After Posting?

11 Best Canva Alternatives in 2026 for AI Design & Marketing

8 Best Midjourney Alternatives in 2026: Features, Pricing & Comparison

How to Restore Old Photos: AI Tools, Tips & Best Methods

Pixelcut AI Review 2026: Features, Pricing, Pros, Cons & Alternatives

How to Apply Watermark to Photos: Methods, Tips & AI Tools

How to Remove a Background in Illustrator: 4 Easy Methods

How to Change Background Color on Instagram Story (Easy Guide)

8 Best AI Poster Generators in 2026: Create Posters Faster with AI

10 Best AI Image Enhancers in 2026: Tested & Compared

10 Best AI Image Editors in 2026: Features, Pricing & Comparison

7 Best AI Background Changer in 2026: Remove & Replace Photo Backgrounds

Luminar Neo vs Lightroom: Features, Pricing & Comparison 2026

Kittl Review 2026: Is It Worth It? Features & Pricing

How to Make a Blurry Image Clear: 5 AI & Manual Ways

How to Remove Background on iPhone: 5 Easy Methods (2026)

Photoroom Background Remover Review 2026: Features & Alternatives

How to Remove Background in Canva: A Step-by-Step Guide

How to Remove Background in GIMP: Beginner-Friendly Guide

Funny Dog Memes to Try: Doge Meaning and 10 Original Ideas

Back to School Checklist 2026: Supplies, Timeline, and Planning

Recraft AI Review 2026: Features, Pricing, Pros, Cons & Alternatives

How to Make an Image Transparent in Google Slides: Opacity & Background Removal

VanceAI Photo Enhancer Review: Features, Pricing & Alternatives in 2026

What Does Emojify Mean? Text, Photos, & Emoji Art Explained

Top 8 Online Background Removers for Ecommerce Photos (2026)

How to Remove Background in Photoshop: 7 Easy Methods

6 Best AI Image Upscalers 2026: Tools Tested & Compared

Project Indigo Review: Is It Better Than iPhone Camera?

How Big Is an 8x10 Photo? Size, Pixels & Frame Guide

How Big Is a 4x6 Photo? Dimensions, Pixels & Printing Tips

Picsart AI Review: Features, Pricing, Pros, Cons & Alternatives

Lovart AI Review: AI Design Agent Features, Pricing & Alternatives

Fotor AI Image Generator Review: Features, Pricing & Alternatives

How to Add Emoji to Photo Online for Free

Emoji Wallpaper Ideas & How to Make One Online (2026)

Minimalist Poster Design: How to Make a Clean Poster (2026)

How to Make a Custom Poster That Is Ready to Print

Instagram Image Size Guide 2026: Post, Reel, Story & Carousel Specs

LinkedIn Image Size Guide: Profile, Post & Banner Dimensions

YouTube Profile Image Size: Best Dimensions & Safe Area 2026

How to Edit Amazon Product Photos That Boost Sales Fast
Create Better Images After Removing Backgrounds
Remove backgrounds from iPhone photos, then turn simple cutouts into professional ecommerce images, social posts, and marketing visuals with AI-powered tools.
