
How to Sharpen an Image in Photoshop?
Learn how to use Smart Sharpen and Unsharp Mask to improve edge clarity while keeping noise, halos, and over-sharpening under control.
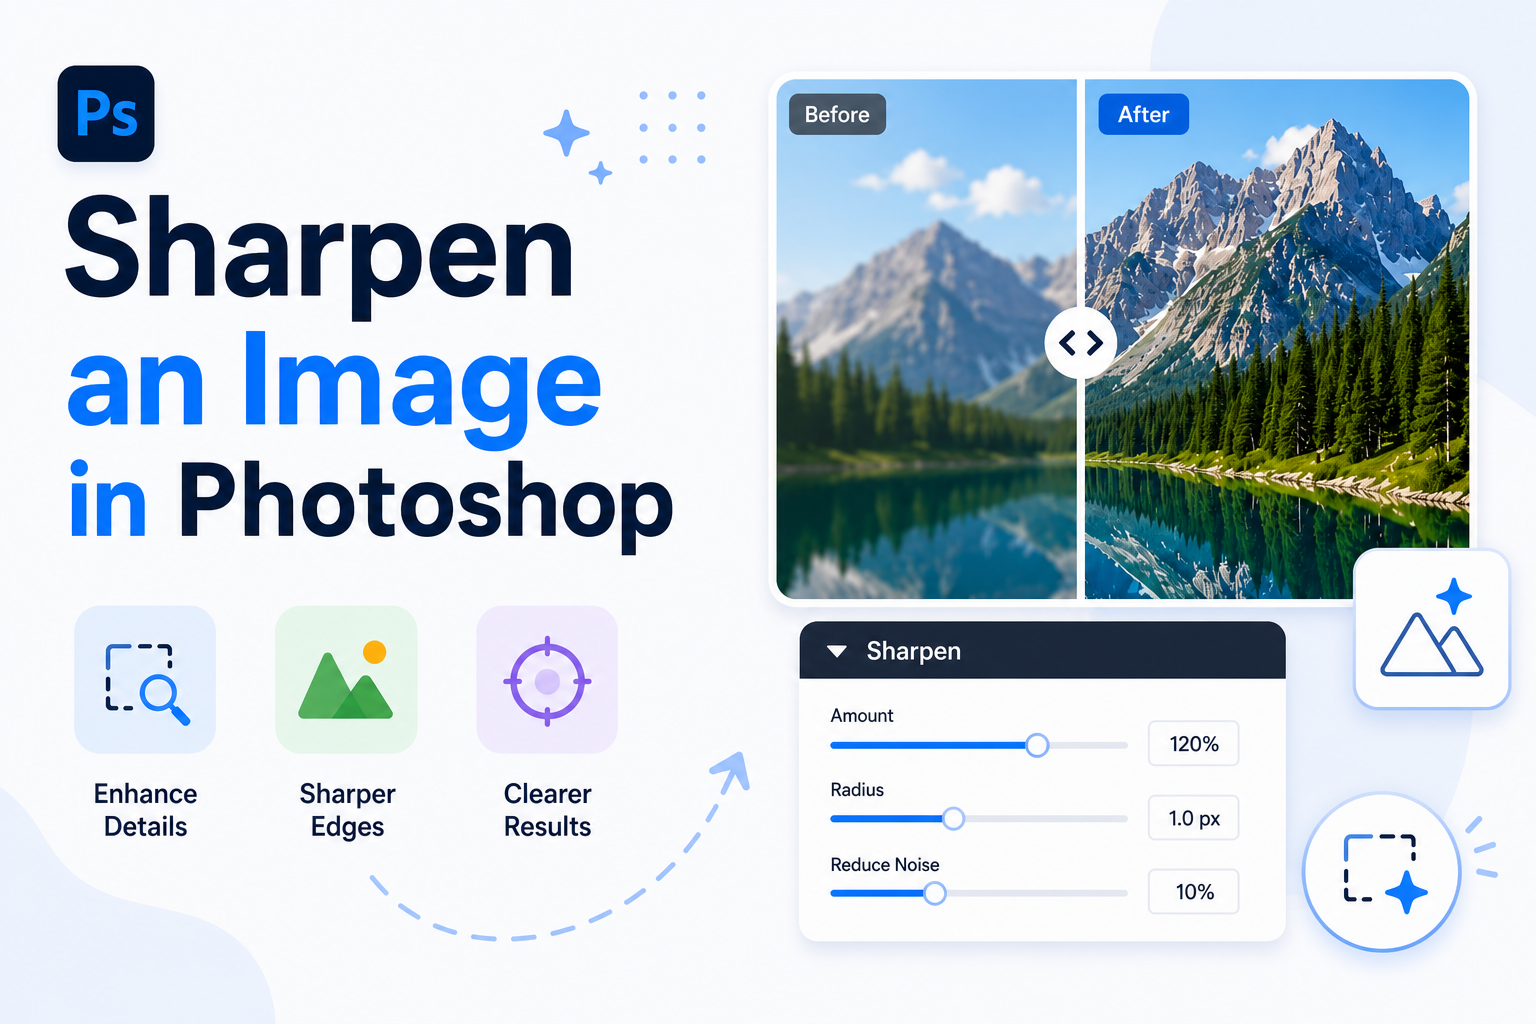
Sharpening can make a slightly soft photo appear cleaner and more defined by increasing contrast around existing edges. However, it cannot fully correct severe blur or recreate detail that was never captured. In this guide, you’ll learn how to sharpen images in Photoshop using Smart Sharpen and Unsharp Mask, including the key settings that help control noise and halos. You’ll also discover a faster online option for simple sharpening tasks.
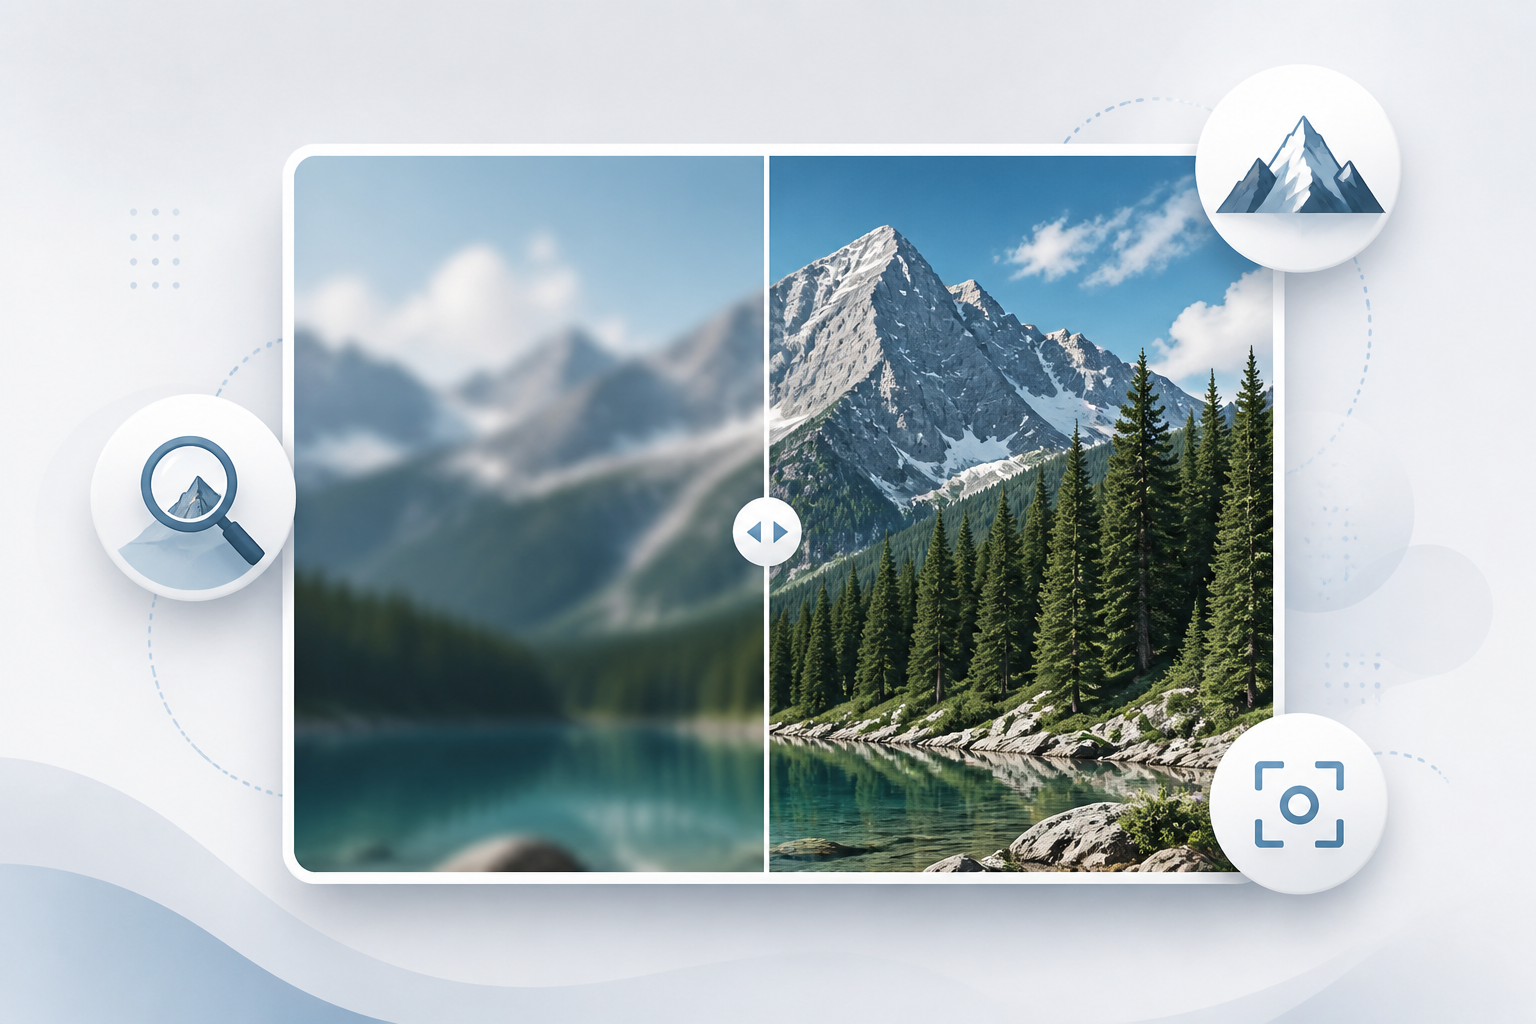
What Does Image Sharpening Actually Do?
Image sharpening increases local contrast along existing edges rather than adding detail. Lighter edge pixels turn lighter, and darker edge pixels turn darker. This wider contrast gap makes textures, outlines, and in-focus areas look clearer. However, higher edge contrast cannot fix severe motion blur, missed focus, pixelation, or low resolution.
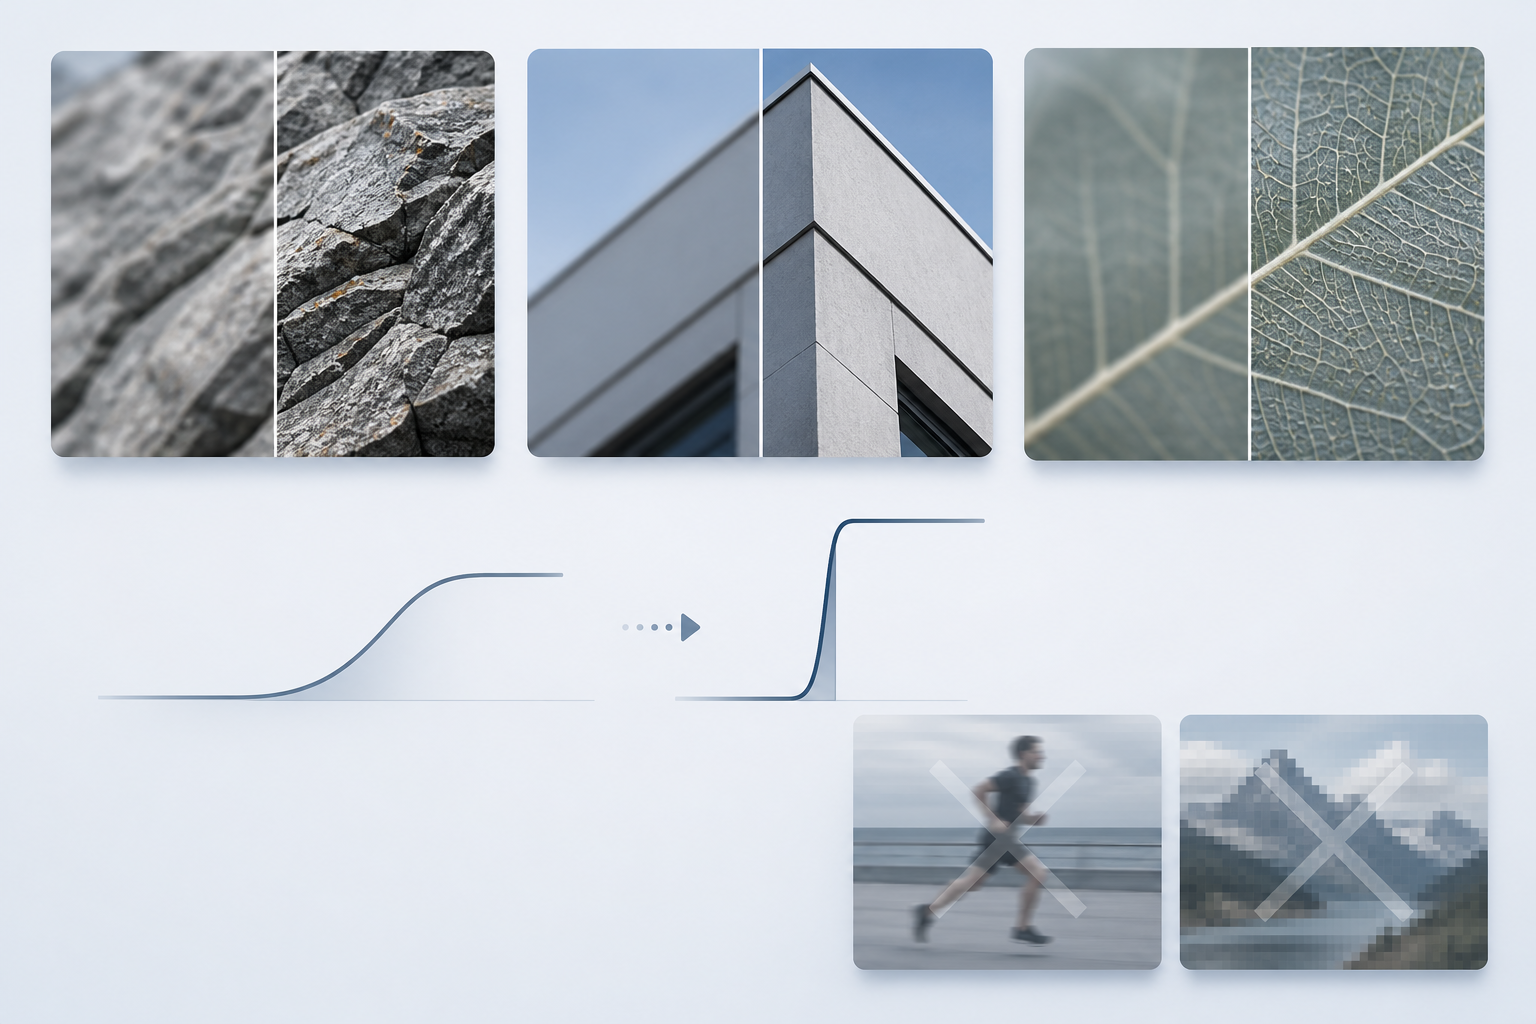
Inspect a file at 100% zoom before you sharpen a photo. This zoom level maps one image pixel directly to one screen pixel for an accurate preview. Other zoom levels distort the display and mislead choices as you make an image look sharper.
How to Sharpen an Image in Photoshop with Smart Sharpen
With expectations set and the view at 100%, Smart Sharpen is the method to reach for first. It controls sharpening strength, edge width, the noise sharpening amplifies, and the type of blur being corrected. Adobe's Smart Sharpen documentation covers every control below to sharpen an image in Photoshop:
Step 1: Prepare the Image/Layer
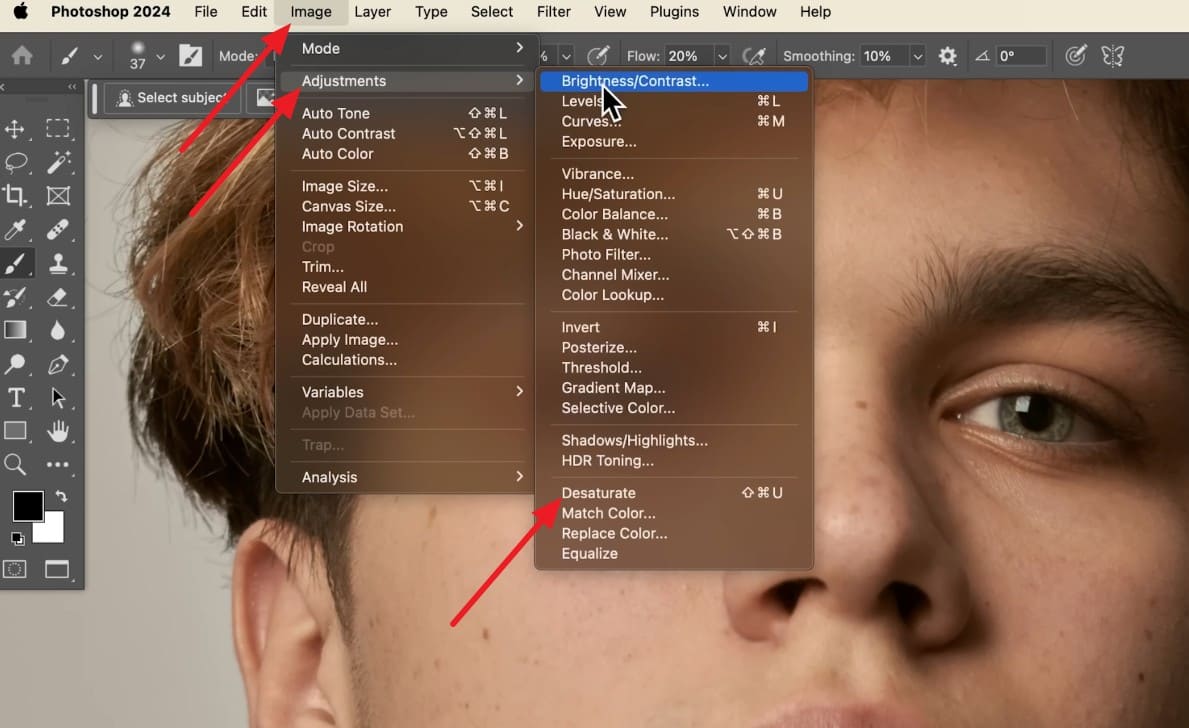
1. Right-click your image layer in the “Layers ” panel and press “ Ctrl + J ” on Windows and “ Cmd + J ” on Mac to duplicate the base image layer. After that, go to “ Image > Adjustments > Desaturate ” to remove colors from the layer.
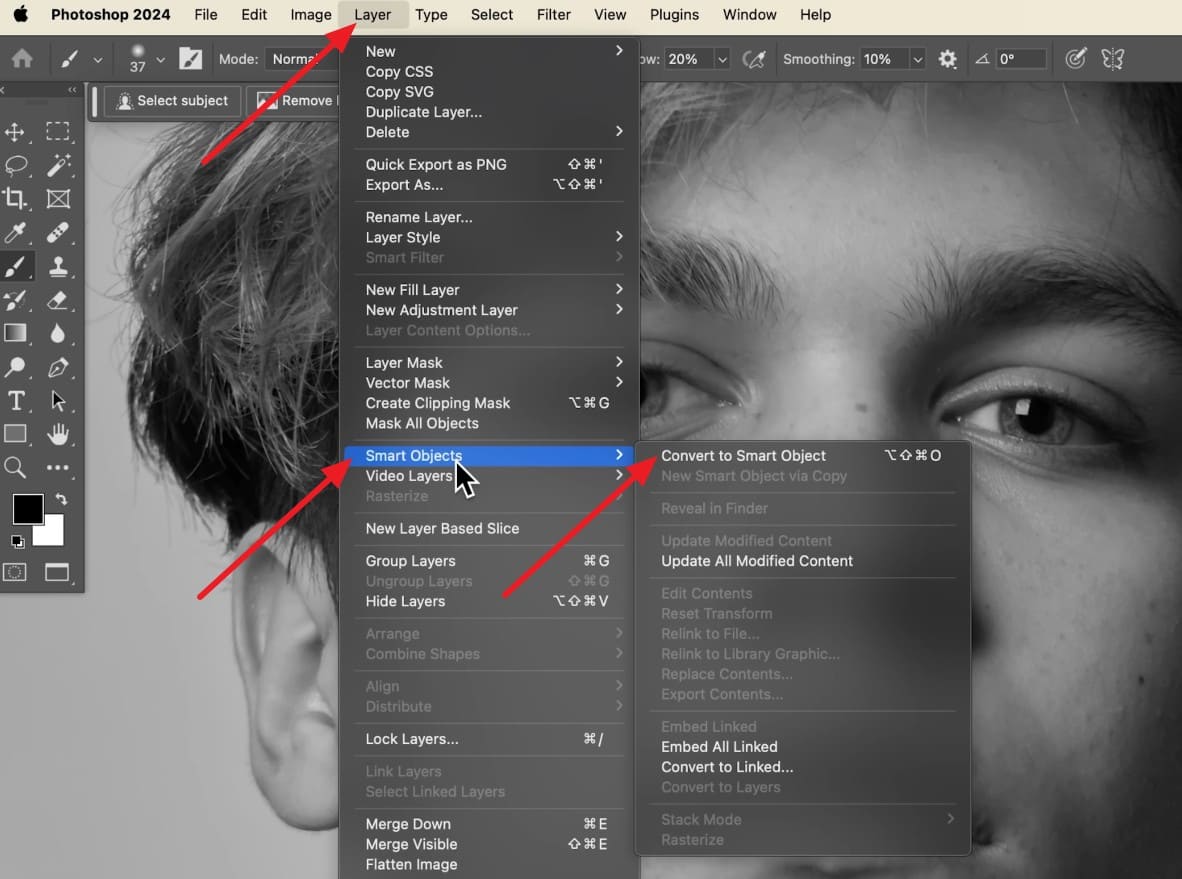
2. Tap on “Layer > Smart Objects ” and choose the “Convert to Smart Object ” option. This allows non-destructive edits and lets you adjust filter settings later.
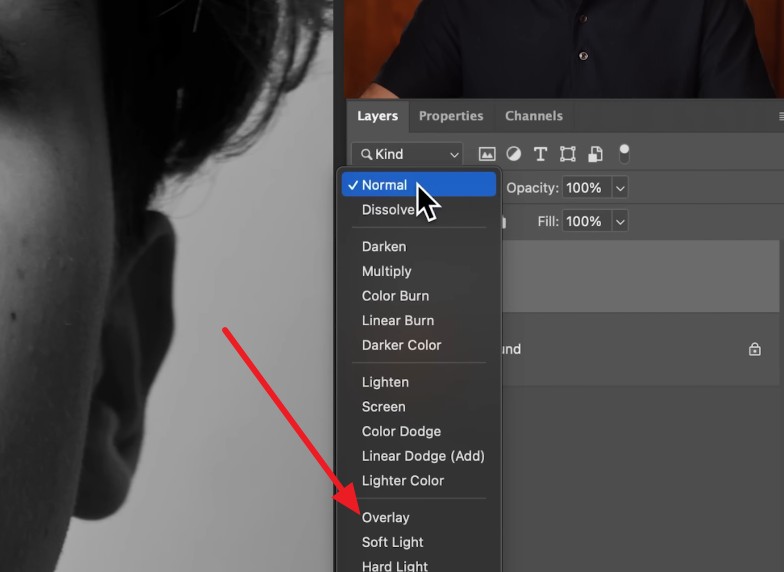
3. In the Layers panel, set the blend mode from “Normal ” to “ Overlay.”
Step 2: Open Smart Sharpen
1. Go to “Filter > Sharpen > Smart Sharpen.”
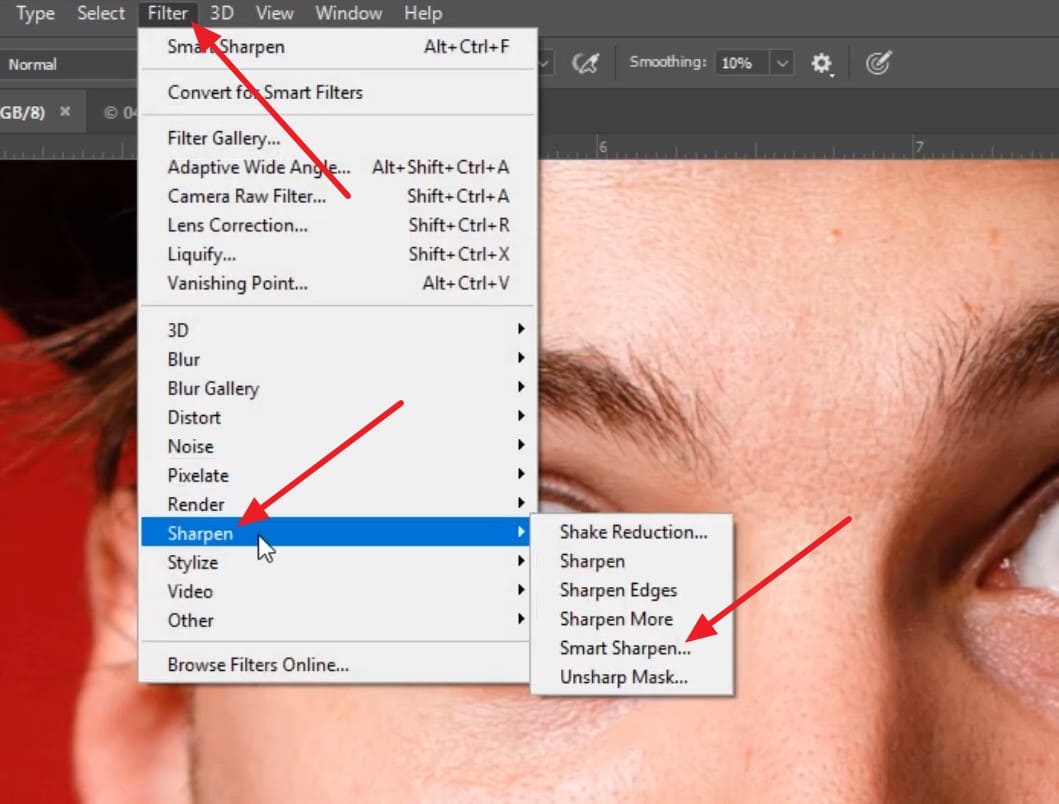
2. Choose the correct setting based on your image's specific issue.
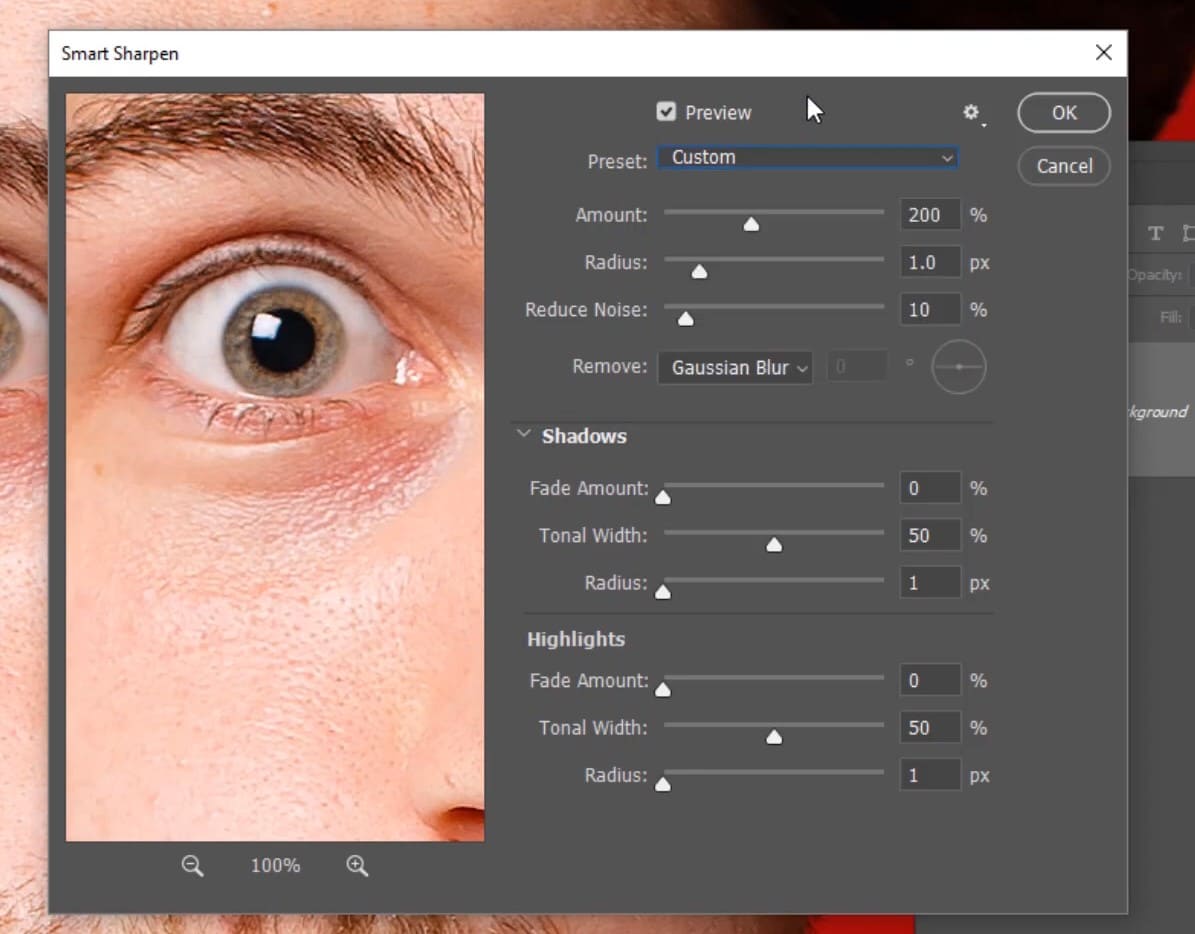
Smart Sharpen Settings
1. Amount: Controls the overall strength of sharpening by increasing contrast along detected edges.
2. Radius: Determines how wide the sharpening effect extends around edges. Lower values suit fine details, while higher values affect broader features.
3. Reduce Noise: Reduces unwanted image noise that may become more noticeable when sharpening is applied.
4. Remove: Selects the blur type Smart Sharpen should address:
- Gaussian Blur: Uses sharpening similar to the effect produced by Unsharp Mask.
- Lens Blur: Detects edges and details to sharpen them while helping reduce visible halos.
- Motion Blur: Reduces directional blur and lets you specify the motion angle.
5. Shadows / Highlights: Reduces sharpening in specific dark or bright tonal areas. Fade Amount controls how much sharpening is reduced, Tonal Width defines the tonal range affected, and Radius determines the surrounding area considered for the adjustment.
Step 3: Review and Apply the Effect
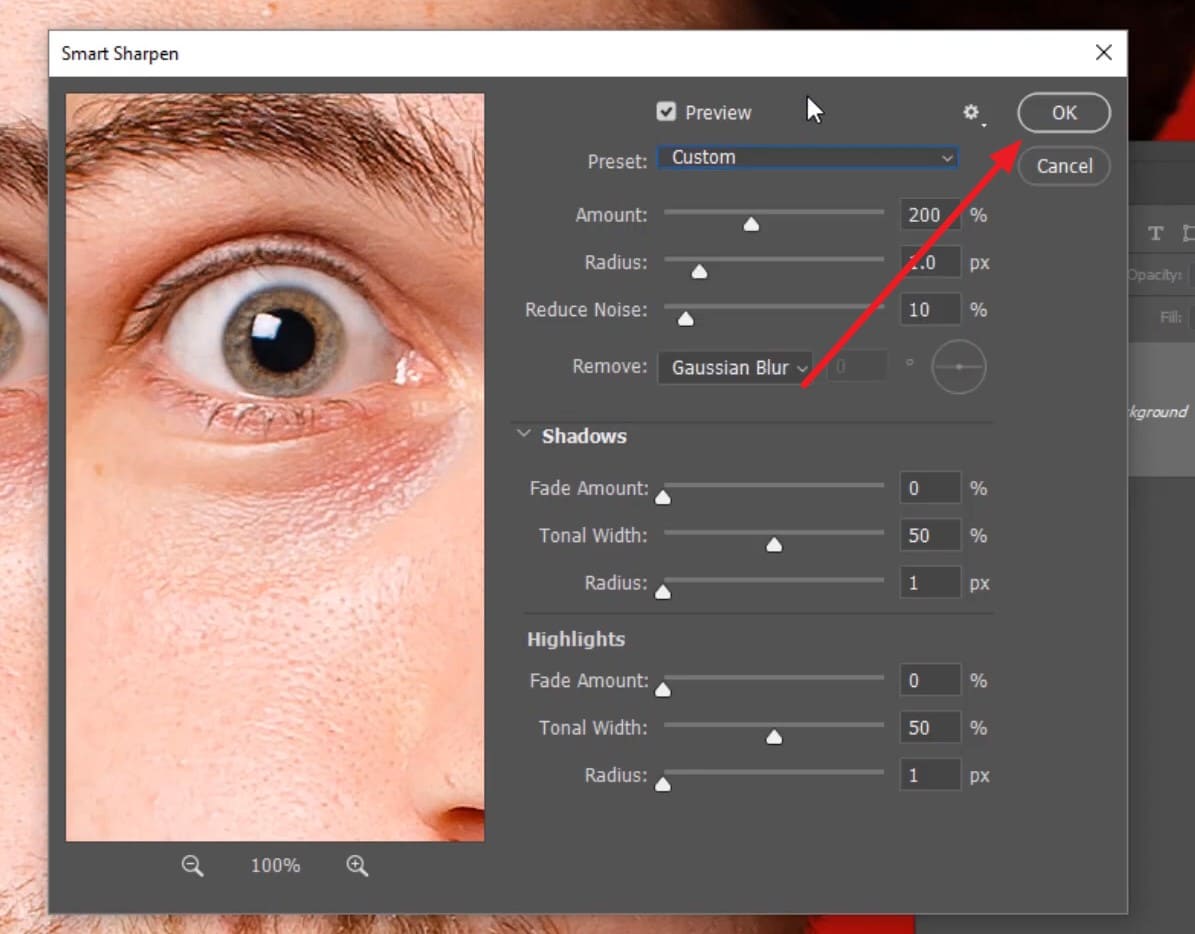
1. Test the different blur removal modes in the preview window to see which option reveals the best detail. Click “OK ” to apply Smart Sharpen to the entire duplicate layer.
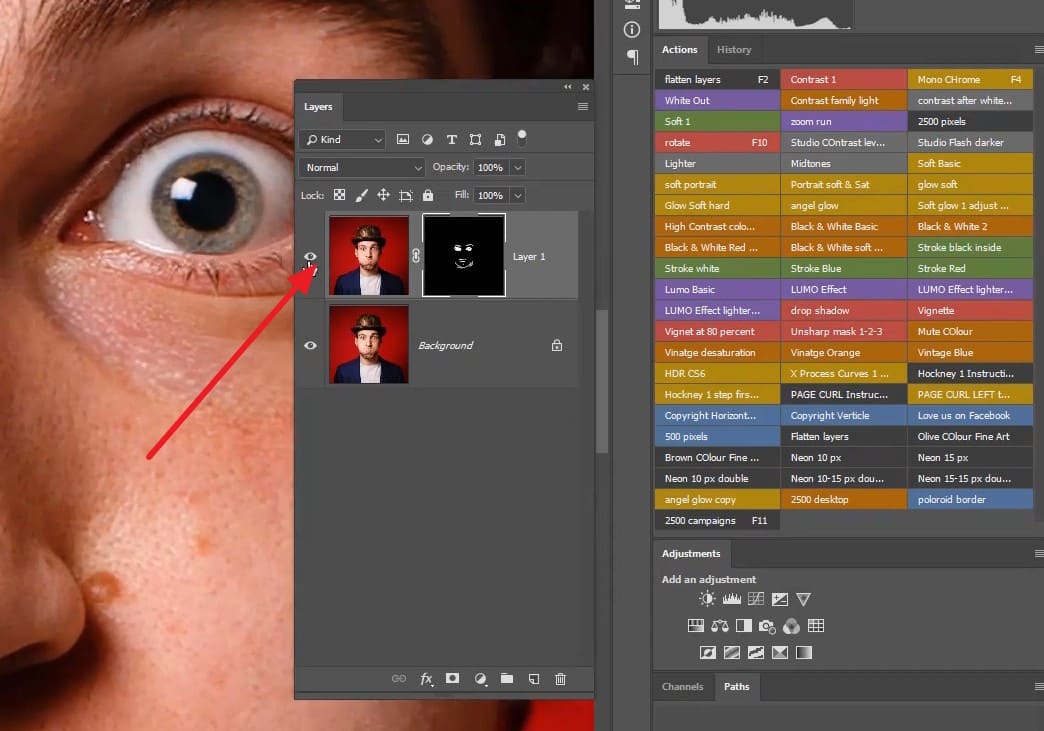
2. Toggle the layer mask or group “Eye ” icon on and off to confirm that key areas look crisp while skin texture remains smooth and natural.
How to Sharpen a Photo with Unsharp Mask
When you want something quicker, Unsharp Mask is Photoshop's traditional sharpening filter, and it works from 3 sliders instead of 7. Adobe's Unsharp Mask documentation gives the accepted range for each control. Review the following guide and learn how to sharpen an image in Photoshop with this tool:
1. Convert the layer to a Smart Object first, so the filter stays editable exactly as it does with Smart Sharpen.
2. Go to “ Filter > Sharpen > Unsharp Mask ” to open the dialog.
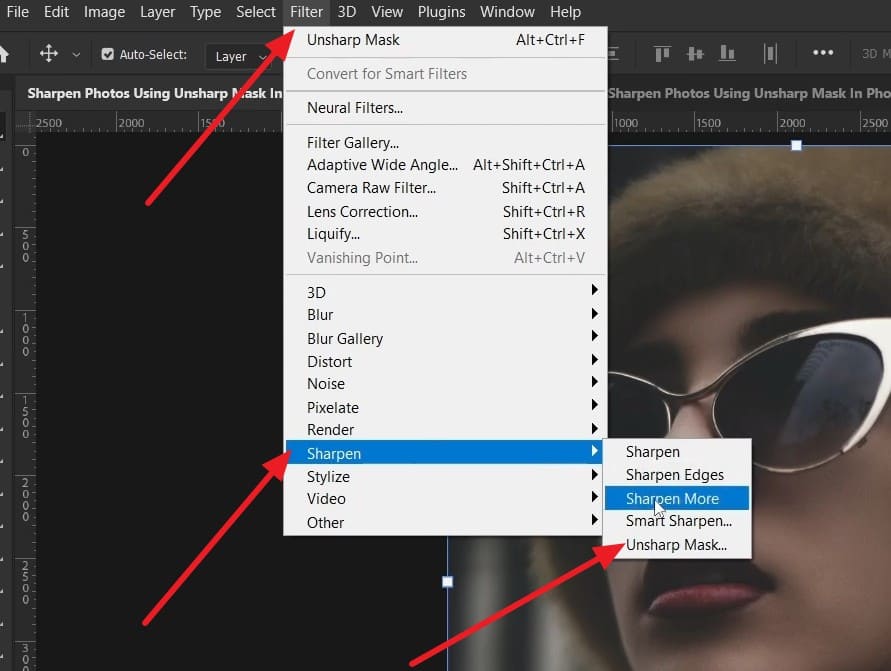
3. Set the “Unsharp Mask Settings ” accordingly:
- Amount (1%–500%): Controls overall edge contrast intensity.
- Radius (0.1–250 Pixels): Defines width around edges for contrast adjustment. Low values refine small details; high values affect broader outlines.
- Threshold (0–255 Levels): Sets minimum tonal difference required before edge contrast applies. Higher values protect smooth areas like skin tones.
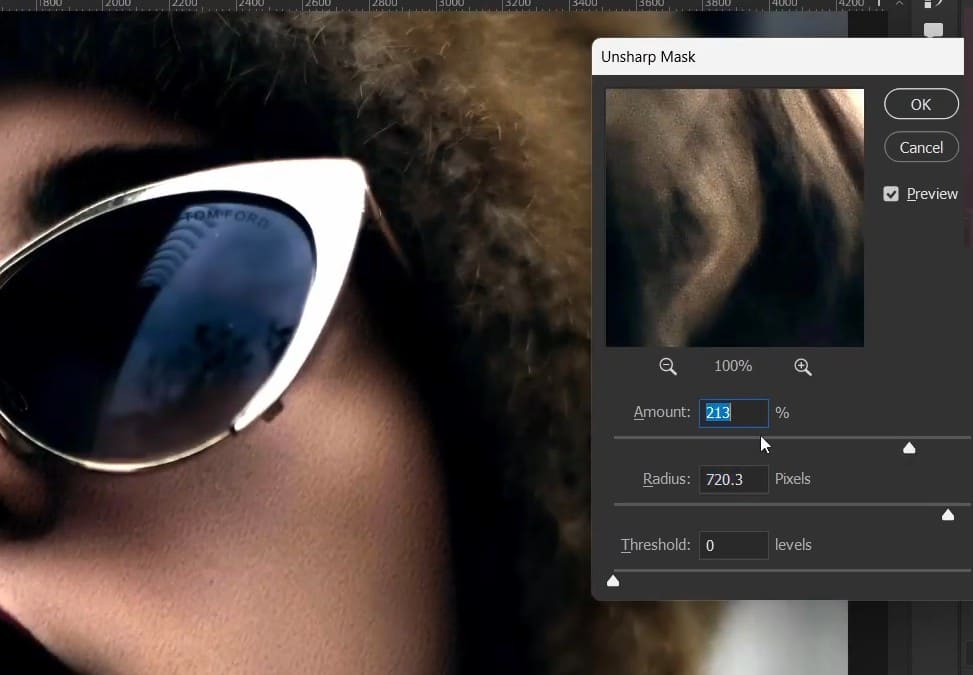
4. Toggle the “Preview” checkbox on and off inside the dialog box to check before-and-after differences. Click “Ok” once edge clarity improves without visible artifacts.
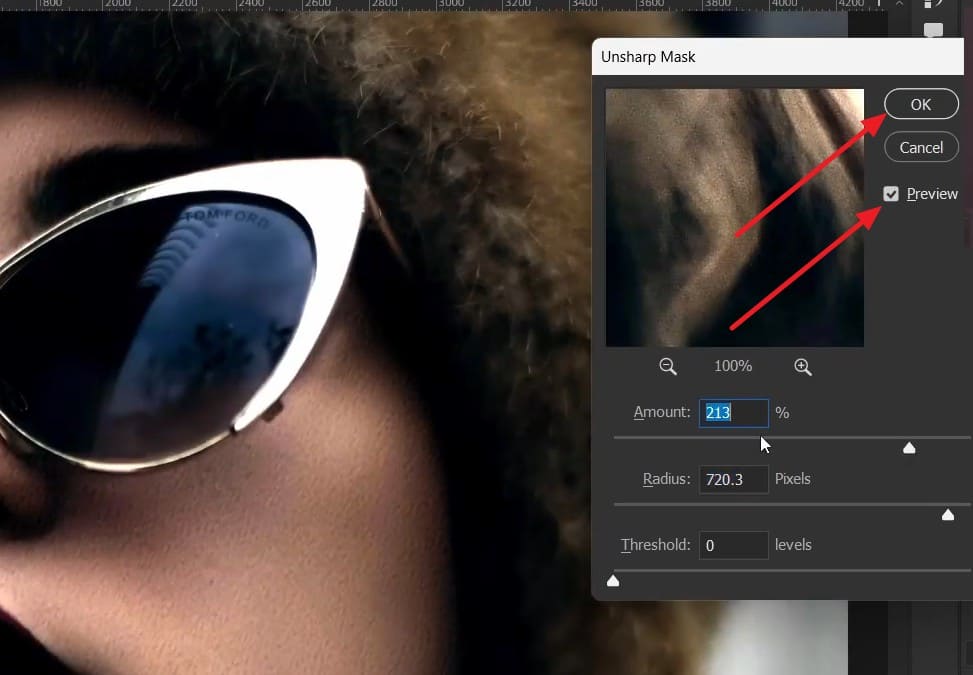
Note: Threshold protects smooth zones and digital noise from unwanted contrast. At zero, the filter sharpens every pixel, which ruins skin tones and flat areas. Set Threshold above zero on portraits or high-ISO files to target main outlines alone.
Smart Sharpen vs Unsharp Mask: Which Should You Use?
Compare both filters in the provided table to know what to pick to sharpen an image in Photoshop:
|
Comparison |
Smart Sharpen |
Unsharp Mask |
|---|---|---|
|
Control Level |
Amount, Radius, Reduce Noise, Remove, plus separate Shadow and Highlight controls |
Amount, Radius, and Threshold |
|
Best Suited To |
Images needing noise control, halo management, or sharpening for a specific blur type |
Clean images that need quick, straightforward sharpening |
|
Learning Curve |
More controls to understand and balance for the desired result |
Three main controls, making it simpler to learn |
|
Main Limitation |
More settings can make over-sharpening easier if they are pushed too far |
No built-in noise reduction or blur-type selection |
Verdict: Neither is the better filter in every situation. Smart Sharpen handles files with heavy noise, edge halos, or specific blur types. Unsharp Mask delivers quick, predictable results on clean files.
A Faster Online Alternative to Photoshop
Manual controls let you sharpen an image in Photoshop with precise adjustments for edges, noise, and halos. For a faster approach, Designkit Image Sharpener automates much of the process. After uploading an image, you can choose HD or Ultra HD enhancement and select a scene option such as Product, Portrait, or Text. The editor also provides tools for retouching, resizing, background removal or generation, object erasing, and image extension.
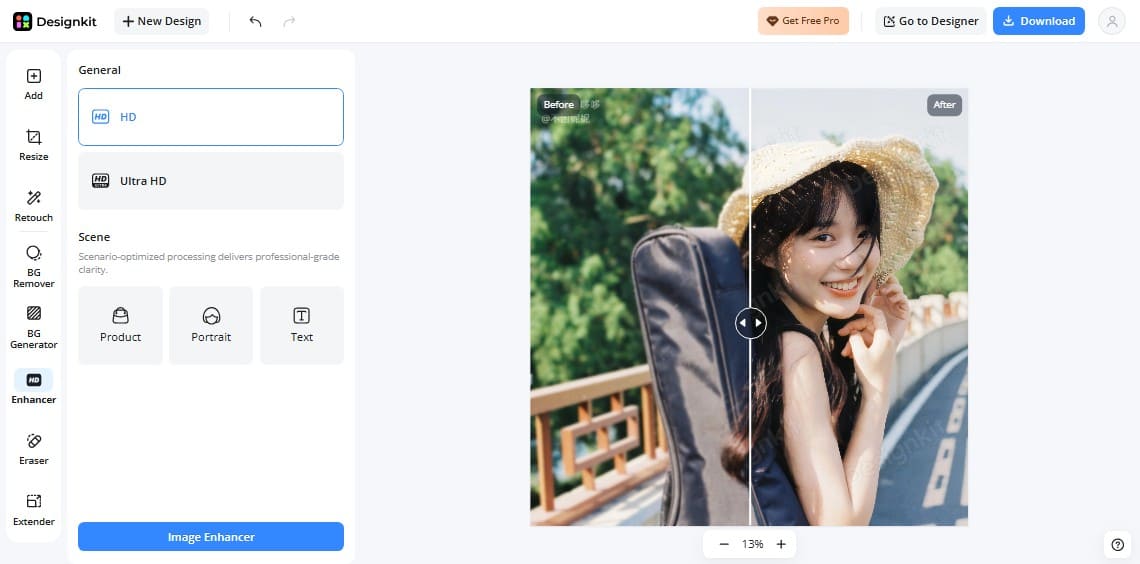
Check the result at full size to judge the sharpening accurately. Designkit provides a simpler automated workflow, while Photoshop gives you more detailed manual control over sharpening. For example, Photoshop lets you adjust settings such as Radius and tonal controls that are not exposed in Designkit’s enhancement workflow. Neither approach can reliably recover every original detail from a severely blurred source.
Common Mistakes When Sharpening an Image
When you sharpen an image, try to avoid these 7 image sharpening mistakes for best results:
|
Mistake |
Why It Affects Image Quality |
Better Approach |
|---|---|---|
|
Judging at the Wrong Zoom |
Fit-to-screen views can hide or exaggerate sharpening artifacts. |
Check important details at 100% zoom. |
|
Using Too Much Amount |
Creates harsh, unnatural-looking edges and excessive contrast. |
Increase Amount only until edges look clean and defined. |
|
Ignoring Edge Halos |
Light or dark outlines around edges indicate excessive sharpening. |
Reduce Amount or Radius until visible halos disappear. |
|
Sharpening Noise |
Grain and compression artifacts become more noticeable in smooth areas. |
Use Reduce Noise or Threshold to protect smoother areas. |
|
Trying to Fix Severe Blur |
Sharpening enhances existing edges but cannot recreate genuinely missing detail. |
Use sharpening for mild softness, not severe blur correction. |
|
Sharpening Destructively |
Applying filters directly limits your ability to revise settings later. |
Convert the layer to a Smart Object before sharpening. |
|
Reusing the Same Settings |
Suitable sharpening varies with subject, image size, detail, and final output. |
Adjust sharpening for each image and its final output size. |
Conclusion
Smart Sharpen is the ideal method for images where noise, halos, or specific blur types need precise control. Unsharp Mask covers quicker edits on clean files. When manual sliders demand too much effort, Designkit Image Sharpener serves as a fast browser-based option.
Always evaluate source details before you sharpen an image in Photoshop. Edge contrast enhances existing lines, but it cannot restore lost details. Start with a clear file and treat these tools as finishing adjustments rather than severe blur repairs.
Frequently Asked Questions
Does sharpening an image increase its resolution?
What is the best way to sharpen an image in Photoshop?
Smart Sharpen applied to a Smart Object suits most situations, because it offers noise control, edge-aware sharpening, and settings you can revise later. Unsharp Mask remains a sound choice on clean images. Neither has one correct set of values, since the right numbers depend on subject and output.
What is the difference between Smart Sharpen and Unsharp Mask?
Smart Sharpen offers Amount, Radius, Reduce Noise, a blur-type selector, and separate shadow and highlight controls. Unsharp Mask offers Amount, Radius, and Threshold. Smart Sharpen can detect edges and produce fewer halos, while Unsharp Mask trades that control for a faster, simpler dialog.
Why does my image look noisy after sharpening?
Sharpening amplifies whatever variation already exists, including sensor noise and compression artifacts. Flat areas show it first. Raise Reduce Noise in Smart Sharpen, or raise Threshold in Unsharp Mask to exclude smooth regions. Lowering the overall Amount usually settles the rest.
Can Photoshop sharpen a very blurry image?
Only to a limited degree. Sharpening emphasizes detail that survived in the file, so it cannot restore what was never recorded. A slightly soft photo will improve noticeably. Heavy motion blur or a badly missed focus point will usually just look harsher rather than clearer.
Should I sharpen an image before or after resizing it?
Sharpen after resizing because sharpening depends on the final image dimensions. Resizing after sharpening can change how crisp or pronounced the effect appears. For best results, resize first, then apply final sharpening based on the intended output size before exporting.
You May Also Like

7 Best Remove.bg Alternatives in 2026: Free & Paid Tools

Instagram Carousel: What It Is, How to Post & Create One

Nano Banana Prompts: 20+ Examples for Better AI Images

Ideogram AI Review 2026: Features, Pricing & Alternatives

Free Mac Photo Editor: 5 Tools Compared for Mac Users

How to Crop a Photo Into a Circle Online (Keep Quality)

How to Make an Image Transparent Online (AI Guide)

Pixlr Background Remover Review 2026: Features, Pricing & Alternatives

How to Fix Overexposed Photos: Recover Highlights Fast

OpenArt AI Review 2026: Features, Pricing & Alternatives

Best AI Headshot Generator: 9 Tools Compared for 2026

Best Stencil Maker Tools 2026: Turn Photos Into Stencils

Pixelbin Watermark Remover Review: Image & Video Results Tested

How to Make a Sticker on iPhone: Easy Step by Step Guide

Best AI Logo Generator in 2026: 10 Tools Compared

How to Turn a Photo Into a Cartoon: A Beginner-Friendly Guide

Landscape vs Portrait: Key Differences & Best Uses in 2026

How to Remove Watermark From Photo: AI, Photoshop & More

How to Fix Pixelated Photos: Photoshop, AI Tools & Tips

Bing Image Creator: How It Works, Features, Uses & Alternatives

How to Remove People from Photos with AI: A Step-by-Step Guide

How to Increase Image Resolution: AI, Photoshop & PPI

How to Add Text to a Photo: 8 Tips for Better Results

How to Fix Grainy Photos: Easy Ways to Clear Images

Creative Profile Picture Ideas for Every Style and Platform

Evoto AI Review 2026: Features, Pricing, Pros & Cons

Pixlr Photo Editor Review: Features, Pricing & Alternatives

Best AI Image Extender Tools in 2026: Expand Photos with AI

How to Make a Collage on iPhone: Easy Guide for 2026

How to Sharpen an Image in Photoshop (Smart Sharpen and Unsharp Mask)

Best Image Background Remover Tools in 2026: AI Tools Compared

How to Make Transparent Background in Paint: Step-by-Step Guide

How to Resize an Image: Best Methods, Tools & Quality Tips

Best AI Image Generator Tools in 2026: Top AI Platforms Compared

Remove.bg Review 2026: Features, Pricing & Is It Worth It?

Luminar Neo Photo Editor Review 2026: AI Features, Price & Pros

How to Post Multiple Photos on Instagram (2026 Guide)

25 Facebook Cover Photo Ideas for Personal & Business Pages

What Is a PFP? Meaning, Examples & How to Create One

Can You Edit an Instagram Post After Posting?

11 Best Canva Alternatives in 2026 for AI Design & Marketing

8 Best Midjourney Alternatives in 2026: Features, Pricing & Comparison

How to Restore Old Photos: AI Tools, Tips & Best Methods

Pixelcut AI Review 2026: Features, Pricing, Pros, Cons & Alternatives

How to Apply Watermark to Photos: Methods, Tips & AI Tools

How to Remove a Background in Illustrator: 4 Easy Methods

How to Change Background Color on Instagram Story (Easy Guide)

8 Best AI Poster Generators in 2026: Create Posters Faster with AI

10 Best AI Image Enhancers in 2026: Tested & Compared

10 Best AI Image Editors in 2026: Features, Pricing & Comparison

7 Best AI Background Changer in 2026: Remove & Replace Photo Backgrounds

Luminar Neo vs Lightroom: Features, Pricing & Comparison 2026

Kittl Review 2026: Is It Worth It? Features & Pricing

How to Make a Blurry Image Clear: 5 AI & Manual Ways

How to Remove Background on iPhone: 5 Easy Methods (2026)

Photoroom Background Remover Review 2026: Features & Alternatives

How to Remove Background in Canva: A Step-by-Step Guide

How to Remove Background in GIMP: Beginner-Friendly Guide

Funny Dog Memes to Try: Doge Meaning and 10 Original Ideas

Back to School Checklist 2026: Supplies, Timeline, and Planning

Recraft AI Review 2026: Features, Pricing, Pros, Cons & Alternatives

How to Make an Image Transparent in Google Slides: Opacity & Background Removal

VanceAI Photo Enhancer Review: Features, Pricing & Alternatives in 2026

What Does Emojify Mean? Text, Photos, & Emoji Art Explained

Top 8 Online Background Removers for Ecommerce Photos (2026)

How to Remove Background in Photoshop: 7 Easy Methods

6 Best AI Image Upscalers 2026: Tools Tested & Compared

Project Indigo Review: Is It Better Than iPhone Camera?

How Big Is an 8x10 Photo? Size, Pixels & Frame Guide

How Big Is a 4x6 Photo? Dimensions, Pixels & Printing Tips

Picsart AI Review: Features, Pricing, Pros, Cons & Alternatives

Lovart AI Review: AI Design Agent Features, Pricing & Alternatives

Fotor AI Image Generator Review: Features, Pricing & Alternatives

How to Add Emoji to Photo Online for Free

Emoji Wallpaper Ideas & How to Make One Online (2026)

Minimalist Poster Design: How to Make a Clean Poster (2026)

How to Make a Custom Poster That Is Ready to Print

Instagram Image Size Guide 2026: Post, Reel, Story & Carousel Specs

LinkedIn Image Size Guide: Profile, Post & Banner Dimensions

YouTube Profile Image Size: Best Dimensions & Safe Area 2026

How to Edit Amazon Product Photos That Boost Sales Fast
Sharpen Your Image Without Manual Sliders
Upload your image to Designkit for automatic enhancement, then choose HD or Ultra HD and a scene mode suited to your photo.
