
How to Make a Transparent Background in Paint: Complete Guide
Create transparent backgrounds in Paint with simple step-by-step methods. Learn how to remove backgrounds, save PNG files, and use AI for faster results.

Microsoft Paint is one of the most accessible image editors that Windows has to offer, but creating a truly transparent background can be confusing. Classic MS Paint has limited support for transparency. Newer versions like Windows Paint and Paint 3D have better background removal support.
Learn how to make a background transparent in Paint and remove unwanted parts. Save images as transparent PNG files and find faster AI options when Paint doesn't produce clean results.
Can Paint Make Backgrounds Transparent?
Whether you can create a transparent image depends on the version of Paint installed on your computer. Windows Paint (latest version) has an automatic background remover feature, but classic MS Paint mainly supports transparent selections (not true background transparency). Knowing the differences can help you select the right workflow for your project.
|
Tool |
Transparent Background Support |
Best For |
|---|---|---|
|
Classic MS Paint |
Limited |
Simple transparent selections |
|
Windows Paint |
Yes |
Automatic background removal |
|
Paint 3D |
Yes |
Object cutouts and PNG export |
|
AI Background Remover |
Yes |
Fast and accurate results |
Transparent Selection vs True Transparency
Many people confuse the MS Paint transparent background and Transparent Selection, but they are two different things. Transparent Selection does not delete a selected background color; it simply hides it when you copy or move an object. Real transparency is to take out the background and leave transparent pixels. To make a transparent background in Paint, remember to save the image as a PNG file, because JPEG and BMP files do not support transparent areas.
How to Make a Transparent Background in Paint
There are several ways to make a background transparent in Paint, depending on the version you use. The following methods explain how to remove backgrounds using Windows Paint, classic MS Paint, and Paint 3D, so you can choose the one that best matches your image.
Method 1: Use Background Removal in Windows Paint
The latest Windows Paint includes an automatic background removal tool that detects the main subject and removes the surrounding background with a single click. It is the easiest method for users searching for Windows Paint transparent background solutions.
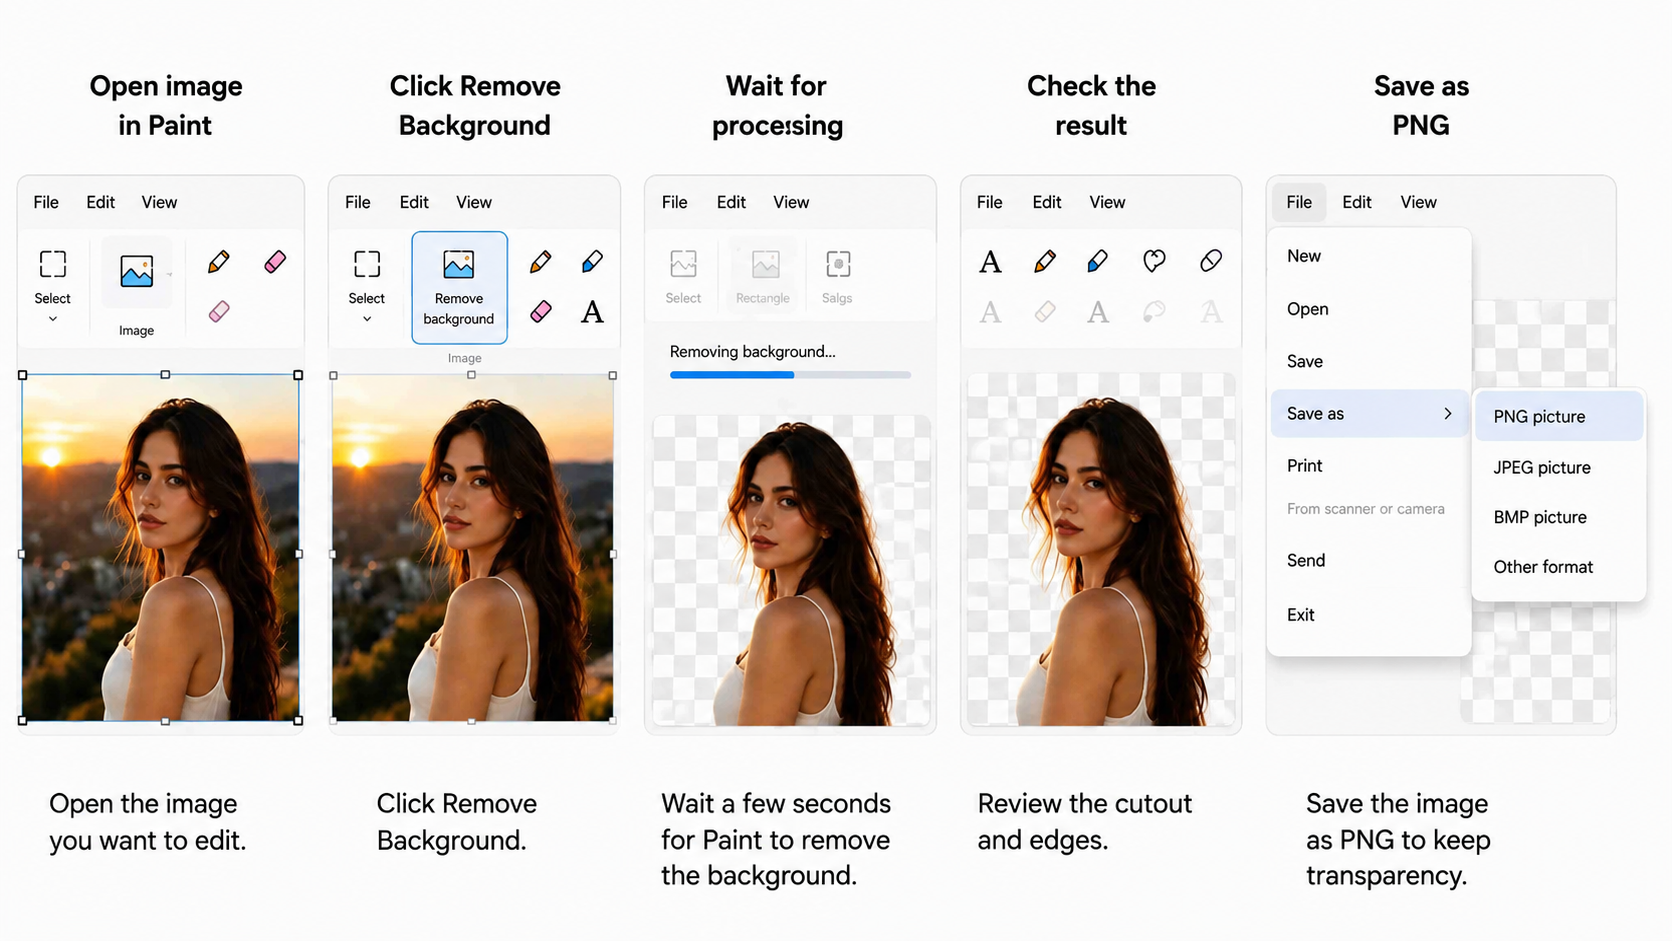
Step 1: Open Your Image in Windows Paint
Launch the updated Paint application and open the image whose background you want to remove. Images with clear contrast between the subject and background usually produce the best results.
Step 2: Click Remove Background
Locate the Remove Background button in the toolbar and select it. Paint will begin analyzing the image automatically.
Step 3: Review the Cutout
Inspect the cutout carefully to ensure important details remain intact. If necessary, make small adjustments before exporting the image.
Step 4: Save the Image as PNG
Choose File > Save As > PNG. Saving as PNG preserves transparency, while other formats may replace the transparent area with a solid color.
This method works particularly well for product images, portraits, simple objects, and social media graphics because the AI can easily distinguish the main subject from a clean background.
Method 2: Use Transparent Selection in Classic MS Paint
If you're using an older version of Paint, you can still make the background transparent in Paint by using Transparent Selection. Although this method does not completely erase backgrounds, it works reasonably well for simple graphics with solid colors.
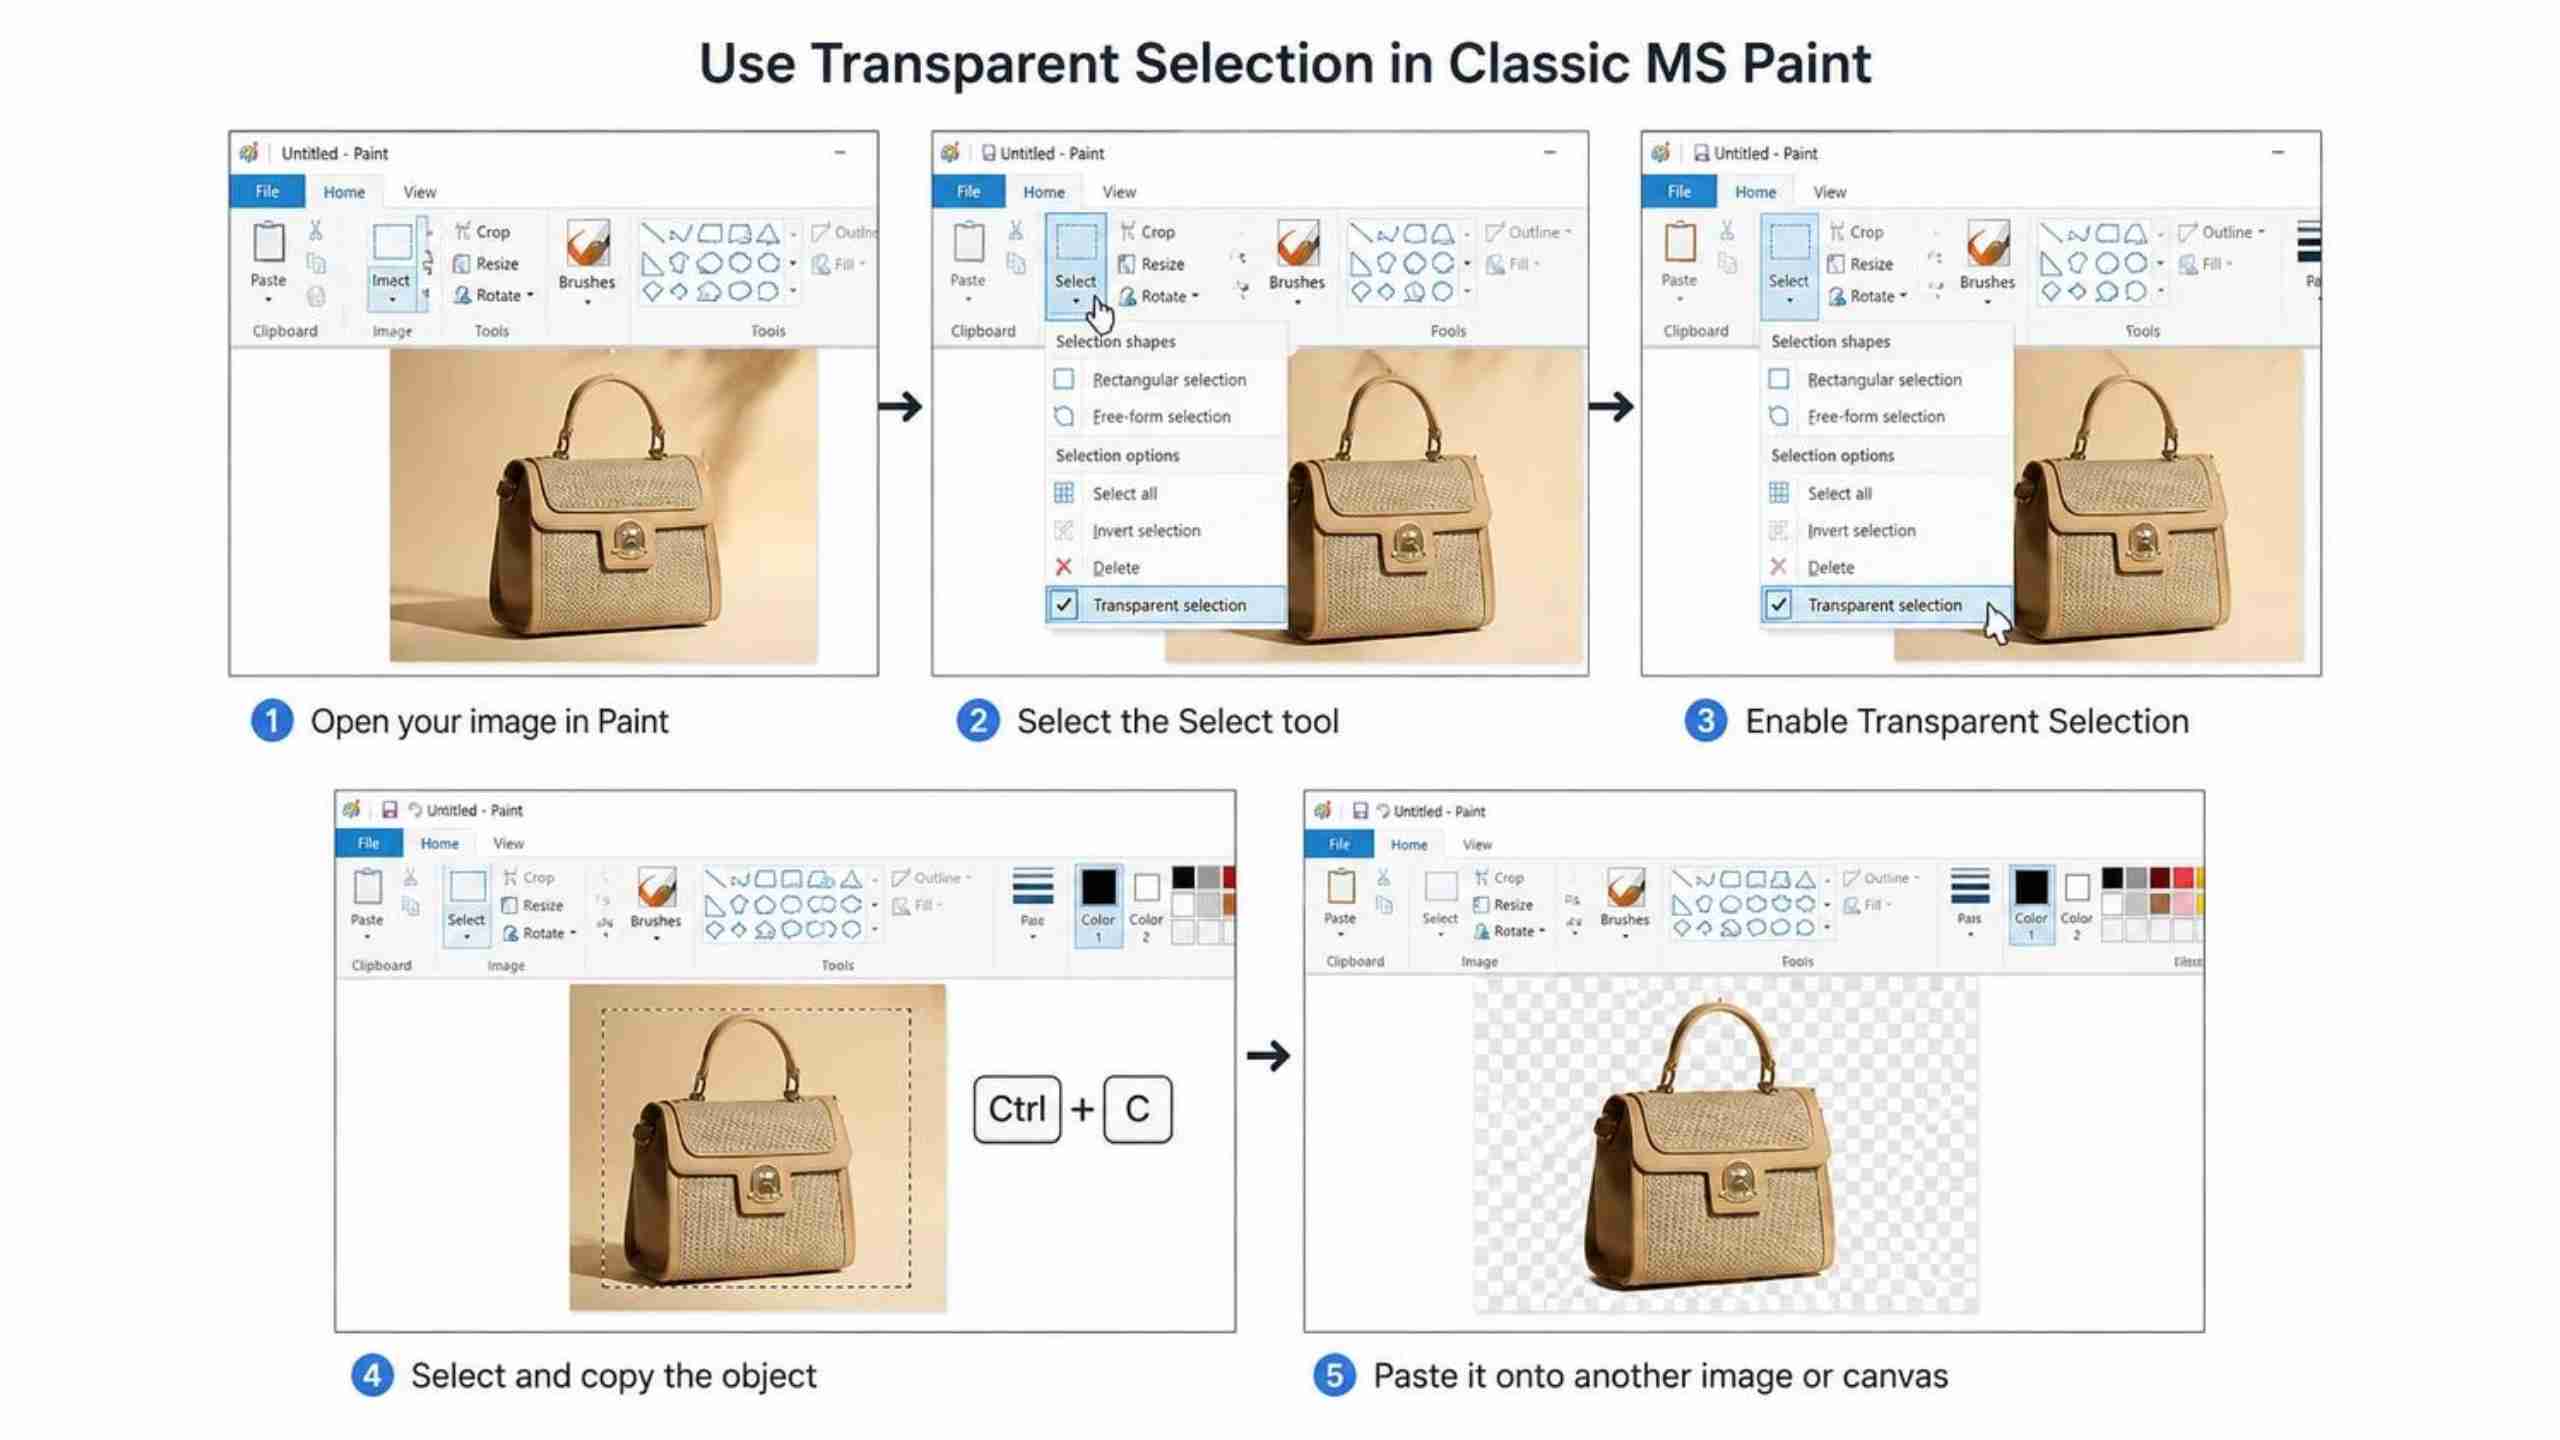
Step 1: Select the Select Tool
Click Select from the Home tab to access the available selection options.
Step 2: Enable Transparent Selection
Open the Select menu and choose Transparent Selection. This tells Paint to ignore the selected background color while copying the object.
Step 3: Select and Copy the Object
Carefully drag the selection box around your subject and copy it using the standard copy command.
Step 4: Save as PNG
Export the final image as a PNG if you want to retain as much transparency as possible during future edits.
This is a common way for people to search for how to make the background transparent in Paint. It works best with simple backgrounds, clear edges around the subject, and good color contrast. However, if you're trying to remove the background with Paint for detailed photos of hair, fur, shadows, or busy backgrounds, the results may not be as clean and often need additional editing.
Method 3: Create a Transparent Background in Paint 3D
With more advanced editing features than classic Paint, Paint 3D is a practical choice if you need cleaner cutouts. Its Magic Select tool automatically detects the main subject, so it's easier to learn how to make a background image transparent without having to trace each and every edge by hand.
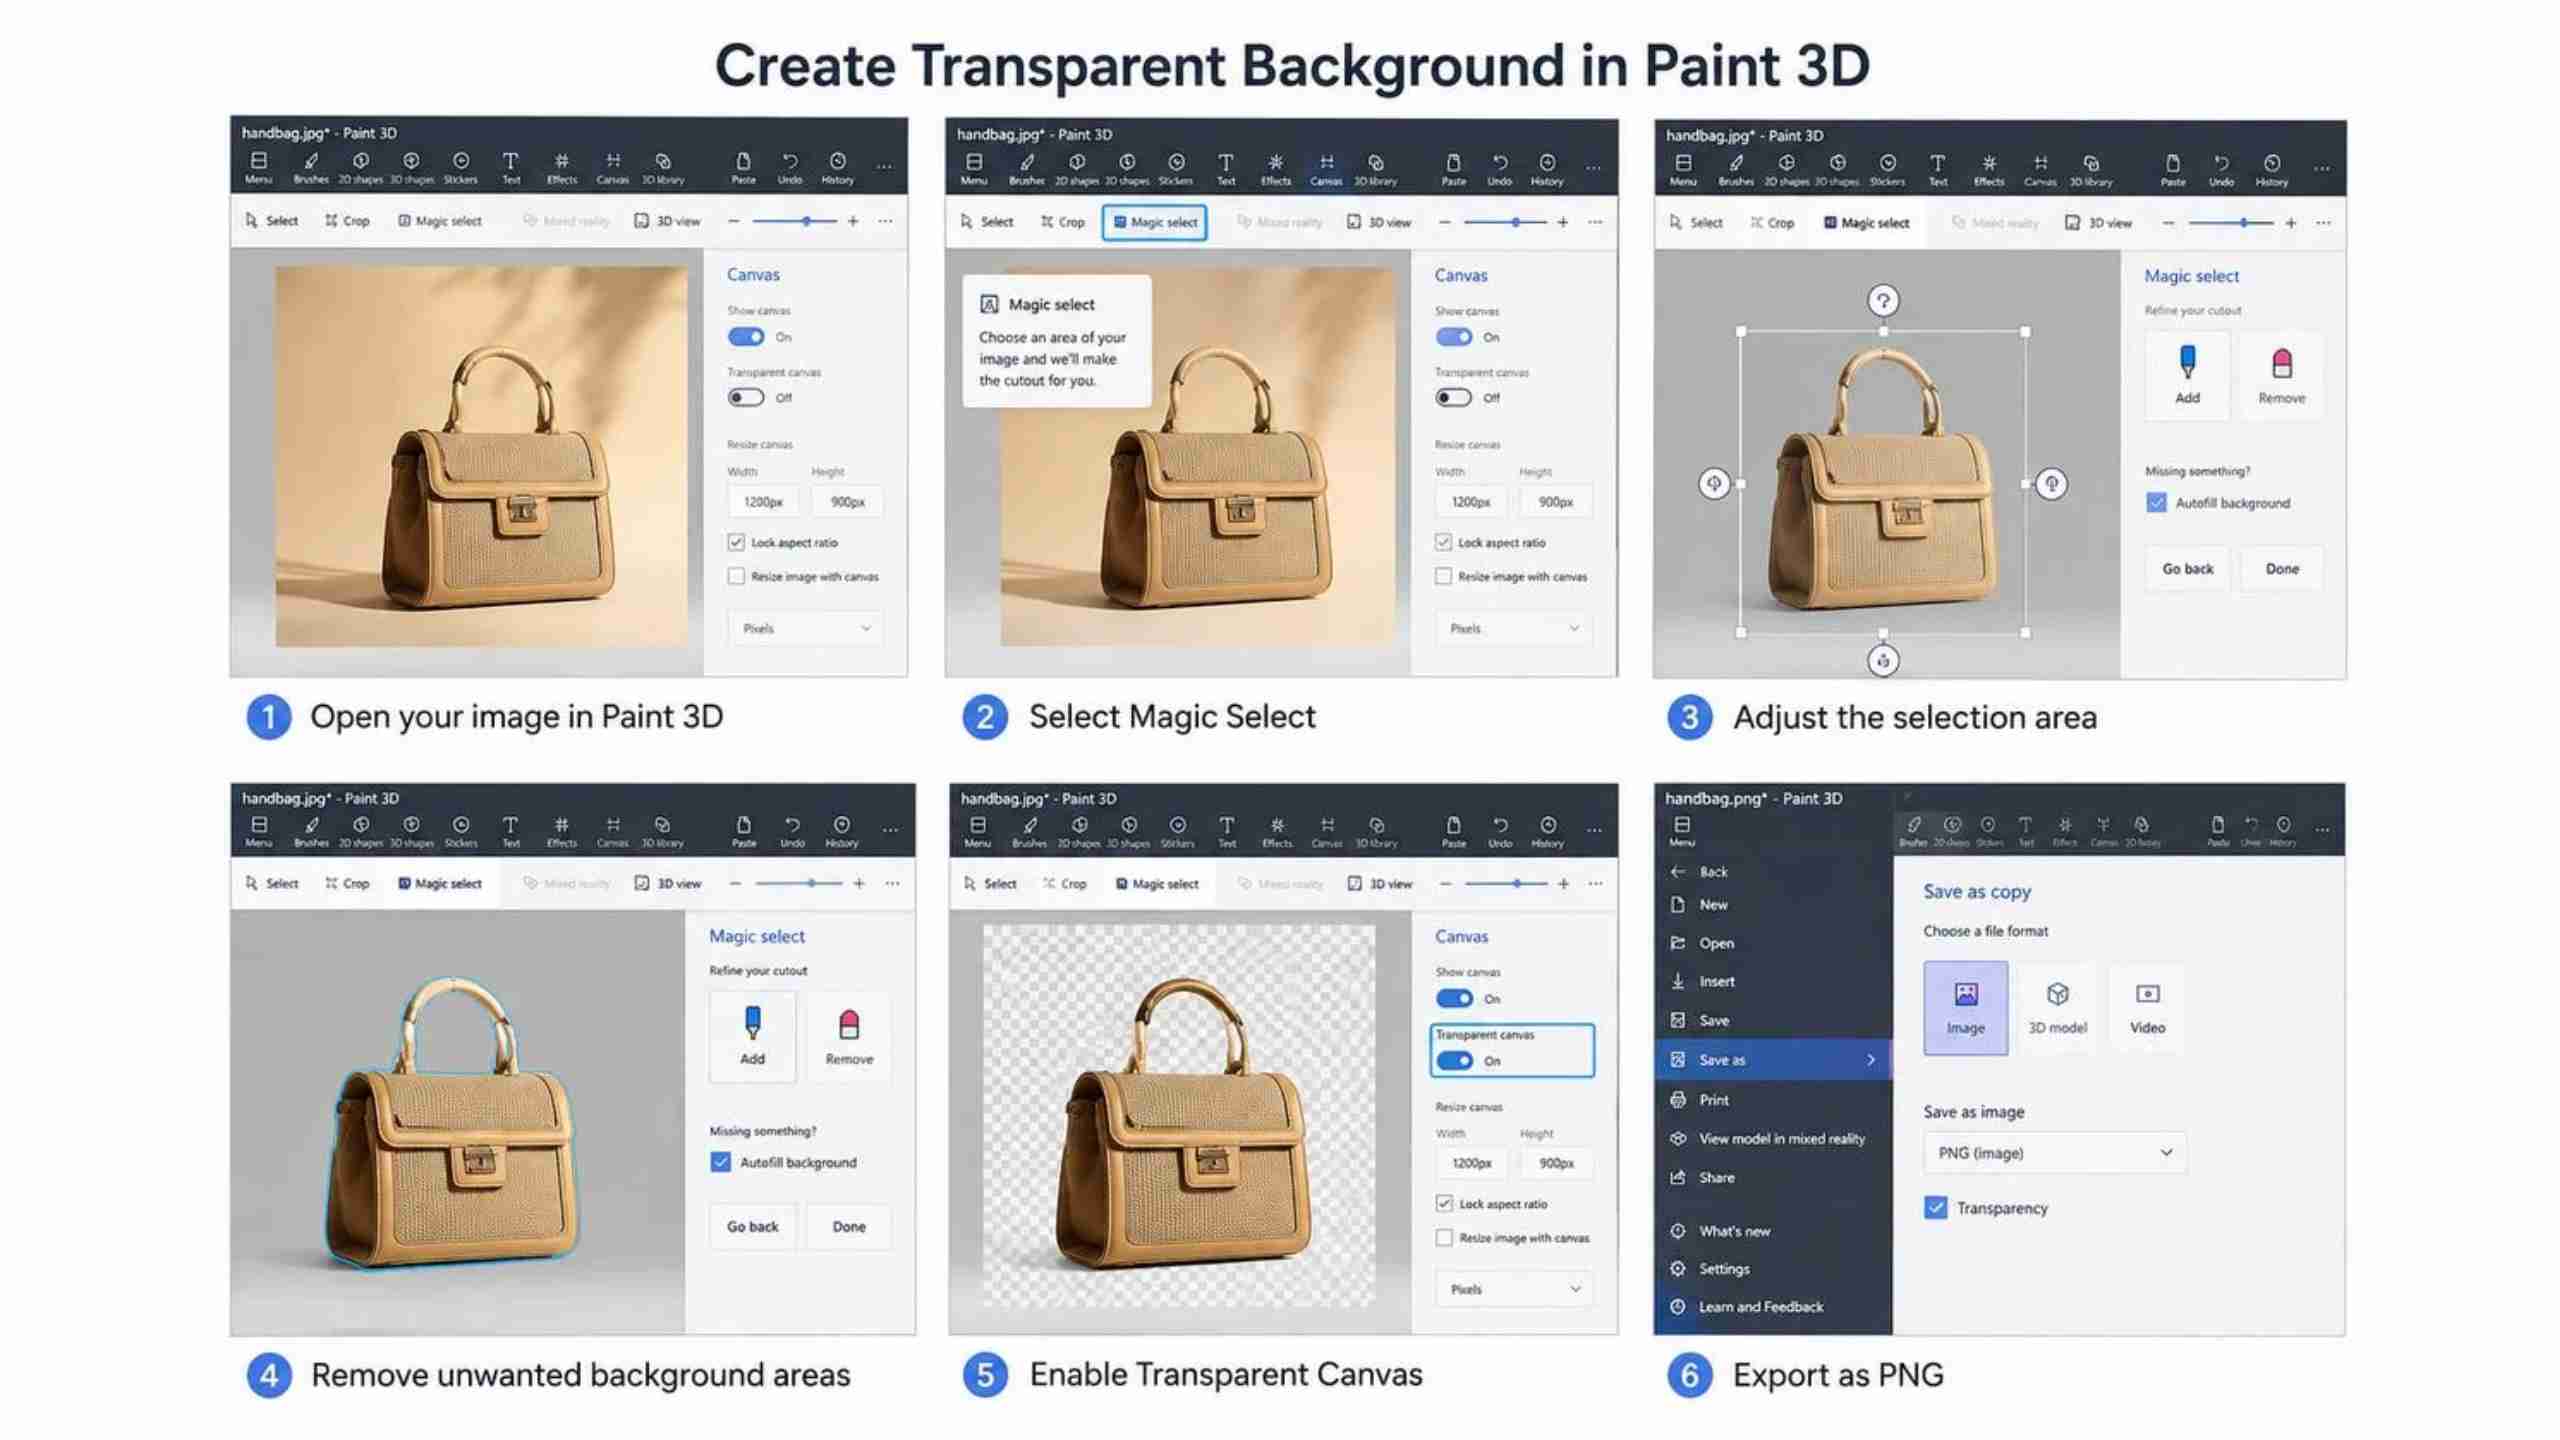
Step 1: Open your image in Paint 3D
Start Paint 3D and import the image you want to edit. Higher-resolution images generally produce more accurate selections.
Step 2: Select Magic Select
Click Magic Select from the toolbar to activate the automatic object selection feature.
Step 3: Adjust the selection area
Resize the selection box so it covers only the subject you want to keep. Paint 3D will generate a preview of the detected object.
Step 4: Remove unwanted background areas
Review the selection and use the add or remove tools to refine edges before confirming the cutout.
Step 5: Enable Transparent Canvas
Turn on Transparent Canvas from the Canvas settings. This removes the remaining background and prepares the image for transparent export.
Step 6: Export as PNG
Save the completed image as a PNG to preserve the transparent background.
How to Remove a White Background in Paint
Many users searching how to remove a background in Paint are actually trying to eliminate a plain white background. While this is easier than removing a busy background, simply deleting white pixels does not always produce a transparent image.
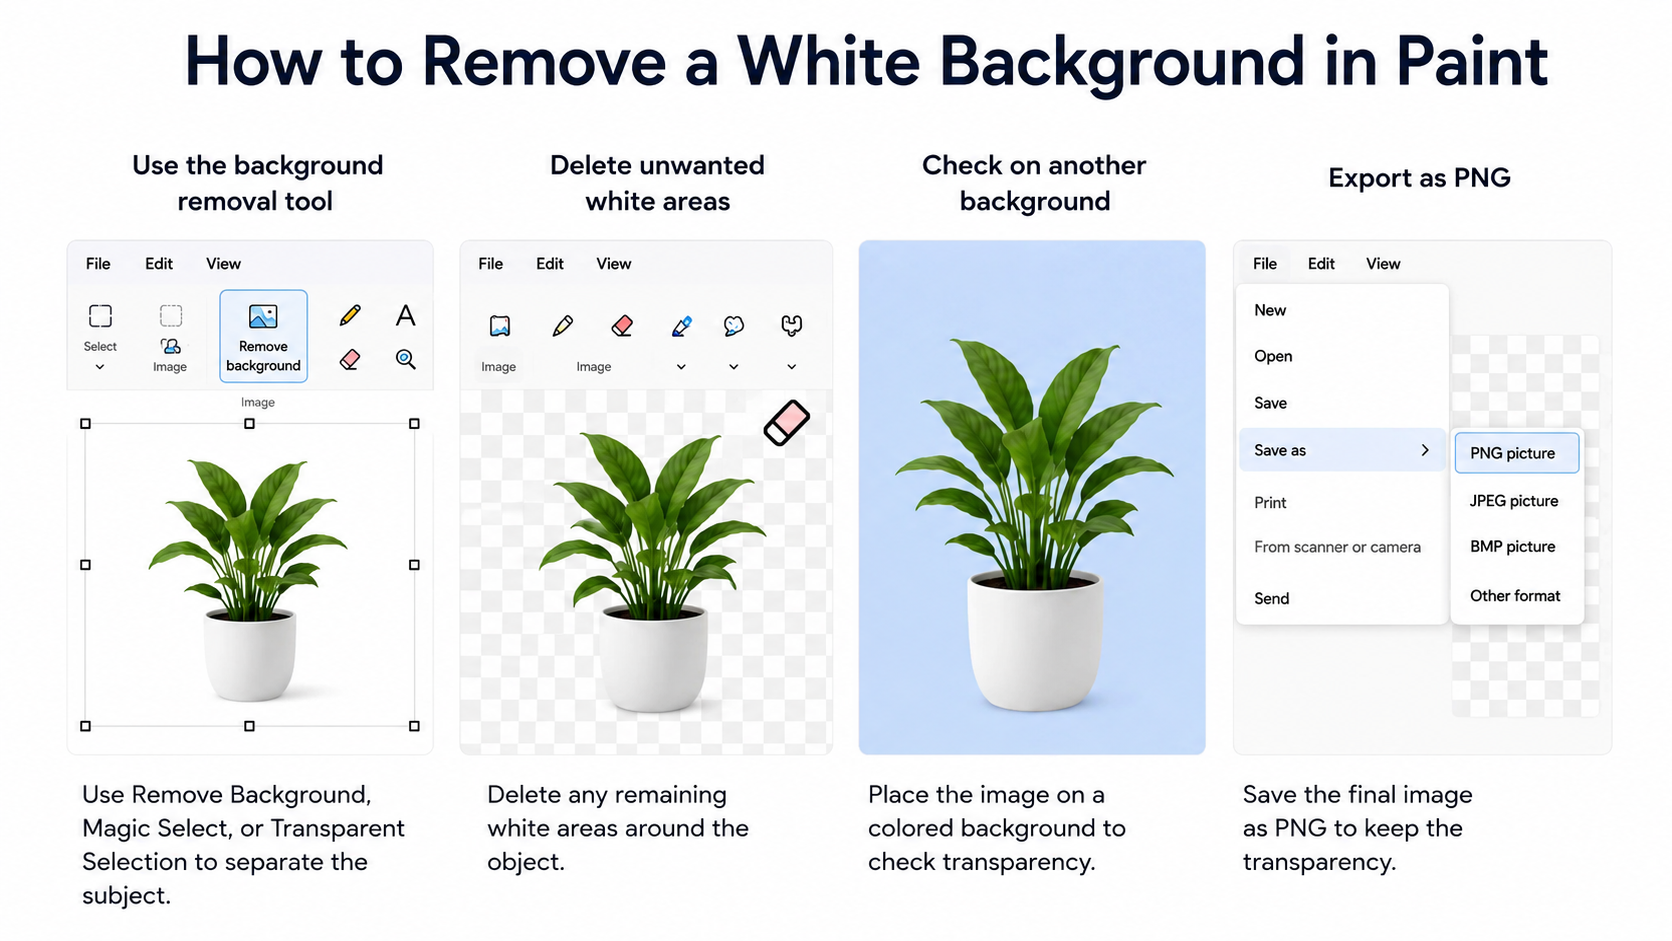
Step 1: Use the Available Background Removal Tool
Depending on your Paint version, use Remove Background, Magic Select, or Transparent Selection to separate the subject from the white area.
Step 2: Delete Unwanted White Areas
Carefully remove any remaining white regions around the object. Zoom in for greater precision if necessary.
Step 3: Check the Image on Another Background
Place the edited image over a colored background to verify that the white area has actually been removed instead of simply hidden.
Step 4: Export as PNG
Always save the final file as a PNG. This is essential if you want transparency to remain visible in other applications.
Remember that a white background is not the same as a transparent background, and JPEG files cannot preserve transparency. Always save your image as a PNG to keep transparent areas intact. Older versions of Paint may not fully delete the background in Paint for detailed images. If you need to remove an imported image from Paint, delete it before flattening the image or use Undo immediately after inserting it.
Export Images with a Transparent Background
After you've learned how to make a transparent background in Paint, exporting the image correctly is just as important as removing the background. Even if the editing is done perfectly, choosing the wrong file format can replace transparent areas with a white or solid-colored background.
Save as PNG
PNG is the preferred format for transparent images because it stores an alpha channel that preserves transparent pixels. When you're done editing, go to File > Save As and choose PNG. This way, the image will retain its transparent background when you use it on websites, presentations, social media, and marketing material.
Why JPEG Doesn't Support Transparency
JPEG is for photographs and compressing images. JPEG does not support transparency. If you save your image as a JPG, the transparent areas will be filled in with a solid color (usually white) automatically. BMP files also have limited transparency support, so if you want a transparent background, PNG is the format to use.
Check Whether the Background Is Actually Transparent
Before using your image, verify that the transparency has been preserved. One simple way is to open the PNG in another editor that displays a checkerboard pattern behind transparent areas. You can also place the image on a colored background in a presentation or design application. If you still see a white box surrounding the subject, the background was not removed correctly, or the image was saved in an unsupported format.
Common Paint Limitations and Troubleshooting
Although Paint is convenient for basic editing, it has several limitations that can affect the quality of your results. Understanding these common issues will help you troubleshoot problems and decide when another tool may be a better choice.
Why Is My Background Still White?
One of the most common questions after learning how to make the background transparent in Paint is why the background still appears white. In most cases, the image was saved as a JPEG instead of a PNG, or the background was hidden rather than actually removed. Older versions of MS Paint also lack true transparency support, which can make it seem as though the edit didn't work.
Why Does Paint Only Remove Part of the Background?
Automatic background removal works best when there is a clear contrast between the subject and its surroundings. If the object and background share similar colors, or if the image is blurry or low resolution, Paint may leave behind unwanted areas or accidentally remove parts of the subject. Taking time to refine the selection can improve the final result, but some images remain difficult to edit.
Can Paint Remove Backgrounds from Complex Images?
Paint does a good job on simple objects with well-defined edges, but can struggle with things like hair, fur, shadows, reflections, and transparent materials. If you're looking for MS Paint remove background solutions for product photos or detailed portraits, you may find that the results require more editing or a more advanced tool.
Quick Tips for Cleaner Cutouts
Use high-resolution images with good contrast between the subject and background for better results. Always save transparent images as PNG files, and for detailed subjects or bulk edits, consider using an AI background remover to achieve cleaner edges with less manual effort.
Paint vs Paint 3D vs AI Background Remover
|
Feature |
Paint |
Paint 3D |
AI Background Remover |
|---|---|---|---|
|
Background removal |
Basic |
Good |
Excellent |
|
Transparent PNG |
Limited |
Yes |
Yes |
|
Complex objects |
Difficult |
Better |
Excellent |
|
Batch editing |
No |
No |
Yes |
|
Beginner friendly |
Easy |
Easy |
Easiest |
Paint is suitable for occasional edits and simple graphics, while Paint 3D offers better object selection and transparent exports. AI background removers go a step further by handling complex edges, processing multiple images, and producing consistent results with minimal effort.
Remove Backgrounds Faster with Designkit
While Paint is useful for simple image edits, it isn't designed for removing backgrounds from detailed subjects or processing large numbers of images. Designkit uses AI to automatically detect the main subject, remove the background, and create clean transparent PNGs in seconds. This makes it a practical option for ecommerce businesses, marketers, designers, and content creators who want professional-looking visuals without spending time on manual editing.
How to Remove Backgrounds with Designkit
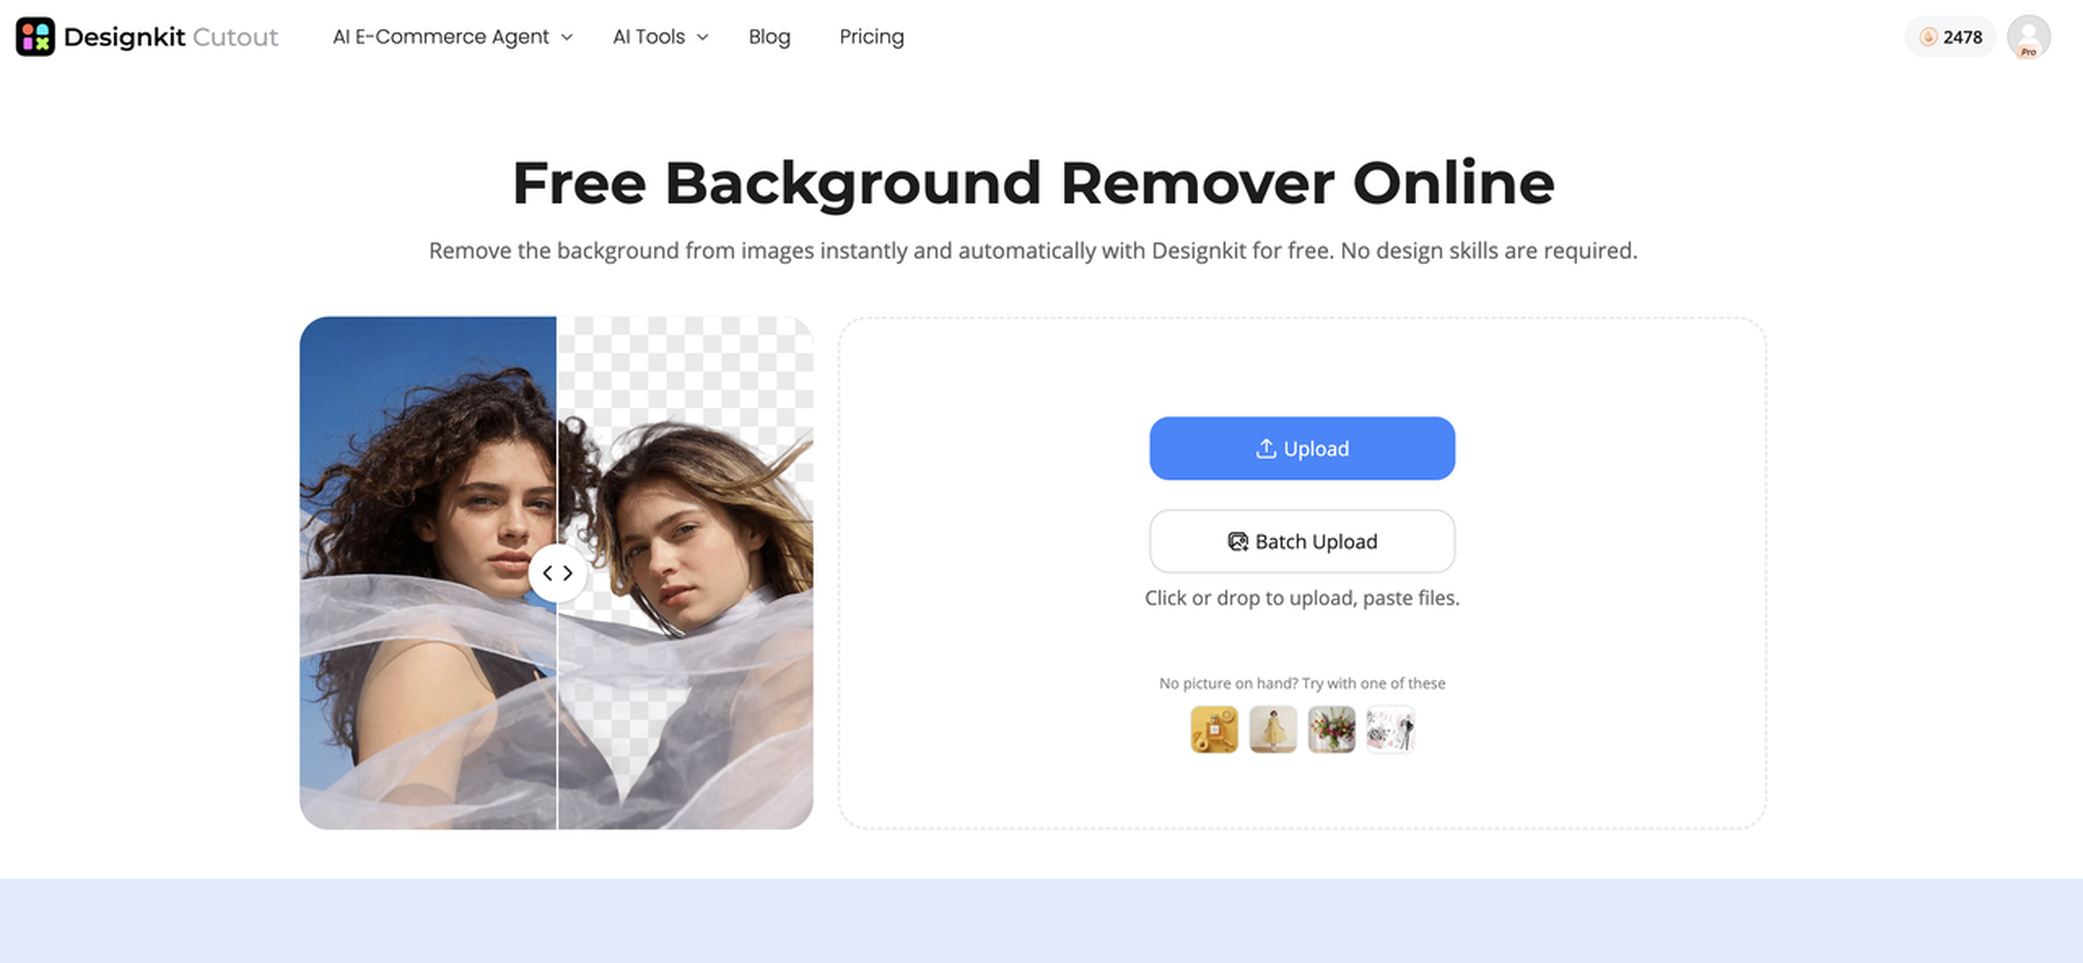
Step 1: Upload Your Image
Open Designkit and upload a product photo, portrait, logo, or any other image that needs a transparent background. The platform supports a variety of image types, making it suitable for both personal and professional projects.
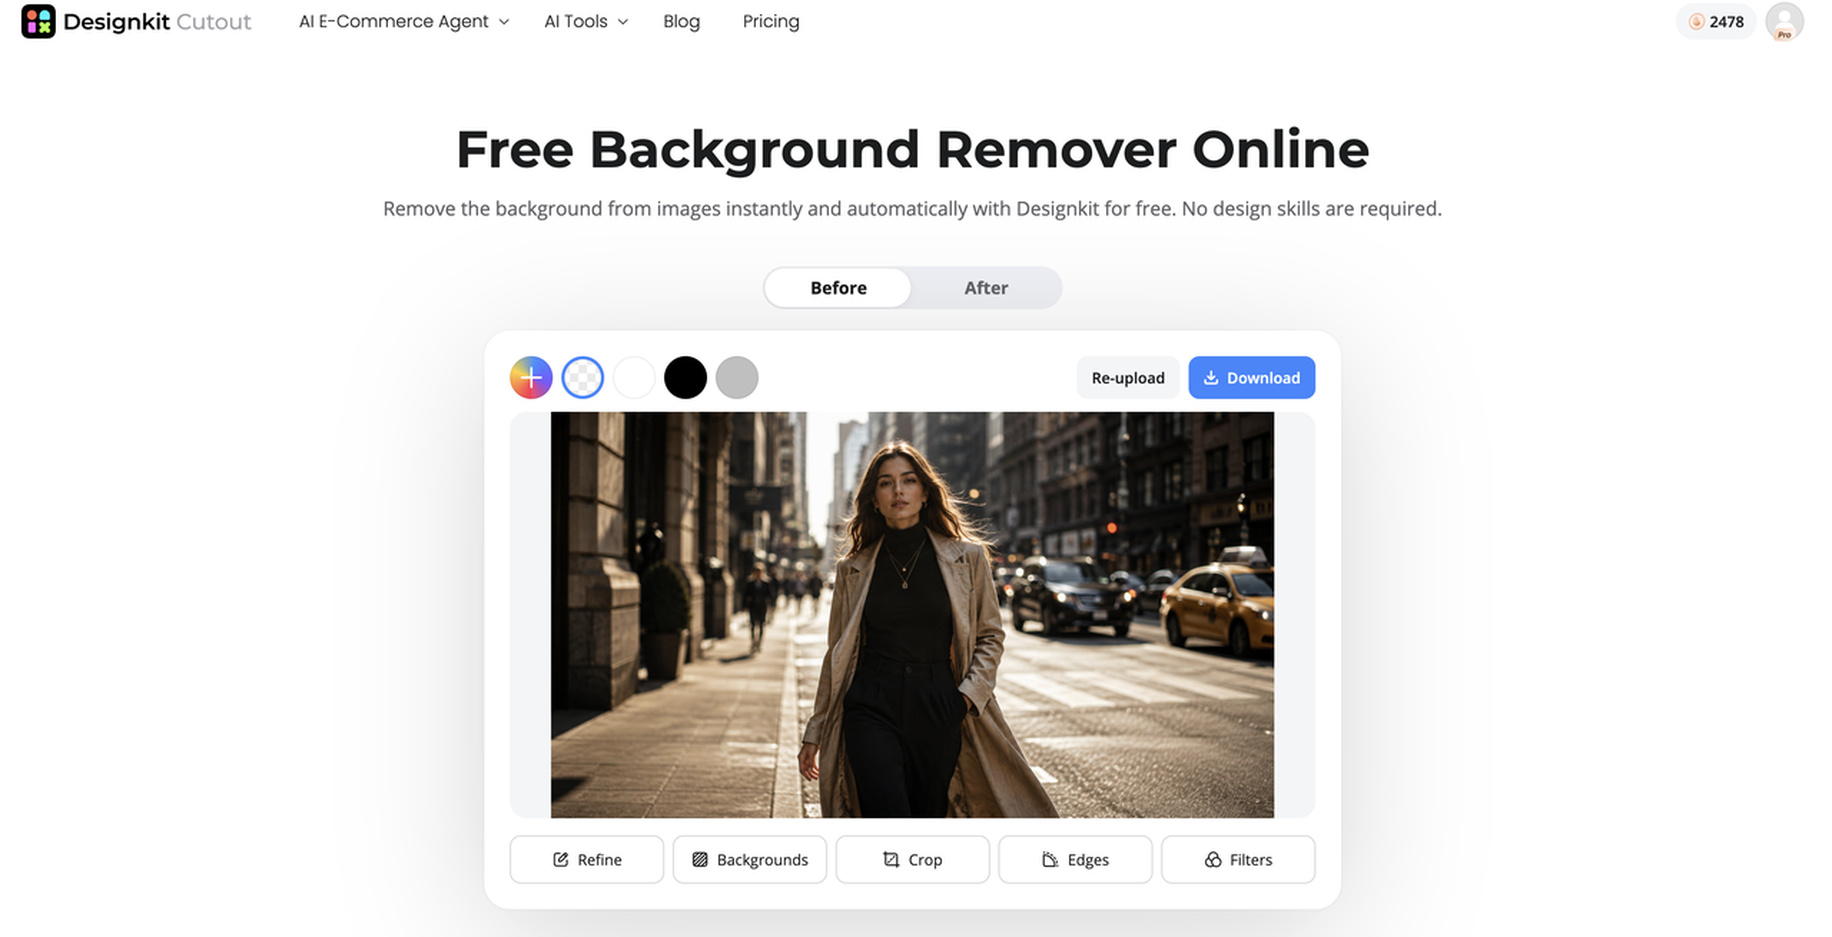
Step 2: Remove the Background Automatically
The AI analyzes your image, detects the primary subject, and removes the background with a single click. Unlike traditional editing tools, it can accurately handle detailed edges such as hair, fur, shadows, and transparent objects.
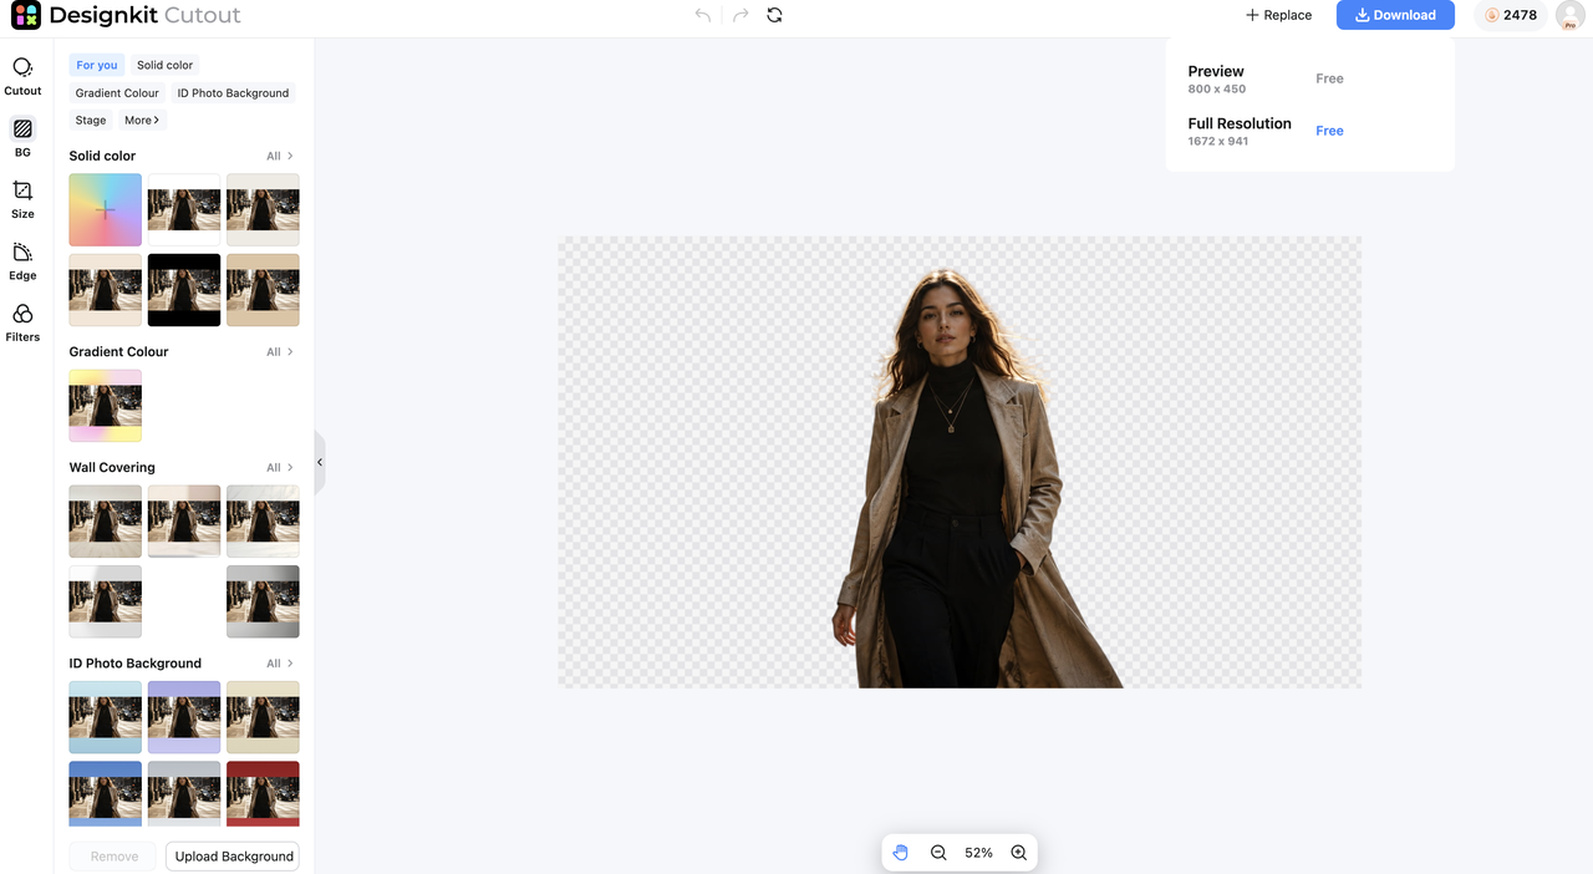
Step 3: Download Your Transparent PNG
Once you're satisfied with the result, download the edited image as a transparent PNG. Your image is now ready for online stores, presentations, websites, advertisements, or social media posts.
Go Beyond Background Removal with AI-Powered Editing
-
AI background remover: Remove backgrounds automatically with AI in just one click. It accurately detects the main subject and produces clean cutouts, even around detailed edges like hair, clothing, and product outlines.
-
Batch background removal: Edit multiple images at the same time instead of processing them one by one. This feature is especially useful for ecommerce stores, catalogs, and large product image libraries.
-
AI background replacement: After removing the original background, replace it with a solid color, transparent background, or a custom scene. This helps create consistent visuals for websites, advertisements, and social media.
-
AI image enhancement: Improve image sharpness, lighting, and overall quality after background removal. Enhanced images appear more professional and are better suited for online stores, presentations, and promotional materials.
Final thoughts
Knowing how to create a transparent background in Paint is useful for quick image edits and simple projects. The latest version of Windows Paint automatically removes backgrounds, and Paint 3D has more editing tools to help you make cleaner cutouts. For simple transparent selections, the classic MS Paint is still fine, but it has serious limitations on detailed images.
If you're an editor of product photos, portraits, or marketing graphics, AI-powered tools can give you cleaner edges, faster processing, and more consistent results. In the end, the tool you choose depends on the complexity of your image, the edits you want to make, and the number of images you have to process.
Frequently Asked Questions
How do I make a background transparent in Paint?
Does MS Paint support transparent backgrounds?
Classic Microsoft Paint is best suited for basic graphics and has limited support for transparency. While AI-powered editors like Designkit can more accurately handle more complicated backdrops, Windows Paint and Paint 3D offer superior alternatives for producing transparent PNG pictures.
Why is my transparent background turning white?
This frequently happens because the image is stored as JPEG, not PNG. JPEG files cannot handle transparency, so any translucent parts are filled with white or some other solid color. If you are using Paint or Designkit, make sure to export the image as a PNG; this will keep the background translucent.
Can Paint remove backgrounds from people or products?
Paint frequently has trouble with details like hair, fur, shadows, and transparent objects, but it can remove backgrounds from straightforward product photographs and portraits with crisp edges. Designkit and other AI background removers are better able to identify fine edges and create crisper, more polished cutouts.
When should I use Designkit instead of Paint?
Painting is a wonderful choice for occasional tweaks and simple graphics. But if you're often creating e-commerce product photographs, marketing graphics, or social media material, Designkit can save time with one-click background removal, batch processing, image improvement, and backdrop replacement.
Can Designkit create transparent backgrounds automatically?
Yes. Designkit utilizes AI to automatically remove backgrounds and create transparent PNGs in seconds. It also makes it easy to edit in bulk, swap backgrounds, enhance images, and export in high resolution for personal and business projects.
How do I remove a PNG background in MS Paint?
If you're searching for how to remove PNG backgrounds in MS Paint, use the Remove Background feature in Windows Paint or Transparent Selection in classic MS Paint. For images with complex edges, AI tools like Designkit can create cleaner transparent PNGs with much less effort.
You May Also Like

7 Best Remove.bg Alternatives in 2026: Free & Paid Tools

Instagram Carousel: What It Is, How to Post & Create One

Nano Banana Prompts: 20+ Examples for Better AI Images

Ideogram AI Review 2026: Features, Pricing & Alternatives

Free Mac Photo Editor: 5 Tools Compared for Mac Users

How to Crop a Photo Into a Circle Online (Keep Quality)

How to Make an Image Transparent Online (AI Guide)

Pixlr Background Remover Review 2026: Features, Pricing & Alternatives

How to Fix Overexposed Photos: Recover Highlights Fast

OpenArt AI Review 2026: Features, Pricing & Alternatives

Best AI Headshot Generator: 9 Tools Compared for 2026

Best Stencil Maker Tools 2026: Turn Photos Into Stencils

Pixelbin Watermark Remover Review: Image & Video Results Tested

How to Make a Sticker on iPhone: Easy Step by Step Guide

Best AI Logo Generator in 2026: 10 Tools Compared

How to Turn a Photo Into a Cartoon: A Beginner-Friendly Guide

Landscape vs Portrait: Key Differences & Best Uses in 2026

How to Remove Watermark From Photo: AI, Photoshop & More

How to Fix Pixelated Photos: Photoshop, AI Tools & Tips

Bing Image Creator: How It Works, Features, Uses & Alternatives

How to Remove People from Photos with AI: A Step-by-Step Guide

How to Increase Image Resolution: AI, Photoshop & PPI

How to Add Text to a Photo: 8 Tips for Better Results

How to Fix Grainy Photos: Easy Ways to Clear Images

Creative Profile Picture Ideas for Every Style and Platform

Evoto AI Review 2026: Features, Pricing, Pros & Cons

Pixlr Photo Editor Review: Features, Pricing & Alternatives

Best AI Image Extender Tools in 2026: Expand Photos with AI

How to Make a Collage on iPhone: Easy Guide for 2026

How to Sharpen an Image in Photoshop (Smart Sharpen and Unsharp Mask)

Best Image Background Remover Tools in 2026: AI Tools Compared

How to Make Transparent Background in Paint: Step-by-Step Guide

How to Resize an Image: Best Methods, Tools & Quality Tips

Best AI Image Generator Tools in 2026: Top AI Platforms Compared

Remove.bg Review 2026: Features, Pricing & Is It Worth It?

Luminar Neo Photo Editor Review 2026: AI Features, Price & Pros

How to Post Multiple Photos on Instagram (2026 Guide)

25 Facebook Cover Photo Ideas for Personal & Business Pages

What Is a PFP? Meaning, Examples & How to Create One

Can You Edit an Instagram Post After Posting?

11 Best Canva Alternatives in 2026 for AI Design & Marketing

8 Best Midjourney Alternatives in 2026: Features, Pricing & Comparison

How to Restore Old Photos: AI Tools, Tips & Best Methods

Pixelcut AI Review 2026: Features, Pricing, Pros, Cons & Alternatives

How to Apply Watermark to Photos: Methods, Tips & AI Tools

How to Remove a Background in Illustrator: 4 Easy Methods

How to Change Background Color on Instagram Story (Easy Guide)

8 Best AI Poster Generators in 2026: Create Posters Faster with AI

10 Best AI Image Enhancers in 2026: Tested & Compared

10 Best AI Image Editors in 2026: Features, Pricing & Comparison

7 Best AI Background Changer in 2026: Remove & Replace Photo Backgrounds

Luminar Neo vs Lightroom: Features, Pricing & Comparison 2026

Kittl Review 2026: Is It Worth It? Features & Pricing

How to Make a Blurry Image Clear: 5 AI & Manual Ways

How to Remove Background on iPhone: 5 Easy Methods (2026)

Photoroom Background Remover Review 2026: Features & Alternatives

How to Remove Background in Canva: A Step-by-Step Guide

How to Remove Background in GIMP: Beginner-Friendly Guide

Funny Dog Memes to Try: Doge Meaning and 10 Original Ideas

Back to School Checklist 2026: Supplies, Timeline, and Planning

Recraft AI Review 2026: Features, Pricing, Pros, Cons & Alternatives

How to Make an Image Transparent in Google Slides: Opacity & Background Removal

VanceAI Photo Enhancer Review: Features, Pricing & Alternatives in 2026

What Does Emojify Mean? Text, Photos, & Emoji Art Explained

Top 8 Online Background Removers for Ecommerce Photos (2026)

How to Remove Background in Photoshop: 7 Easy Methods

6 Best AI Image Upscalers 2026: Tools Tested & Compared

Project Indigo Review: Is It Better Than iPhone Camera?

How Big Is an 8x10 Photo? Size, Pixels & Frame Guide

How Big Is a 4x6 Photo? Dimensions, Pixels & Printing Tips

Picsart AI Review: Features, Pricing, Pros, Cons & Alternatives

Lovart AI Review: AI Design Agent Features, Pricing & Alternatives

Fotor AI Image Generator Review: Features, Pricing & Alternatives

How to Add Emoji to Photo Online for Free

Emoji Wallpaper Ideas & How to Make One Online (2026)

Minimalist Poster Design: How to Make a Clean Poster (2026)

How to Make a Custom Poster That Is Ready to Print

Instagram Image Size Guide 2026: Post, Reel, Story & Carousel Specs

LinkedIn Image Size Guide: Profile, Post & Banner Dimensions

YouTube Profile Image Size: Best Dimensions & Safe Area 2026

How to Edit Amazon Product Photos That Boost Sales Fast
Create Clean Transparent Images Faster
Paint is useful for quick edits, but complex images often require more advanced tools. Designkit helps you remove backgrounds, create transparent PNGs, and prepare professional visuals for ecommerce, marketing, and social media in seconds.
