
How to Remove a Background in Illustrator: Complete Guide
Remove backgrounds in Illustrator using the Pen Tool, Image Trace, and clipping masks. Learn which method works best for your images.

Removing a background in Illustrator is a frequent step taken to create clean product images, logos, marketing materials, and transparent design assets. But the ideal workflow will depend on the type of image, the amount of complexity in the background and what you want to achieve with your edits.
Before choosing a method, consider whether you're working with a raster image or vector artwork, removing a simple white background or a complex background, and whether you need a destructive edit or a non-destructive workflow using masks and clipping paths.
In this guide, you'll learn how to remove a background in Illustrator using Image Trace, the Magic Wand, the Pen Tool, and clipping masks. Whether you're working with logos, product photos, or marketing graphics, how to remove a background in Illustrator becomes much easier once you understand which method fits your project. We'll also explain when AI-powered tools offer a faster alternative for processing multiple images.
Which method should you use to remove a background in Illustrator?
There are a few ways to remove backgrounds in Illustrator, but they are all for different uses. The right choice depends on the type of image you have, the complexity of the background, and whether you want the edit to be permanent or want the option of going back. The table below will help you to choose the right one.
|
Method |
Best for |
Skill level |
|---|---|---|
|
Image Trace |
Logos, simple art, clean white BG |
Beginner |
|
Magic Wand |
Flat solid-color backgrounds after expanding |
Beginner–Intermediate |
|
Pen Tool + Clipping Mask |
Products, people, detailed photo cutouts |
Intermediate–Advanced |
|
Shape Clipping Mask |
Non-destructive crops when outline is simple |
Intermediate |
|
AI background removal |
Bulk ecommerce product photos |
Beginner |
How to remove a background in Illustrator
Illustrator provides several ways to remove backgrounds depending on your image. Some methods automatically separate simple backgrounds, while others require manual editing for greater precision. Follow the workflow that best matches your project and editing experience. Users searching for how to delete the background in Illustrator should choose Image Trace for simple graphics and the Pen Tool for detailed photographs, as each method is suited to different image types.
Method 1: Image Trace
Image Trace works well for logos, icons, and artwork with neat white backgrounds. One of the easiest ways to remove background in illustrator for simple artwork is to convert raster images to editable vectors.
Step 1: Import and trace the image
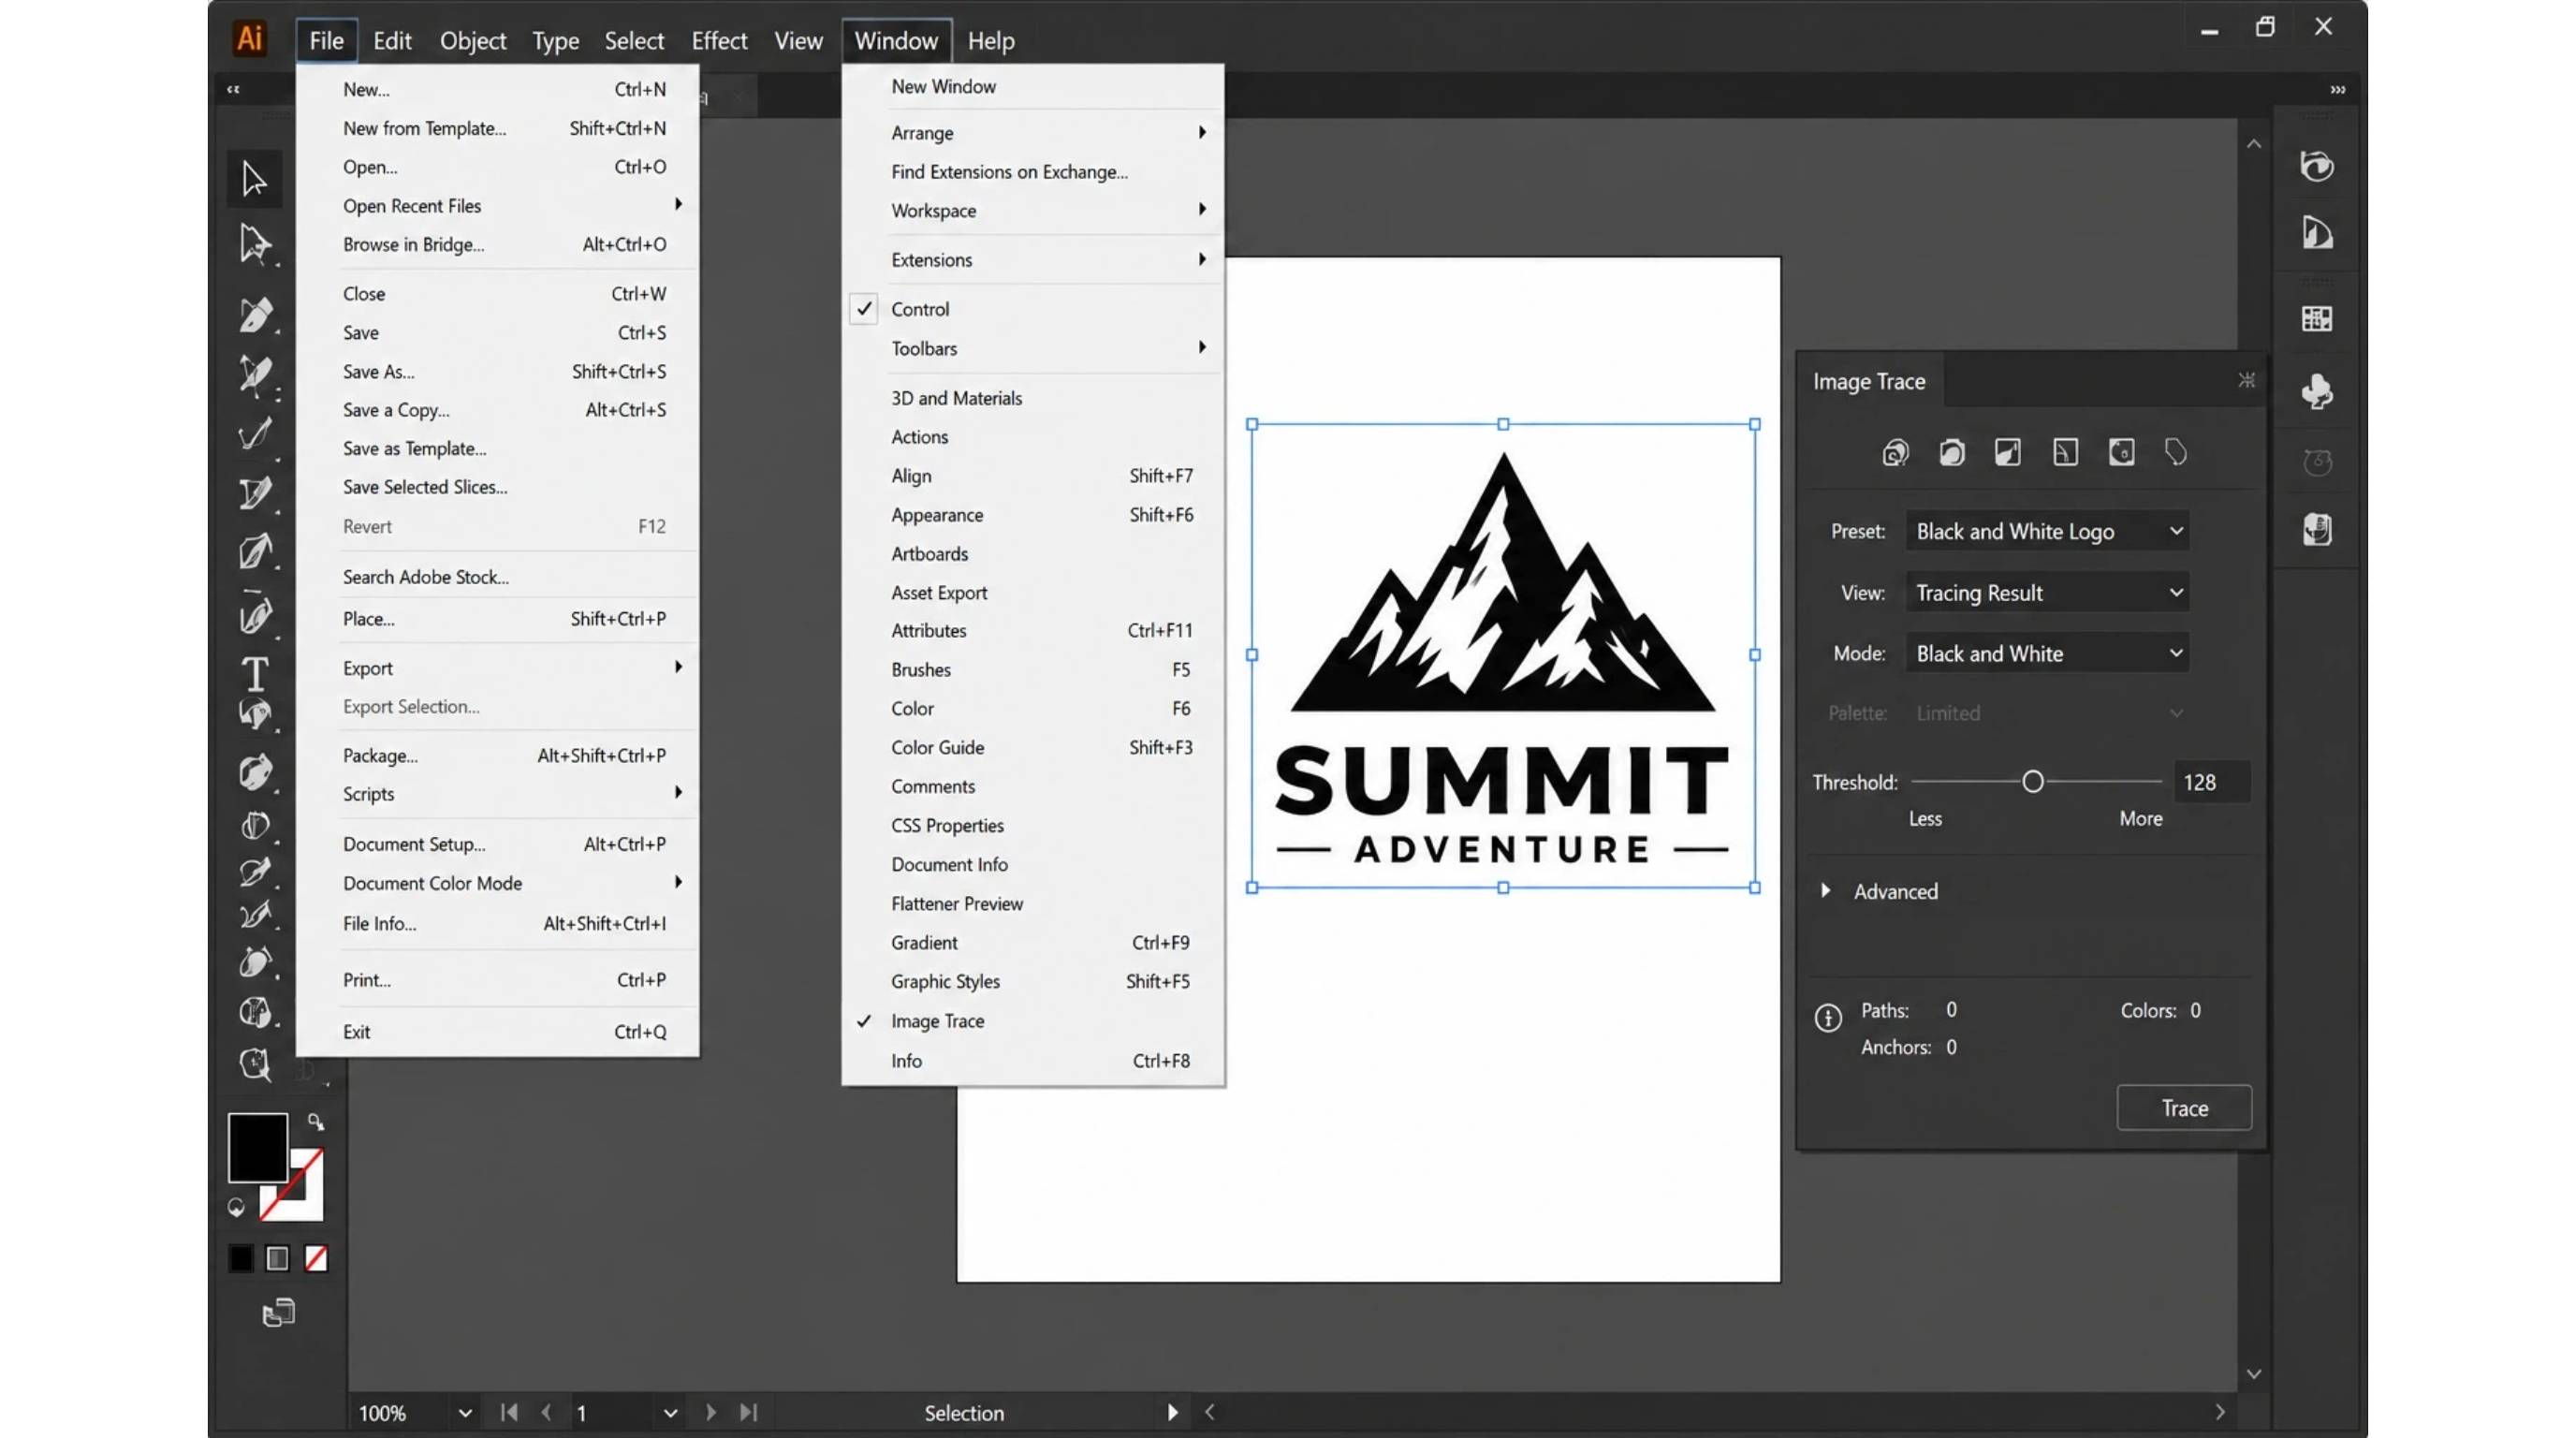
Go to File > Place to add your image, then open Window > Image Trace. Choose a preset that best matches your artwork.
Step 2: Remove the white background
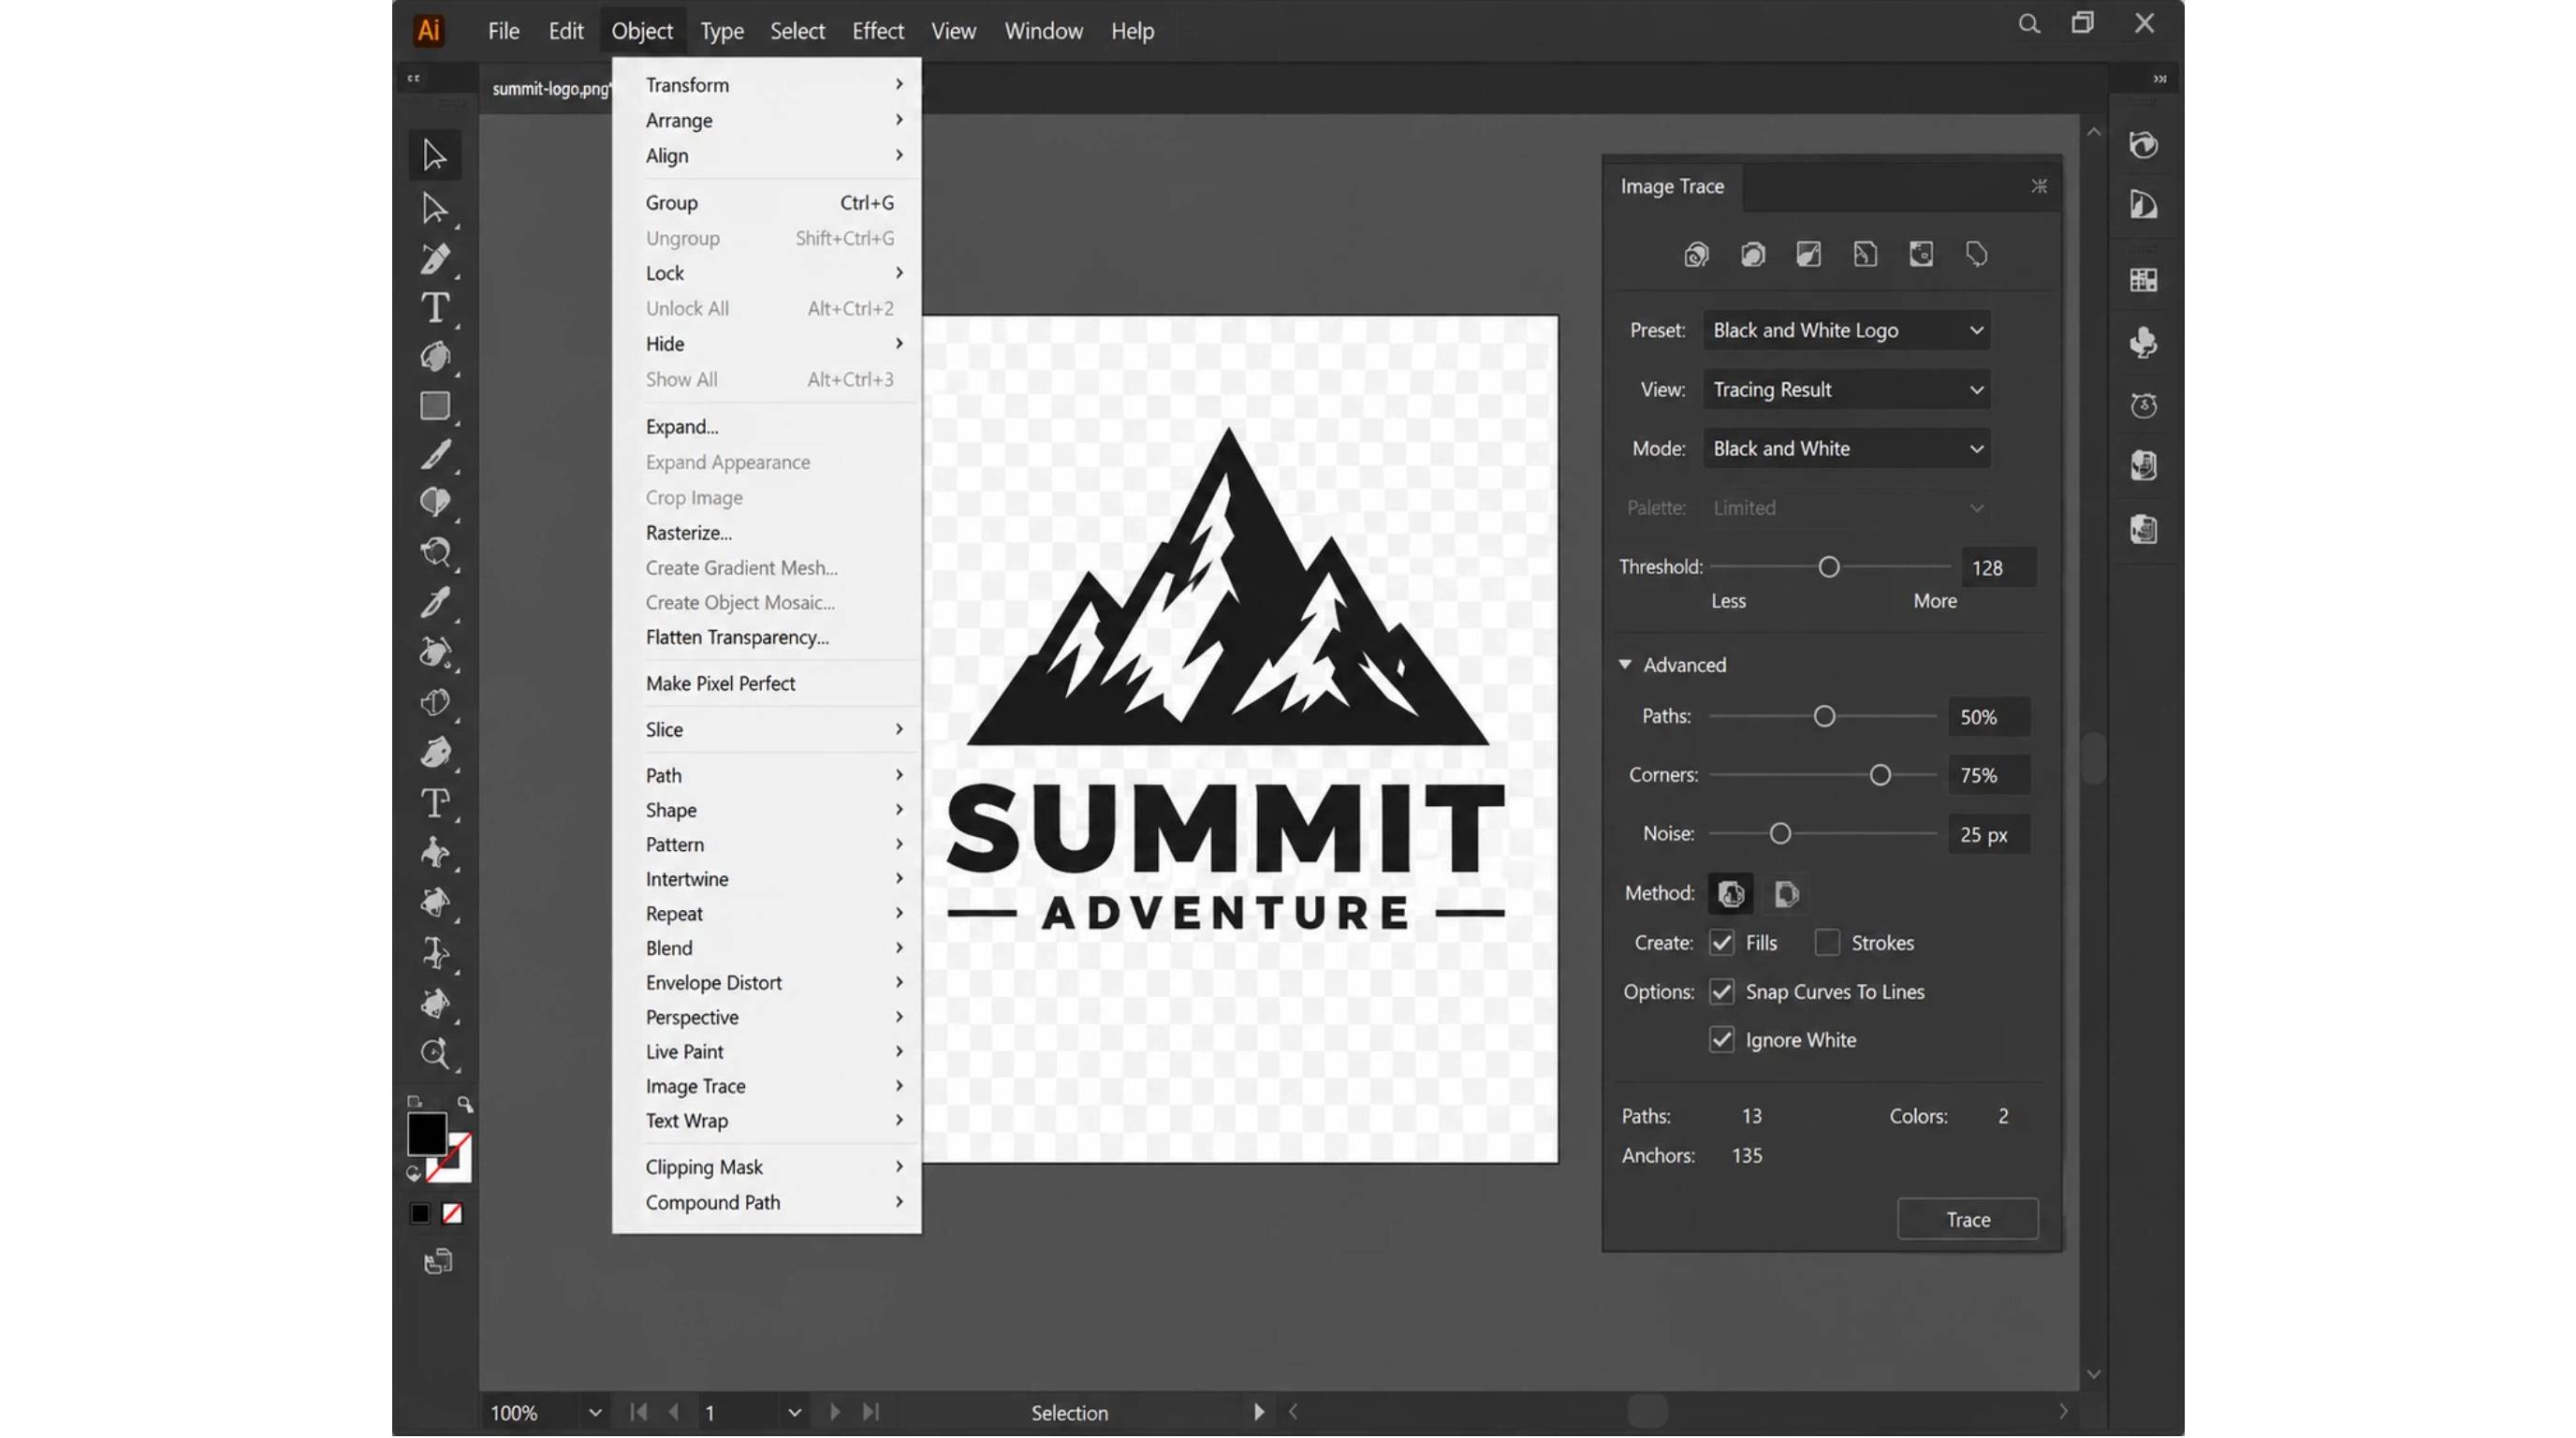
Expand the Advanced settings and enable Ignore White. Click Trace, then choose Object > Expand to convert the result into editable vector paths.
Step 3: Clean up and verify
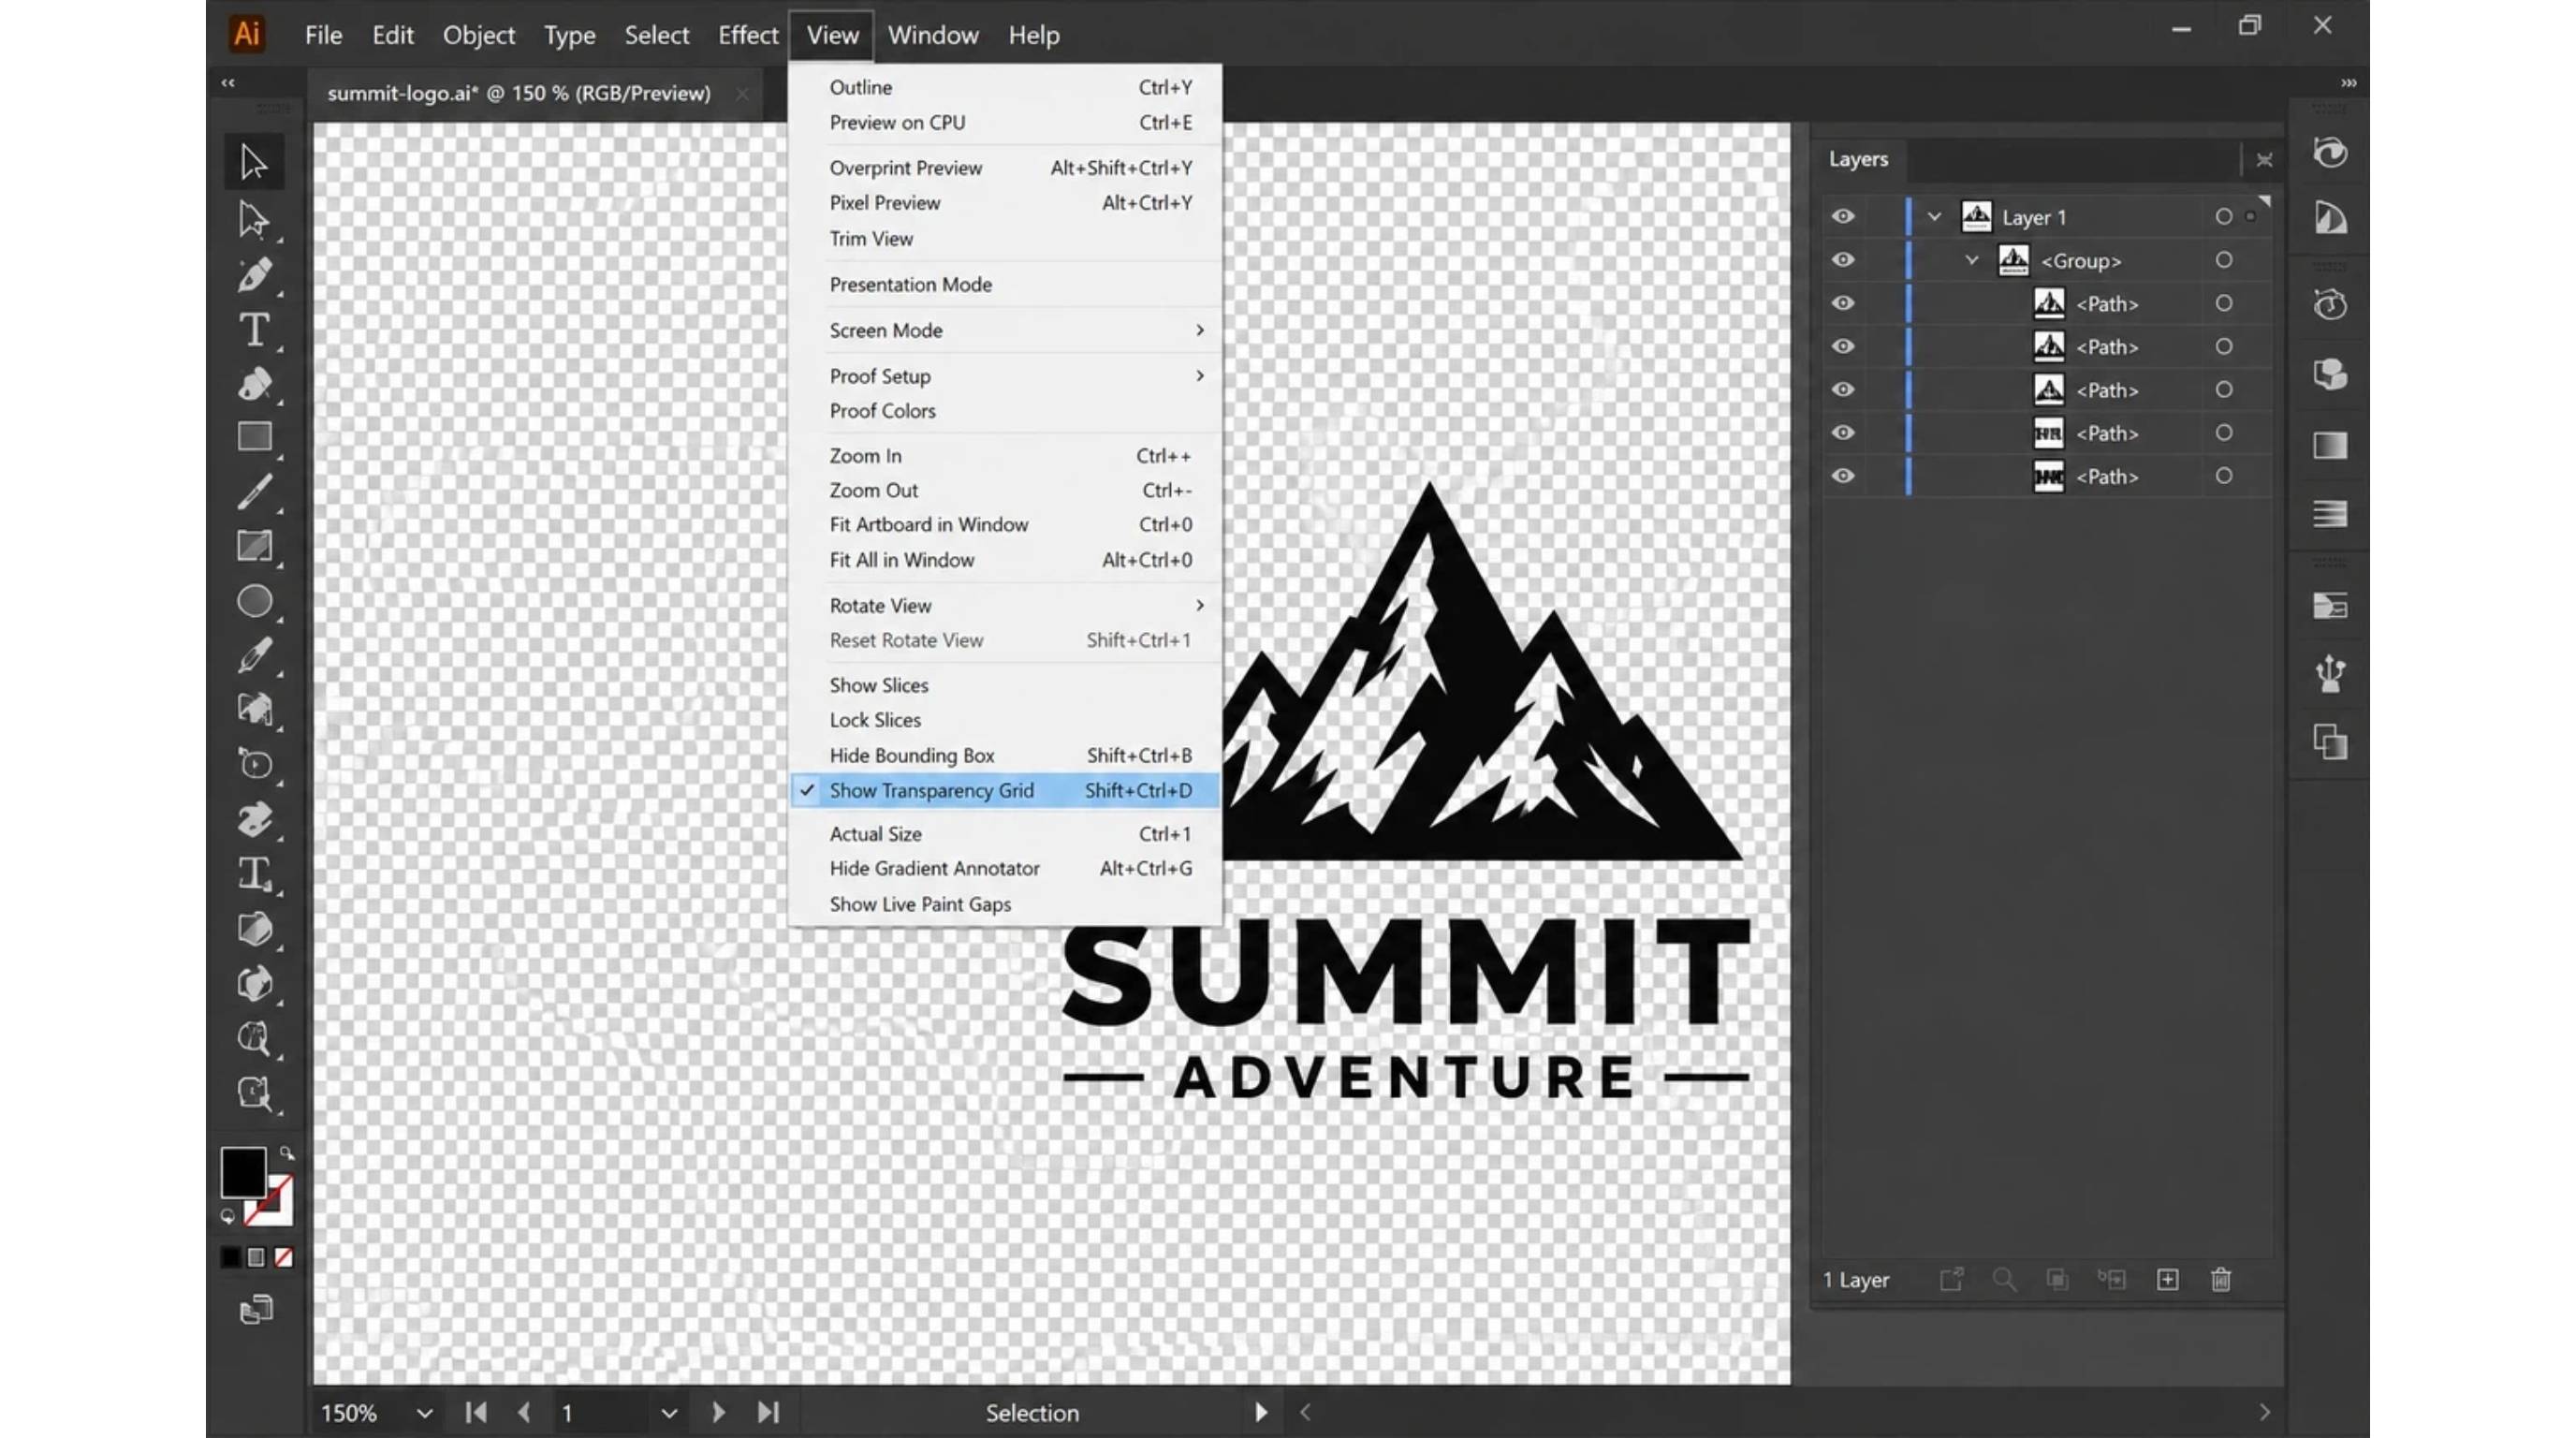
Ungroup the artwork if needed, delete any remaining background shapes, and enable View > Show Transparency Grid to confirm the background has been removed.
Method 2: Magic Wand for solid-color backgrounds
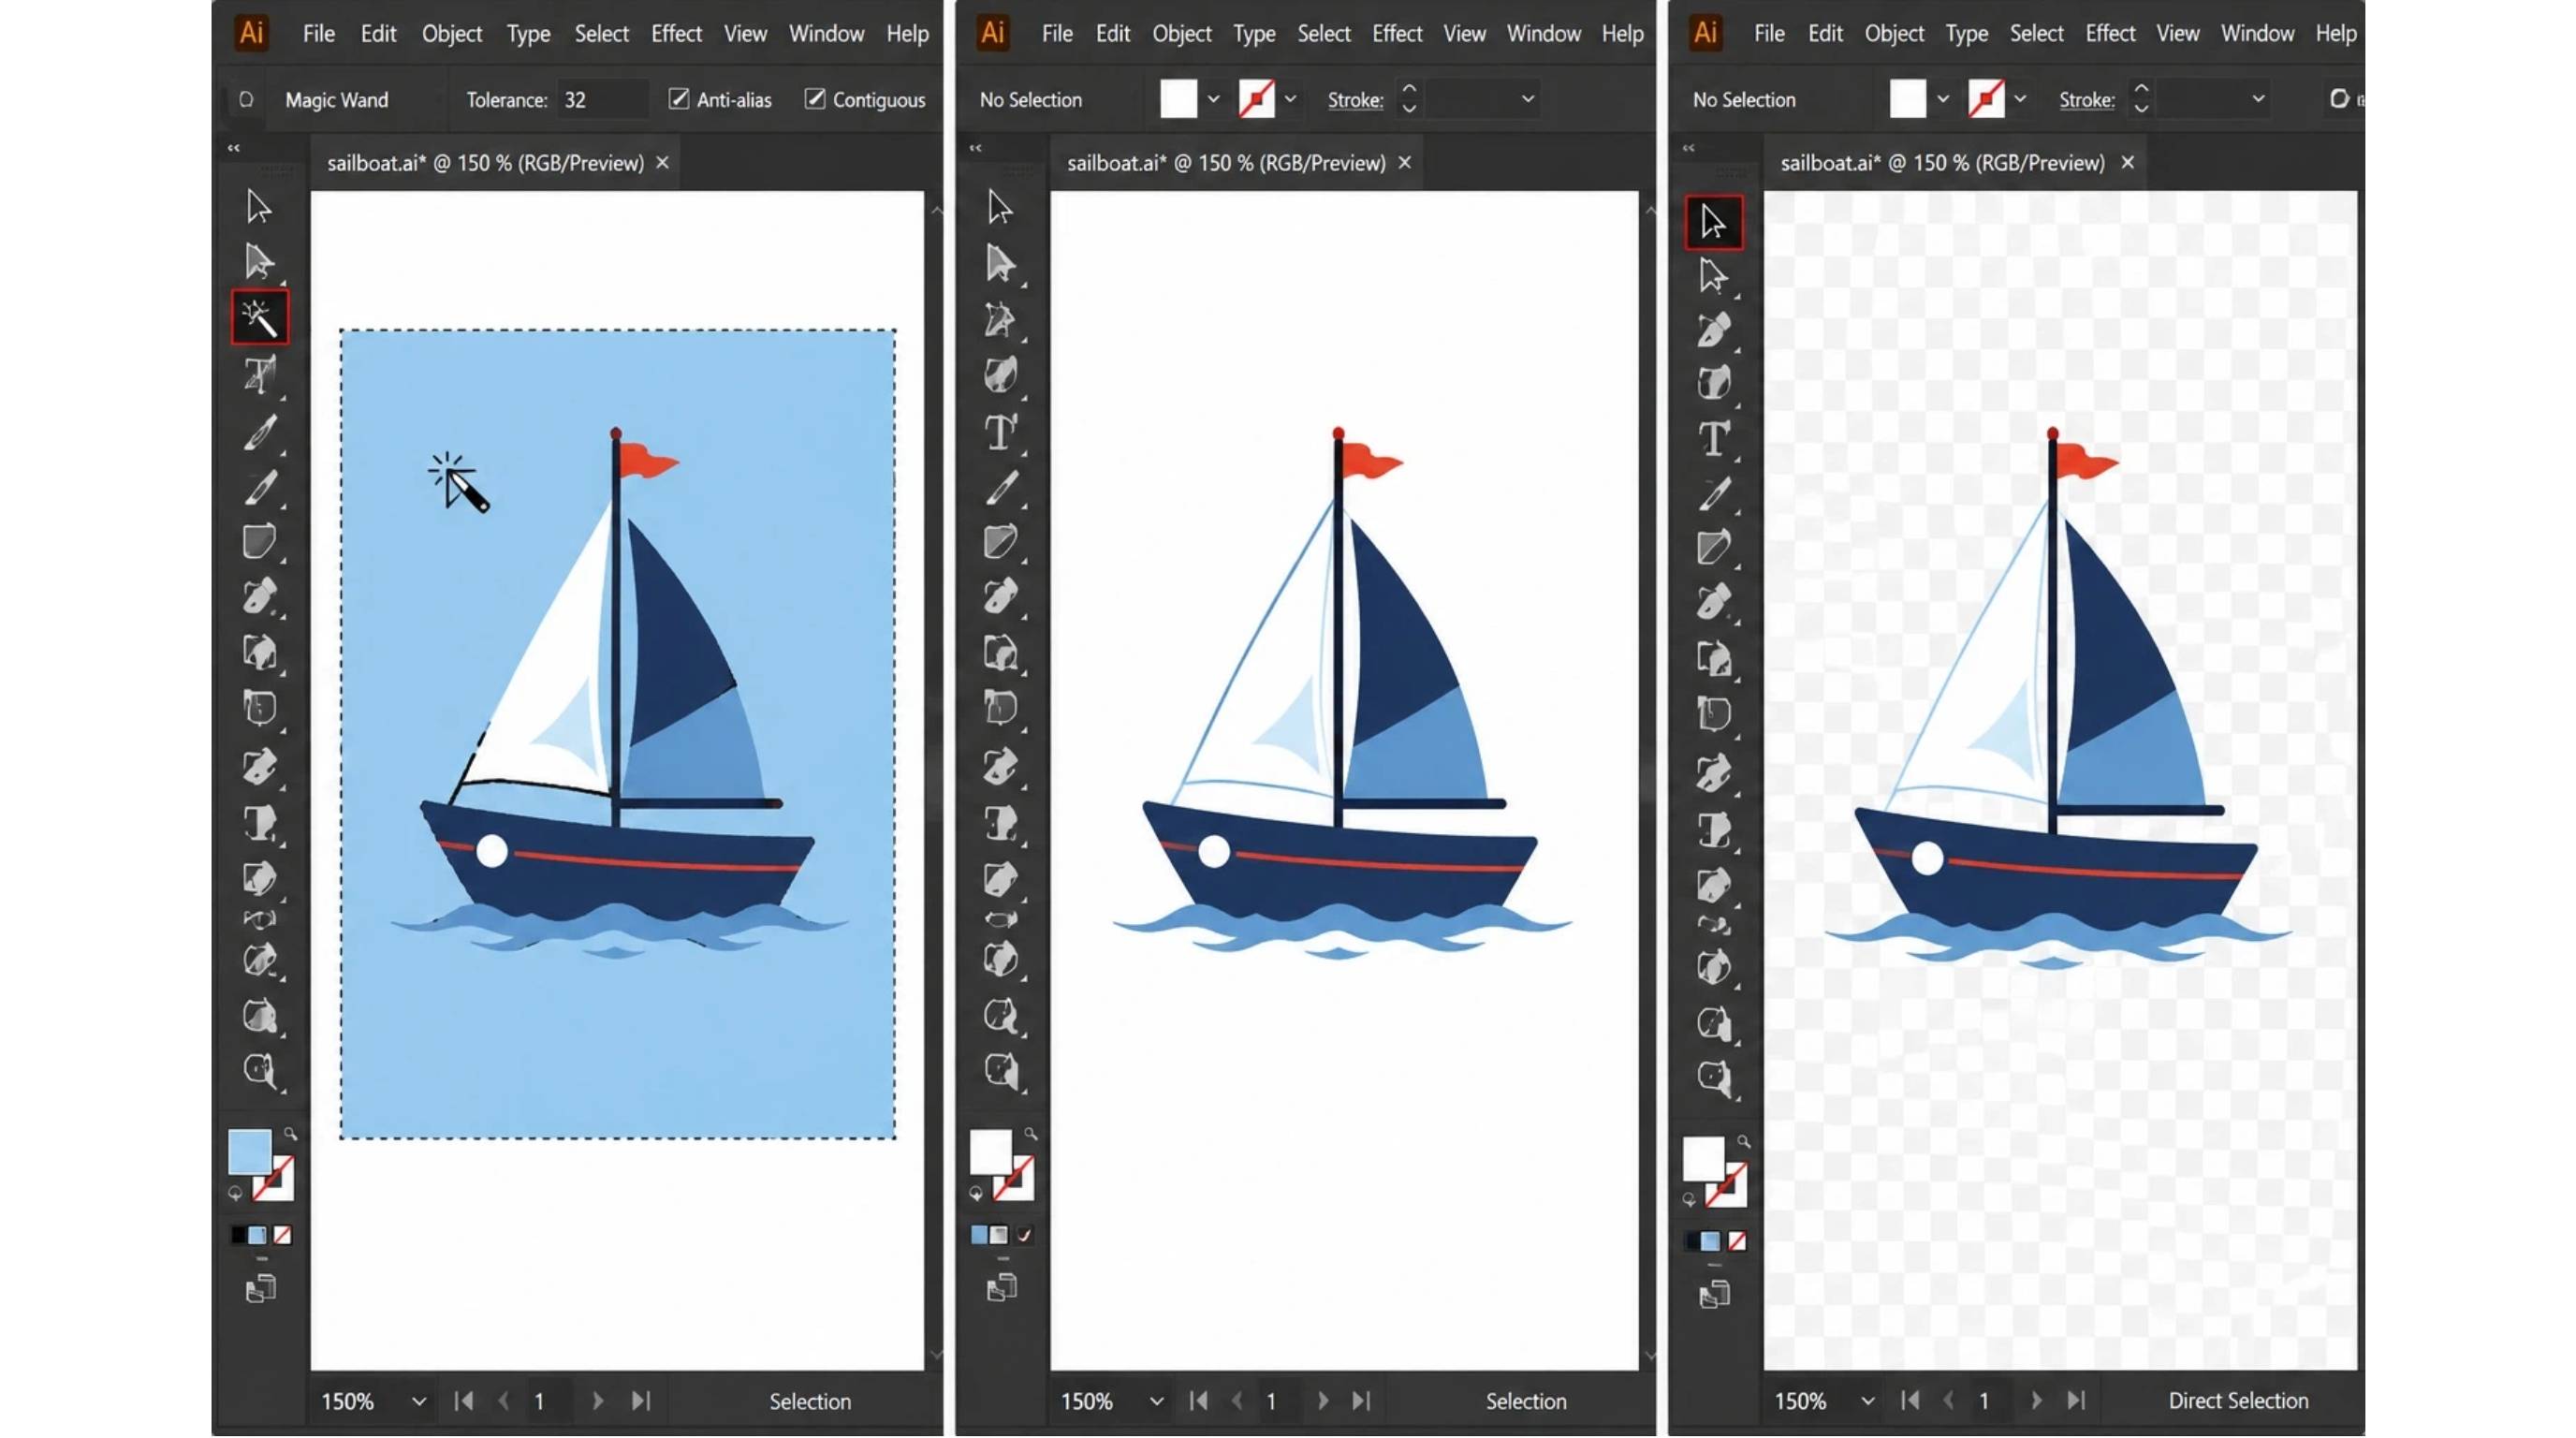
The Magic Wand tool works well for vector artwork and expanded Image Trace results with solid-color backgrounds. It quickly selects matching fills, making it easy to remove the background from image Illustrator projects with simple designs. This approach is also useful if you're learning how to remove image background in Illustrator when the artwork contains solid-color fills that can be selected automatically.
Step 1: Select the background
Expand the artwork if necessary, then choose the Magic Wand Tool (Y) and click the background color to select similar filled objects.
Step 2: Delete unwanted areas
Press Delete to remove the selected background. Repeat the process if multiple colors or shapes remain.
Step 3: Refine the result
Use the Direct Selection Tool (A) to remove any leftover shapes and check the Transparency Grid to ensure the background is transparent.
Method 3: Pen Tool + Clipping Mask
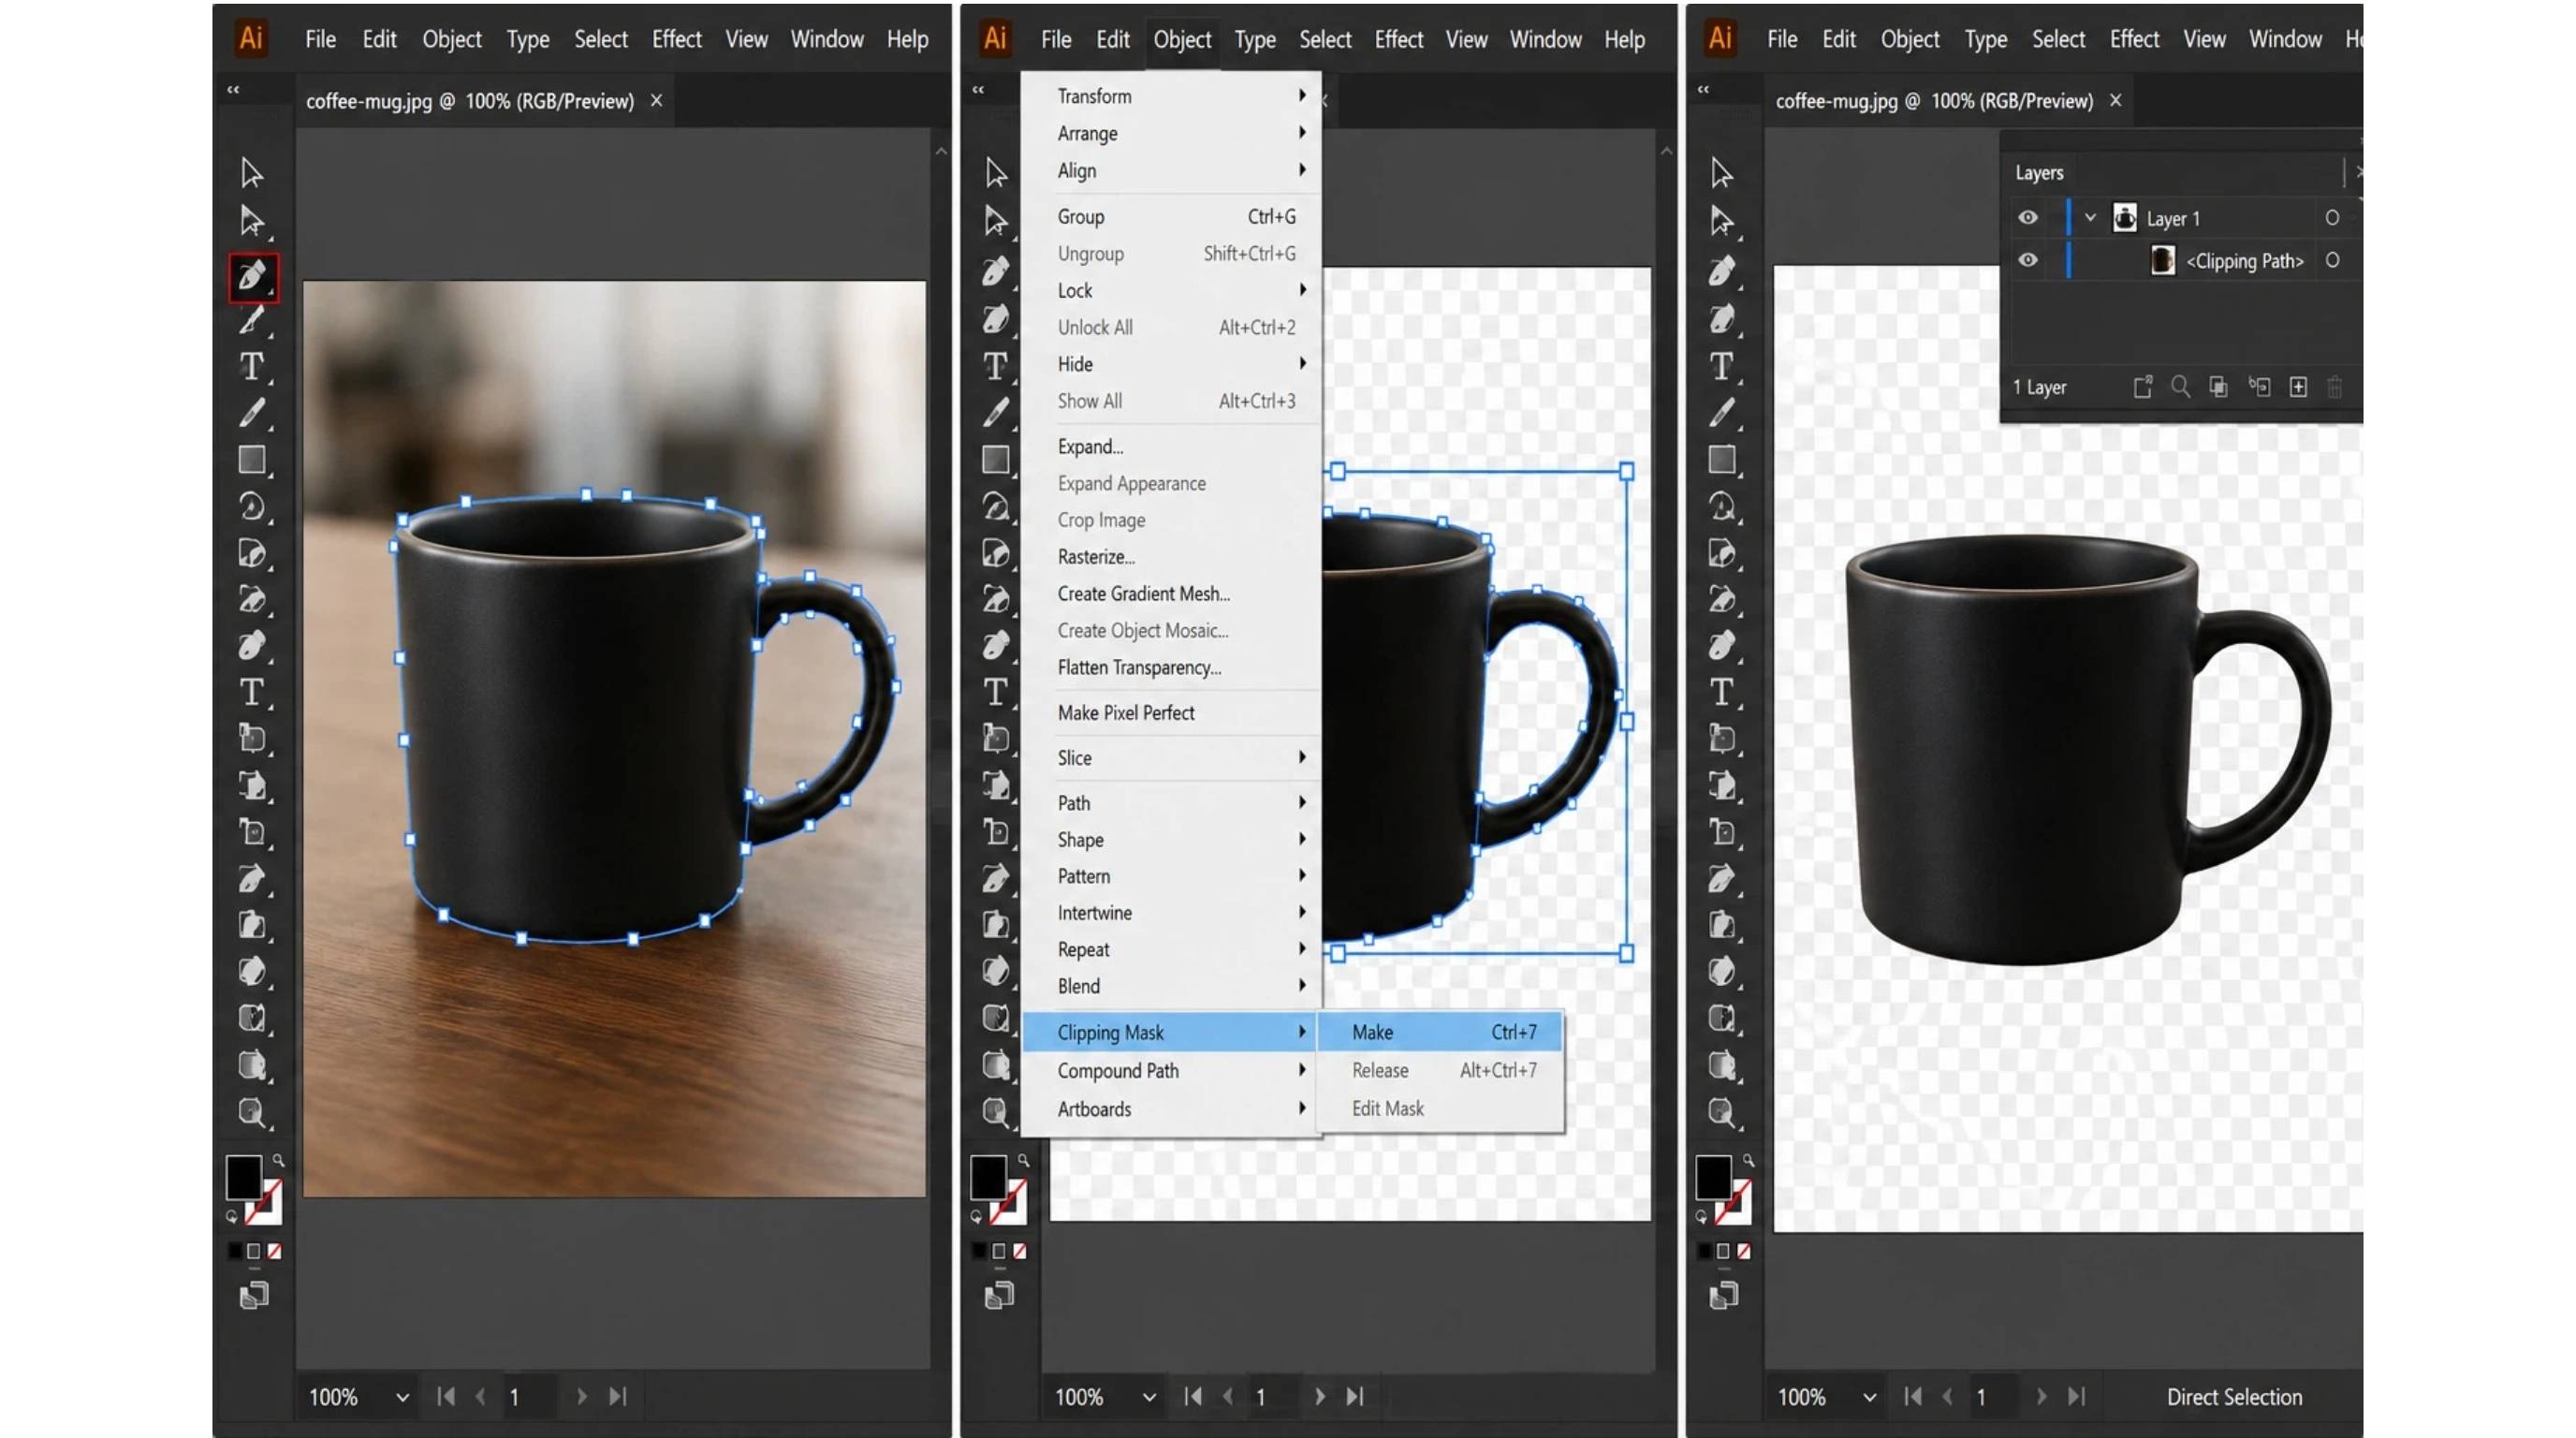
The Pen Tool offers the highest level of precision for products, people, and detailed objects. If you're learning how to remove background in Illustrator with Pen Tool, this method delivers the cleanest manual cutouts. If you've searched for how to remove background on Adobe Illustrator, the Pen Tool is widely recommended because it offers the highest level of precision for manual cutouts.
Step 1: Draw a path around the subject
Place your image, lock its layer if needed, and use the Pen Tool (P) to carefully create a closed path around the object you want to keep.
Step 2: Create the clipping mask
Unlock the image, select both the image and the completed path, then choose Object > Clipping Mask > Make or press Ctrl/Cmd + 7.
Step 3: Refine the cutout
Edit the clipping path whenever necessary to improve edges without permanently deleting any part of the original image.
Method 4: Clipping Mask with shapes
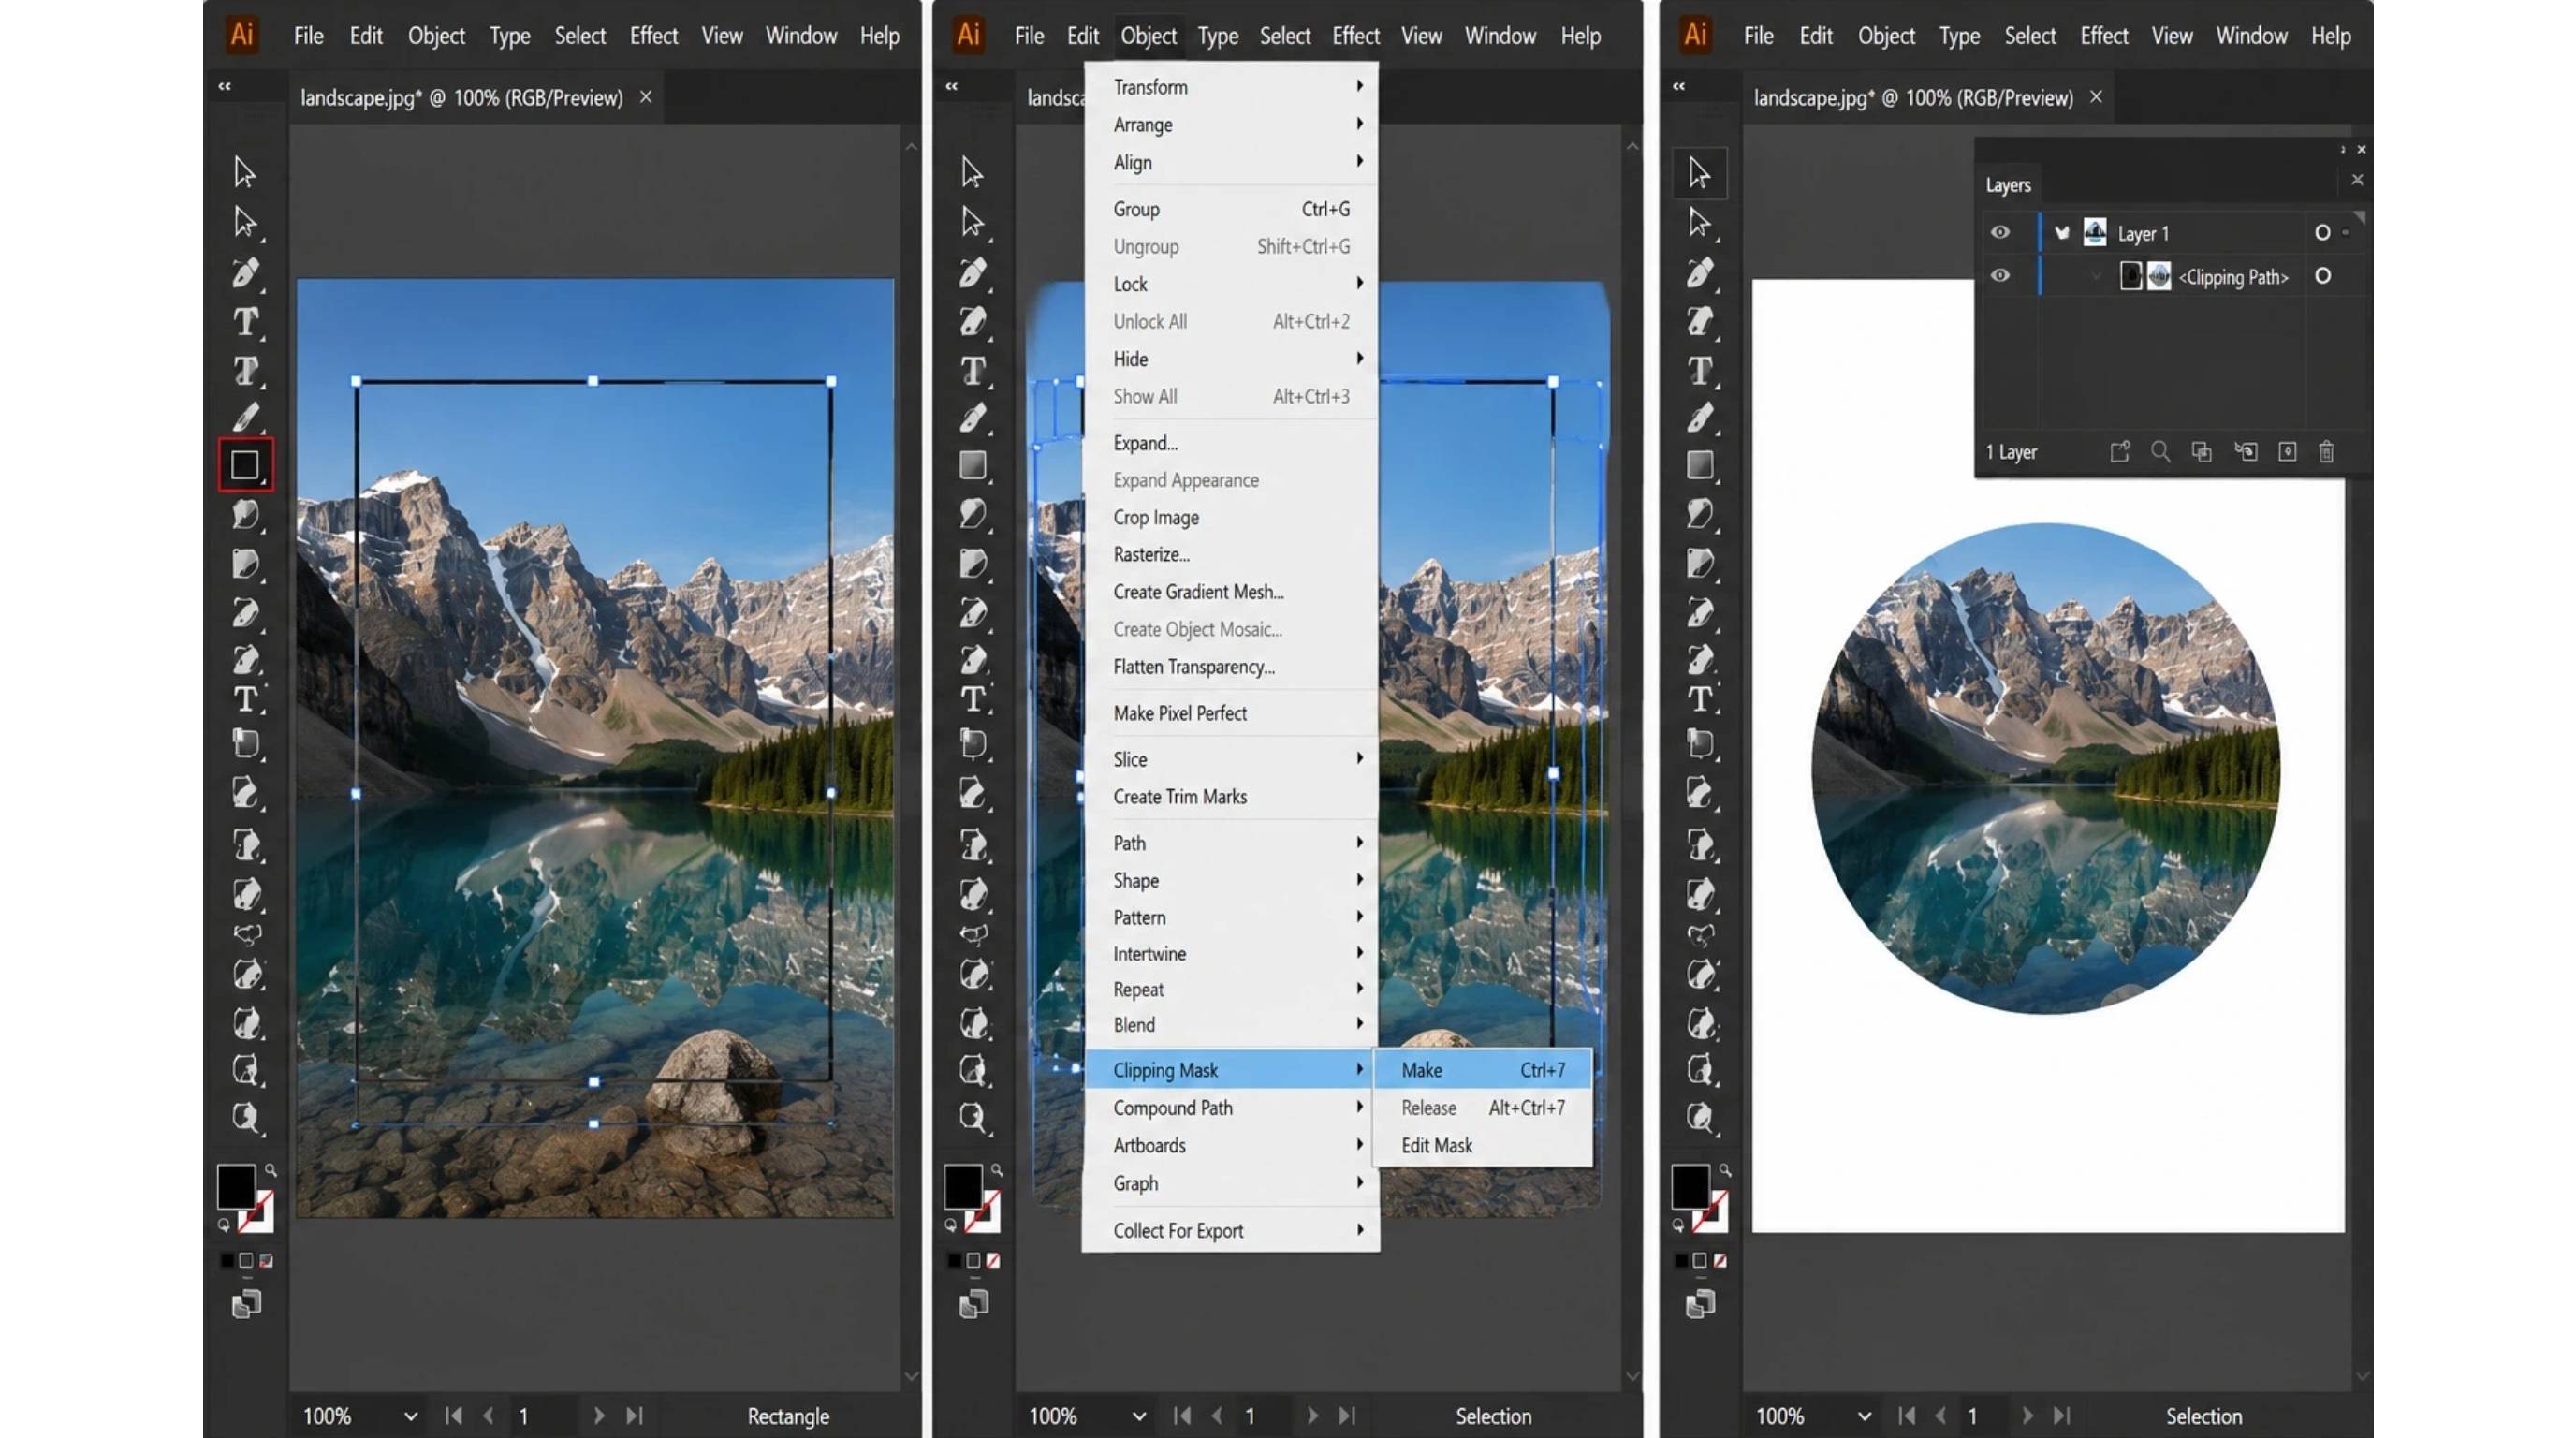
When your subject has a simple outline, a shape-based clipping mask provides a quick, non-destructive way to remove background in Illustrator projects without modifying the original image.
Step 1: Draw a clipping shape
Create a rectangle, ellipse, or custom shape that covers the portion of the image you want to keep.
Step 2: Apply the clipping mask
Select both the shape and the image, then choose Object > Clipping Mask > Make to hide everything outside the selected shape.
Step 3: Adjust the mask
Use the Direct Selection Tool to reposition or edit the clipping path at any time while keeping the original image intact.
How to delete a white background in Illustrator
If you have an image with a simple white background, it's relatively easy to get rid of it in Illustrator. For logos, icons and simple graphics, Image Trace with the Ignore White option is often the fastest fix since it ignores white areas while tracing. Scale the artwork, then use the Magic Wand Tool or Direct Selection Tool to delete any remaining white objects.
Image Trace may not produce clean results for photos or images with shadows and textured backgrounds. You will get more precision with the Pen Tool or a clipping mask in these cases. Always select View > Show Transparency Grid before exporting to make sure that the background has been removed completely.
After removing, export a transparent background (PNG/SVG)
Removing the background in Illustrator and saving in the right format will ensure your transparent image looks good on websites, ecommerce stores, presentations and print projects. PNG and SVG are the two most common options, and which one you use will depend on how you plan to use the file.
Check transparency before you export
Make sure your artwork is really transparent before you export. View > Show Transparency Grid to illustrate the checkerboard background of Illustrator. If you still see unwanted white shapes or hidden objects, delete them before exporting. It is also good practice to keep an editable AI file so you can make changes in the future without having to repeat the background removal process.
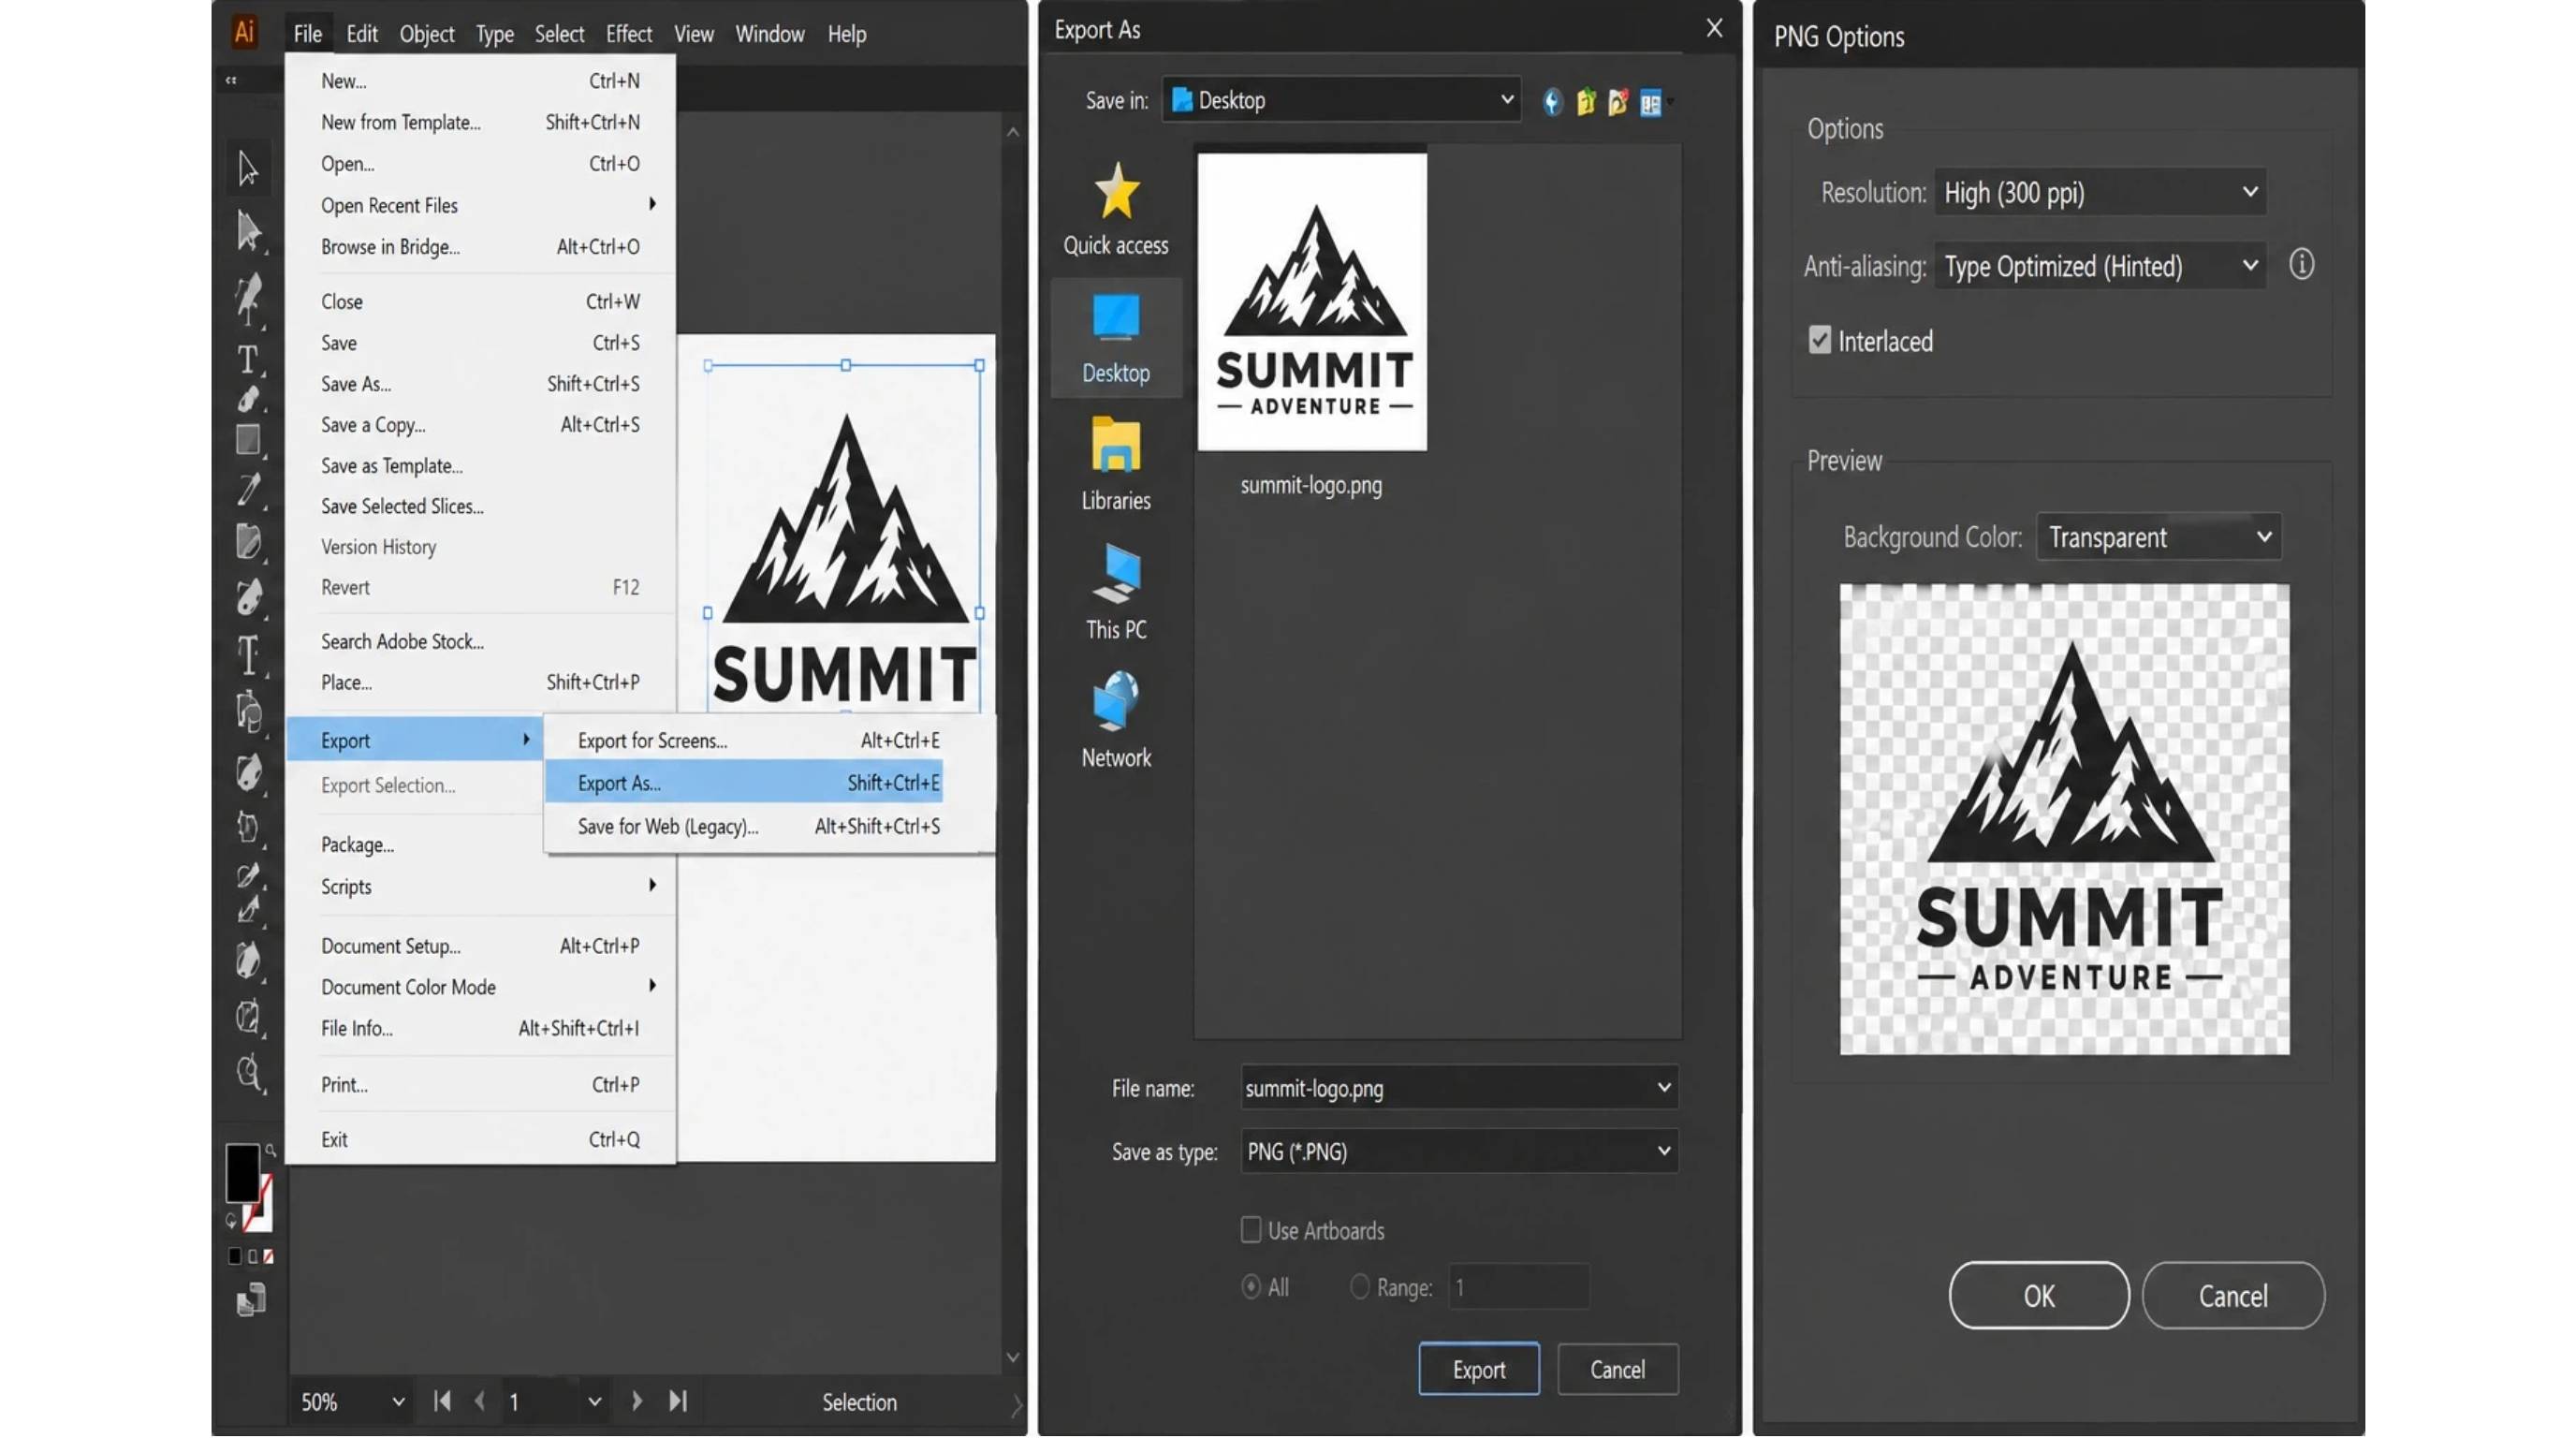
Export as transparent PNG
Step 1: Open the export settings
Go to File > Export > Export As and select PNG as the output format.
Step 2: Enable transparency
In the PNG options, set the Background Color to Transparent and choose the appropriate resolution for your project.
Step 3: Export the image
Save the file to create a transparent PNG that's ready for websites, ecommerce listings, presentations, or social media.
When to use SVG instead
SVG is perfect for logos, icons, and any other vector graphics, as it maintains a crisp quality at any size. If you have used Image Trace and Expand to convert your artwork into vectors, when you export as SVG, it will retain scalability. PNG is still the better option for pictures or intricate cutouts as it maintains detail in your image and allows for transparent backgrounds.
Tips for cleaner background removal
Even with the right technique, the quality of your final output depends on your source image and editing workflow. There are a few simple best practices you can follow to make cleaner edges, reduce your editing time, and create professional-looking transparent images.
Start with high-resolution sources
The higher the resolution, the more detail the image has. This makes it easier to make accurate selections and get smooth edges. Poor quality images are usually pixelated, which results in less accurate background removal and requires manual cleanup afterwards.
Prefer simple backgrounds when possible
If you're photographing products or objects yourself, use a plain, solid-colored background whenever possible. Simple backgrounds make it much easier to remove the background of the image in Illustrator and improve the accuracy of tools like Image Trace.
Refine edges and excess anchor points
After you've got that background out of there, zoom in and look at the edges of your subject. Remove any unneeded anchor points and make the jagged curves more natural-looking and cleaner for a cutout.
Keep an unedited original
Always make a copy of your original image or Illustrator file before editing. By keeping the original, you can go back to the project, make changes, or try a different background removal method without starting over.
Know when Photoshop or AI is faster
Illustrator is a great choice for vector editing and precise manual cutouts. But if you're working with detailed photos or processing large numbers of product images, AI background removal tools or Photoshop can save you a lot of editing time.
Illustrator Background Removal vs AI Background Remover
Both Illustrator and AI background removal tools can produce transparent images, but they are designed for different types of workflows. Illustrator has more precision and vector editing, while AI tools are geared towards speed and efficiency for large-scale image processing.
|
|
Illustrator |
AI Background Remover |
|---|---|---|
|
Precision/vector control |
Excellent |
Good (raster cutout) |
|
Learning curve |
Higher |
Low |
|
Batch product photos |
Slow |
Fast |
|
Logo / print-ready vectors |
Strong |
Limited |
|
Ecommerce campaign volume |
Extra steps |
Faster to listing-ready |
Illustrator remains the better choice when you need detailed vector editing and full control. However, AI tools are often more efficient for businesses processing large volumes of product images.
Remove image backgrounds faster with Designkit
Illustrator provides designers with exacting control for detailed edits and vector-based workflows. But what ecommerce brands and marketing teams struggle with is how to create hundreds of product visuals at scale and with consistency across listings, ads, and social campaigns.
AI-powered tools can assist in automating this process, automatically removing backgrounds, creating new product scenes, and preparing images for ecommerce platforms and marketing materials. They don't substitute for the precision of the Pen Tool, but they can cut down significantly on repetitive editing when creating visuals at scale.
How to remove backgrounds with Designkit
Step 1: Upload your image
Import your product photo, lifestyle image, or marketing asset into Designkit.
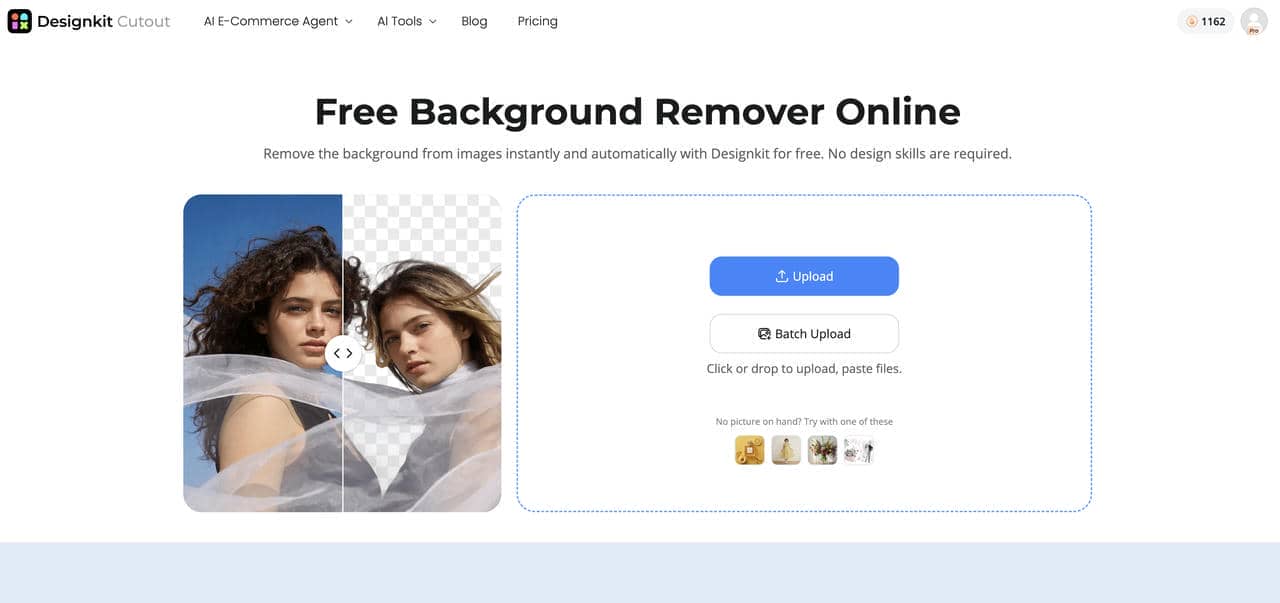
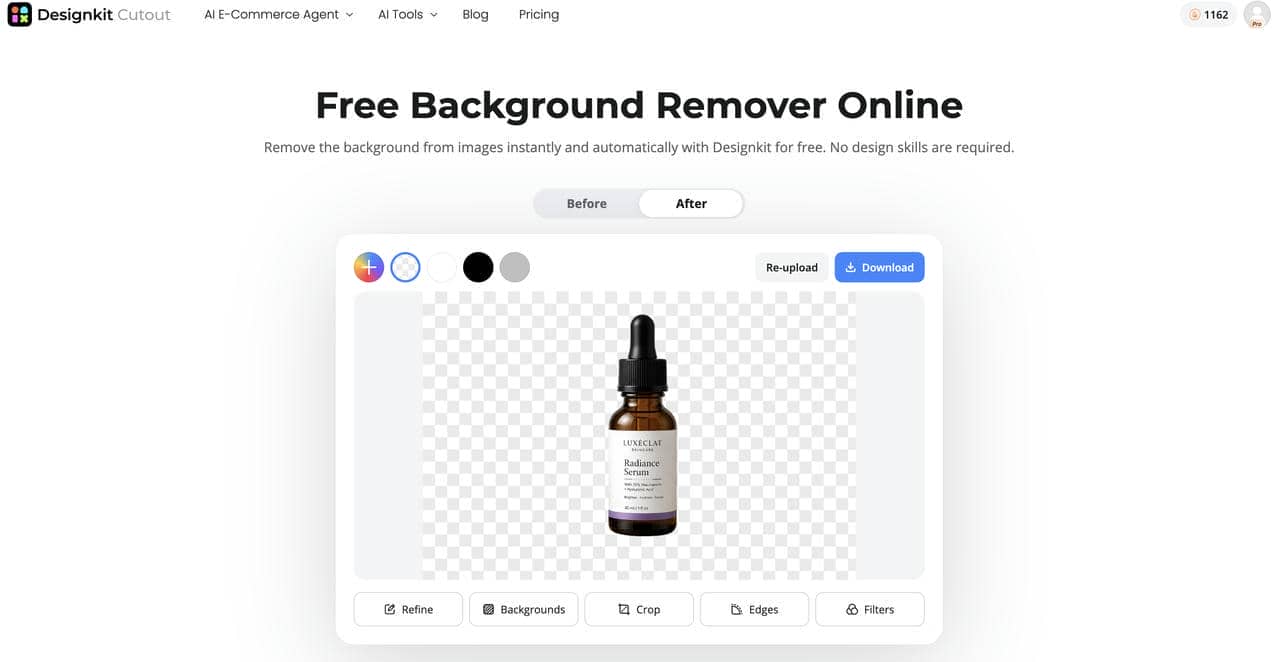
Step 2: Remove the background with AI
The AI automatically detects the subject and removes the background. You can make small refinements if necessary.
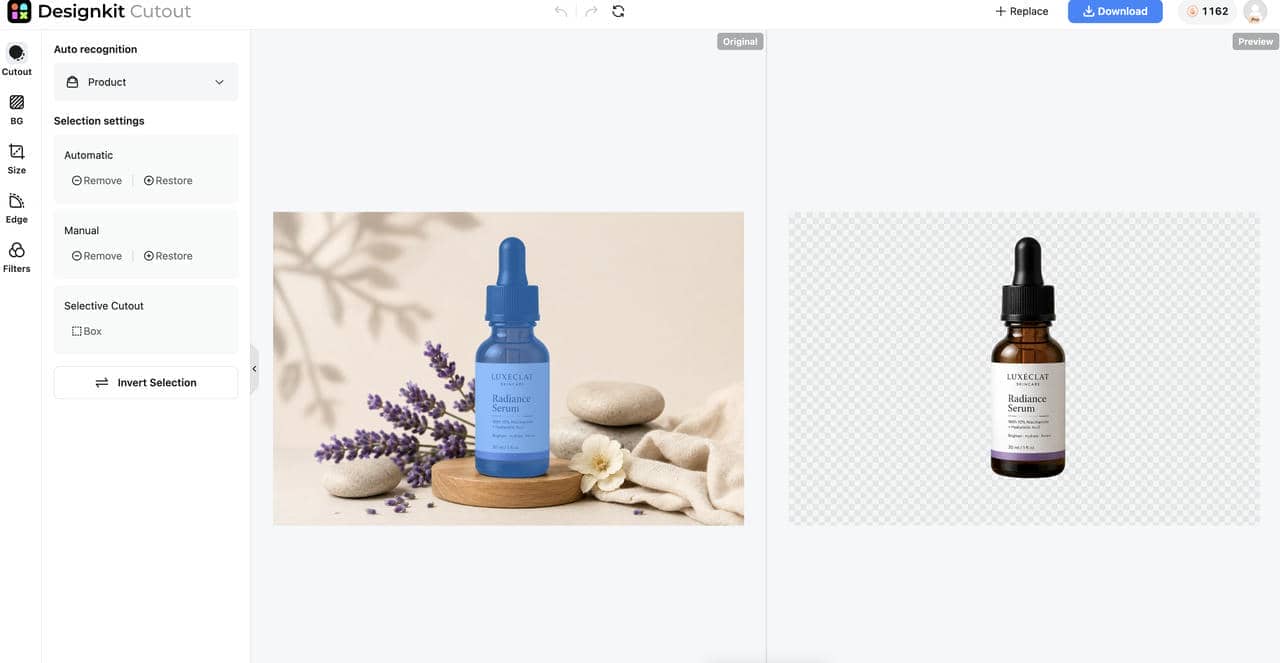
Step 3: Export your transparent image
Download a high-quality transparent image that's ready for ecommerce listings, advertisements, websites, or social media.
Designkit features for background removal
Besides background removal, Designkit comes with an array of AI-powered features that simplify image editing and enable you to produce professional product visuals quicker. These tools will help you speed up your workflow, whether you're working with a few images or a full product catalog.
-
AI background removal: Automatically detects the subject and removes the background with a click. Clean cutouts for product photos, portraits, and marketing images.
-
AI background generation: Replace plain backgrounds with AI-generated scenes that match your product, brand, or campaign, creating more engaging visuals.
-
Batch image processing: Edit multiple images simultaneously to save time when preparing large product catalogs, online listings, or marketing assets.
-
Brand-consistent product visuals: Maintain a uniform look across all your product images by creating visuals with consistent backgrounds, lighting, and styling.
-
AI image enhancement: Improve image quality by sharpening details, enhancing colors, and increasing clarity after background removal for a polished final result.
-
Export-ready transparent assets: Download transparent images that are ready for use on ecommerce platforms, websites, presentations, and other marketing materials.
Final thoughts
Learning how to remove backgrounds in Illustrator means you'll have greater control over creating transparent logos, product images, and marketing graphics. Illustrator has strong tools like Image Trace, Magic Wand, and Pen Tool for different editing needs, but AI-powered solutions are often quicker for bulk image processing. Designkit makes it easy to create professional, ecommerce-ready visuals in less time with automatic background removal, image enhancement, and background generation.
Frequently Asked Questions
How do I remove a background in Illustrator with the Pen Tool?
How do I delete a white background in Illustrator?
For logos and simple graphics, use Image Trace with the Ignore White option enabled. Use the Magic Wand or Direct Selection Tool to make the artwork larger, and delete any white shapes that are left.
Can Illustrator automatically remove backgrounds?
There is no one-click background remover in Illustrator. But tools like Image Trace can automatically get rid of simple white backgrounds on logos and illustrations, whereas complicated images need manual editing.
What is the easiest way to remove a background from an image in Illustrator?
For simple graphics, Image Trace is the easiest choice. The Pen Tool and clipping masks can give you more precise results for detailed photos or products, but will take you longer to edit.
Does Illustrator remove backgrounds better than AI tools?
Illustrator has more precision and full control over vector editing, so it's perfect for detailed design work. AI tools are generally quicker for background removal of large numbers of raster images and product photos.
Can I remove backgrounds from multiple images at once?
Illustrator does not have an efficient batch background removal workflow. When you need to work on multiple images at once, AI-powered tools like Designkit can do the background removal work for you automatically, saving you a lot of time.
What file format keeps a transparent background?
PNG is the format of choice for transparent raster images, and SVG is the format of choice for logos and vector graphics that need to scale without losing quality.
Can Designkit remove backgrounds automatically?
Yes. Designkit uses AI to automatically identify subjects and remove the background. It also offers background generation, image enhancement, and batch processing to help you create more professional product visuals more efficiently.
You May Also Like

7 Best Remove.bg Alternatives in 2026: Free & Paid Tools

Instagram Carousel: What It Is, How to Post & Create One

Nano Banana Prompts: 20+ Examples for Better AI Images

Ideogram AI Review 2026: Features, Pricing & Alternatives

Free Mac Photo Editor: 5 Tools Compared for Mac Users

How to Crop a Photo Into a Circle Online (Keep Quality)

How to Make an Image Transparent Online (AI Guide)

Pixlr Background Remover Review 2026: Features, Pricing & Alternatives

How to Fix Overexposed Photos: Recover Highlights Fast

OpenArt AI Review 2026: Features, Pricing & Alternatives

Best AI Headshot Generator: 9 Tools Compared for 2026

Best Stencil Maker Tools 2026: Turn Photos Into Stencils

Pixelbin Watermark Remover Review: Image & Video Results Tested

How to Make a Sticker on iPhone: Easy Step by Step Guide

Best AI Logo Generator in 2026: 10 Tools Compared

How to Turn a Photo Into a Cartoon: A Beginner-Friendly Guide

Landscape vs Portrait: Key Differences & Best Uses in 2026

How to Remove Watermark From Photo: AI, Photoshop & More

How to Fix Pixelated Photos: Photoshop, AI Tools & Tips

Bing Image Creator: How It Works, Features, Uses & Alternatives

How to Remove People from Photos with AI: A Step-by-Step Guide

How to Increase Image Resolution: AI, Photoshop & PPI

How to Add Text to a Photo: 8 Tips for Better Results

How to Fix Grainy Photos: Easy Ways to Clear Images

Creative Profile Picture Ideas for Every Style and Platform

Evoto AI Review 2026: Features, Pricing, Pros & Cons

Pixlr Photo Editor Review: Features, Pricing & Alternatives

Best AI Image Extender Tools in 2026: Expand Photos with AI

How to Make a Collage on iPhone: Easy Guide for 2026

How to Sharpen an Image in Photoshop (Smart Sharpen and Unsharp Mask)

Best Image Background Remover Tools in 2026: AI Tools Compared

How to Make Transparent Background in Paint: Step-by-Step Guide

How to Resize an Image: Best Methods, Tools & Quality Tips

Best AI Image Generator Tools in 2026: Top AI Platforms Compared

Remove.bg Review 2026: Features, Pricing & Is It Worth It?

Luminar Neo Photo Editor Review 2026: AI Features, Price & Pros

How to Post Multiple Photos on Instagram (2026 Guide)

25 Facebook Cover Photo Ideas for Personal & Business Pages

What Is a PFP? Meaning, Examples & How to Create One

Can You Edit an Instagram Post After Posting?

11 Best Canva Alternatives in 2026 for AI Design & Marketing

8 Best Midjourney Alternatives in 2026: Features, Pricing & Comparison

How to Restore Old Photos: AI Tools, Tips & Best Methods

Pixelcut AI Review 2026: Features, Pricing, Pros, Cons & Alternatives

How to Apply Watermark to Photos: Methods, Tips & AI Tools

How to Remove a Background in Illustrator: 4 Easy Methods

How to Change Background Color on Instagram Story (Easy Guide)

8 Best AI Poster Generators in 2026: Create Posters Faster with AI

10 Best AI Image Enhancers in 2026: Tested & Compared

10 Best AI Image Editors in 2026: Features, Pricing & Comparison

7 Best AI Background Changer in 2026: Remove & Replace Photo Backgrounds

Luminar Neo vs Lightroom: Features, Pricing & Comparison 2026

Kittl Review 2026: Is It Worth It? Features & Pricing

How to Make a Blurry Image Clear: 5 AI & Manual Ways

How to Remove Background on iPhone: 5 Easy Methods (2026)

Photoroom Background Remover Review 2026: Features & Alternatives

How to Remove Background in Canva: A Step-by-Step Guide

How to Remove Background in GIMP: Beginner-Friendly Guide

Funny Dog Memes to Try: Doge Meaning and 10 Original Ideas

Back to School Checklist 2026: Supplies, Timeline, and Planning

Recraft AI Review 2026: Features, Pricing, Pros, Cons & Alternatives

How to Make an Image Transparent in Google Slides: Opacity & Background Removal

VanceAI Photo Enhancer Review: Features, Pricing & Alternatives in 2026

What Does Emojify Mean? Text, Photos, & Emoji Art Explained

Top 8 Online Background Removers for Ecommerce Photos (2026)

How to Remove Background in Photoshop: 7 Easy Methods

6 Best AI Image Upscalers 2026: Tools Tested & Compared

Project Indigo Review: Is It Better Than iPhone Camera?

How Big Is an 8x10 Photo? Size, Pixels & Frame Guide

How Big Is a 4x6 Photo? Dimensions, Pixels & Printing Tips

Picsart AI Review: Features, Pricing, Pros, Cons & Alternatives

Lovart AI Review: AI Design Agent Features, Pricing & Alternatives

Fotor AI Image Generator Review: Features, Pricing & Alternatives

How to Add Emoji to Photo Online for Free

Emoji Wallpaper Ideas & How to Make One Online (2026)

Minimalist Poster Design: How to Make a Clean Poster (2026)

How to Make a Custom Poster That Is Ready to Print

Instagram Image Size Guide 2026: Post, Reel, Story & Carousel Specs

LinkedIn Image Size Guide: Profile, Post & Banner Dimensions

YouTube Profile Image Size: Best Dimensions & Safe Area 2026

How to Edit Amazon Product Photos That Boost Sales Fast
Create Transparent Product Images Faster
Illustrator gives you precise control for vector editing and detailed cutouts, and AI tools speed up image editing when you have lots of images to work on. With Designkit, you can remove backgrounds, create new scenes, and build professional product visuals in minutes.
