
How to Increase Image Resolution and Keep the Result Natural
Compare AI upscaling and Photoshop methods, understand the limits of enlargement, and choose the right resolution for web, social, or print.

Small images can lose clarity when enlarged. Stretch one across a banner, and edges may look jagged while fine details become soft or blurry. Standard resizers add pixels through interpolation, but they cannot recover details missing from the original image. AI upscalers can generate plausible details, improve edges, and enhance textures, often producing a sharper and more natural-looking result.
Which method you choose matters more than the numbers you type. This comprehensive guide covers how to increase image resolution with Designkit and Photoshop, how the methods differ, and how much your output needs.
Can You Increase Image Resolution Without Losing Quality?
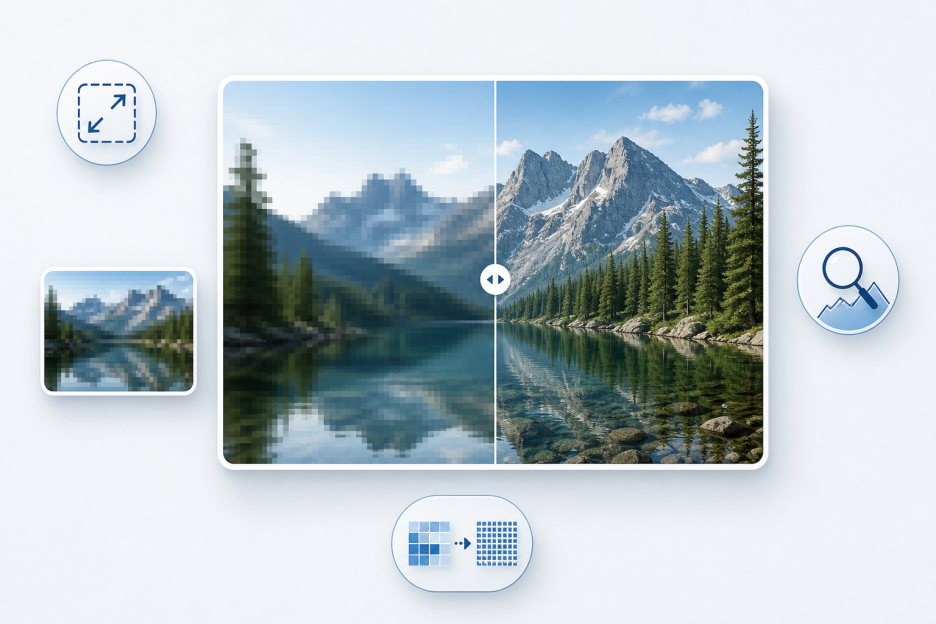
Yes, you can make an image high resolution enough to hold up at a larger size, but no method recovers data the original camera never recorded. Resolution depends on pixel dimensions rather than file size alone. For instance, a photo at 800 by 600 contains 480,000 pixels, which sets the true limit on real detail.
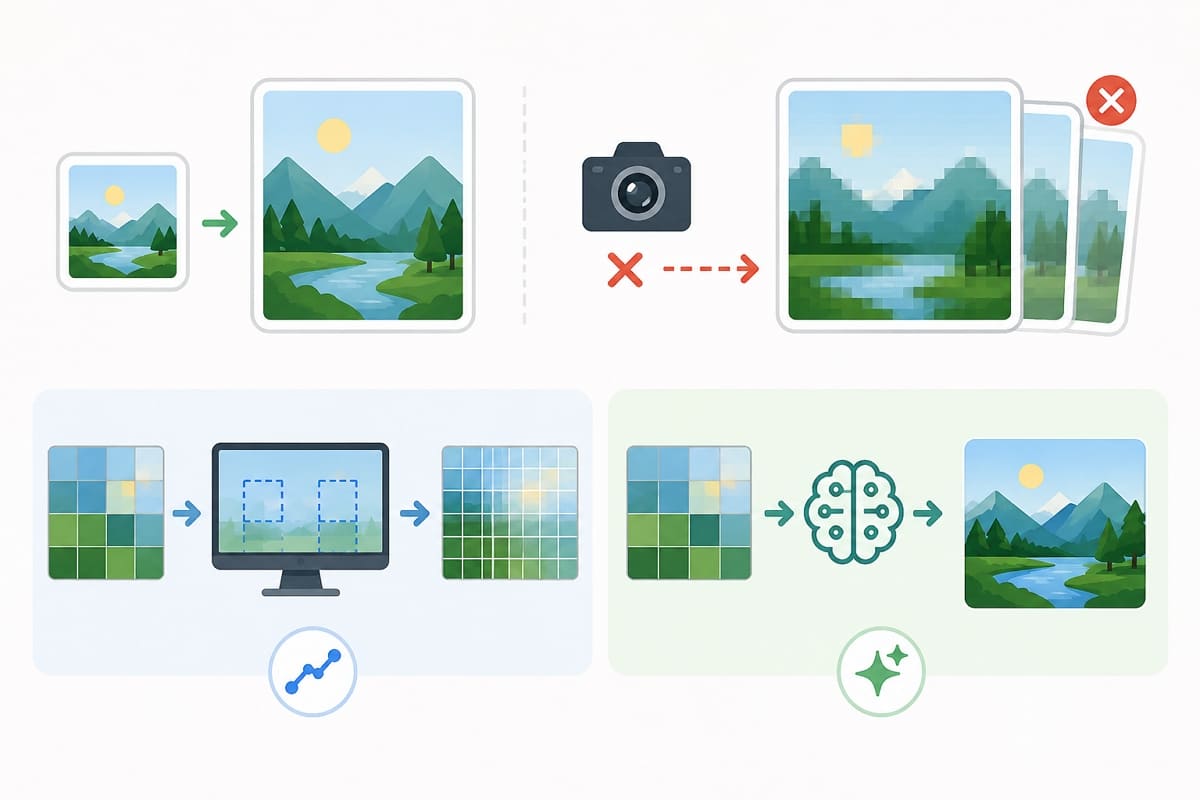
A larger file size can result from more pixels, higher bit depth, extra metadata, or less compression. Standard software expands pictures through resampling, where new pixels are calculated from existing image data. These averaged pixels carry zero new information, which explains why enlarged images appear soft and faint.
How AI Fills the Detail Gap
AI tools provide a superior method when you discover how to improve a low-resolution image. Modern algorithms reconstruct plausible edges, realistic textures, and crisp details based on visual patterns learned elsewhere. Consequently, the final result looks remarkably sharp at an expanded scale. However, users must maintain realistic expectations.
AI upscalers generate plausible detail rather than recover information lost from the original image. Fine patterns, small text, and facial features can reveal these limitations first. Advanced models may produce convincing results, but they cannot restore visual data the source never captured.
How to Increase Image Resolution in Photoshop
Browser tools handle most enlargement automatically. Photoshop gives you more control over resizing, resampling, and noise reduction, which helps when the result needs fine adjustment. The workflow uses both Preferences and the Image Size dialog to increase image resolution in Photoshop. Follow the steps below to apply the settings correctly:
1. Go to the top menu, click “Image,” then select “Image Size” and set your pixel dimensions to a higher number.
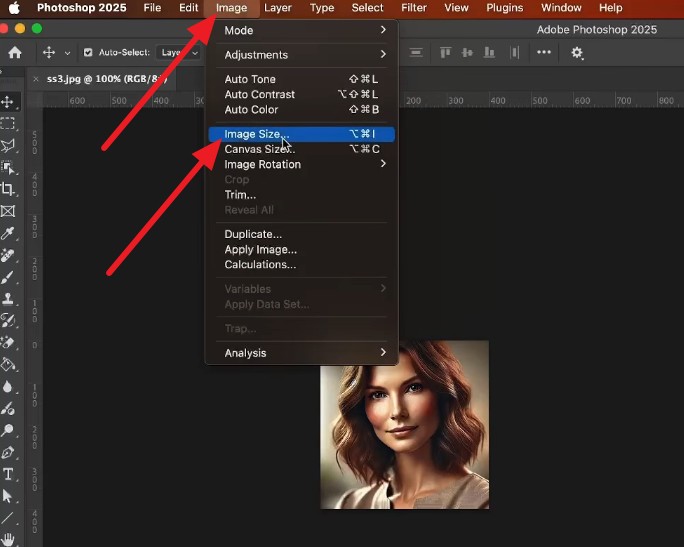
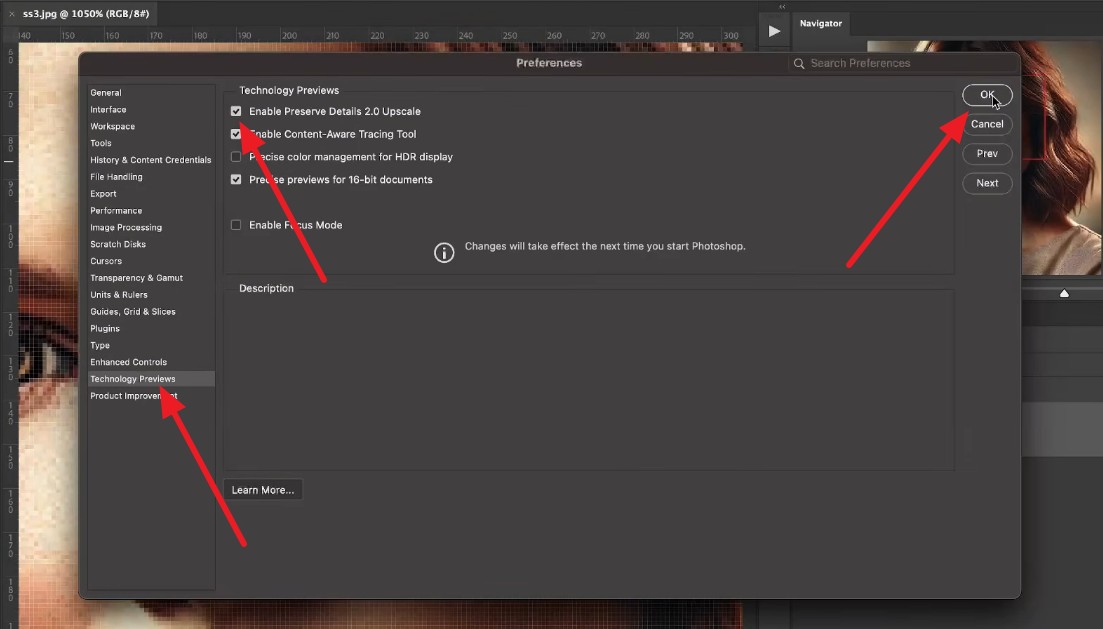
2. Press “Ctrl + K ” (Windows) or “ Command + K ” (Mac) to open Preferences. Select “ Technology Previews ” from the left menu > Check the box for “ Enable Preserve Details 2.0 Upscale ” and click “ OK.”
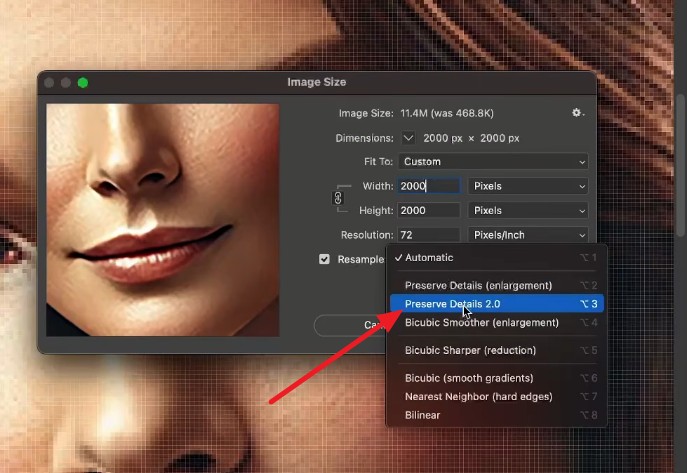
3. Under the “Resample” drop-down, select “Preserve Details 2.0,” set the “Reduce Noise” slider, and click "OK. Check the preview at 100% before committing, then export a copy so the original file stays untouched.
Note: Scale only as much as needed. Moderate enlargement can stay sharp, while aggressive scaling may reveal softness and artifacts
A Simpler Alternative: Increase Image Resolution with Designkit
The quickest route to increase image resolution needs no software at all. Designkit's Image Enhancer runs the upscale in the browser, which suits anyone who wants to enhance photo quality without learning a desktop editor. You can upload images in batches and choose between HD and Ultra HD resolution options. So, if you wonder how to enhance photo quality with this AI tool, review the following steps in detail:
Step 1: Upload the Low-Resolution Image
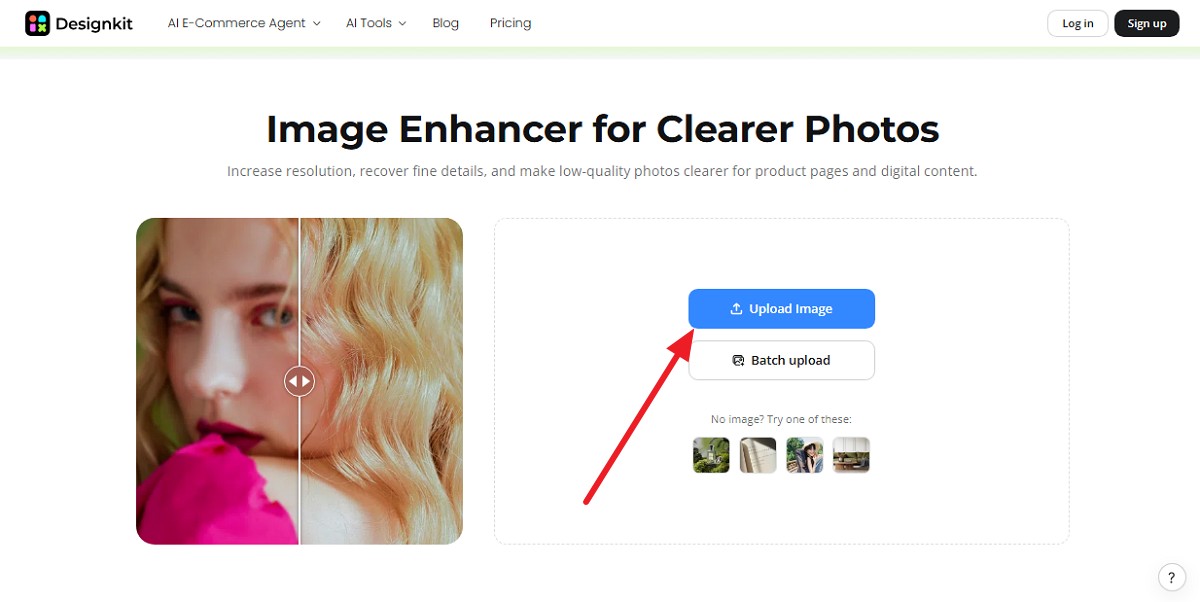
Open the “Image Enhancer ” tool and press the “ Upload Image ” icon to add the image.
Tip:Use the best original you have rather than a screenshot, a messaging-app copy, or a file saved as JPEG several times over. Heavy compression artifacts expand alongside real detail, which tricks the model into reinforcing total noise.
Step 2: Choose the Enhancement Quality
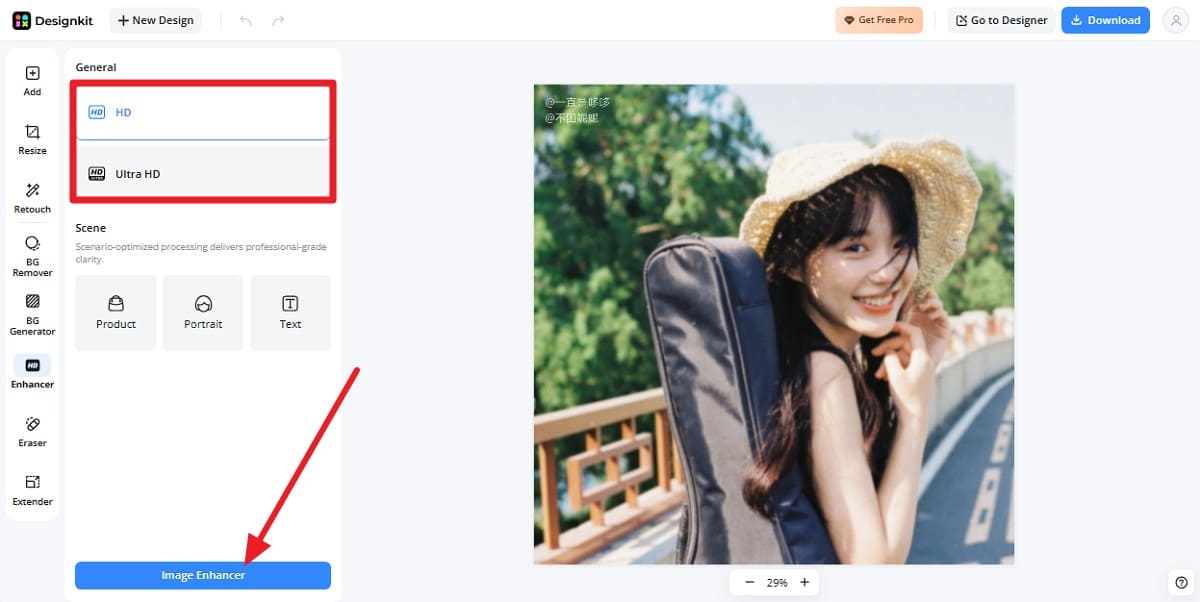
With the file in place, pick the enhancement quality options from “HD ” or “ Ultra HD ” and click on “ Image Enhancer.” The highest setting isn't automatically the right one, since heavier enhancement can smooth skin, flatten texture, or invent detail that was never there.
Tip: Always select a setting based on target size and final destination, since web thumbnails require far less precision than physical prints. When two options produce similar results, choose the lighter option to preserve a natural appearance over time.
Step 3: Review and Download the Enhanced Image
Settings decide what the model attempts, and only the result tells you whether it worked. When the image is upscaled, compare the outcomes, press the “Download ” option, and choose the export format.
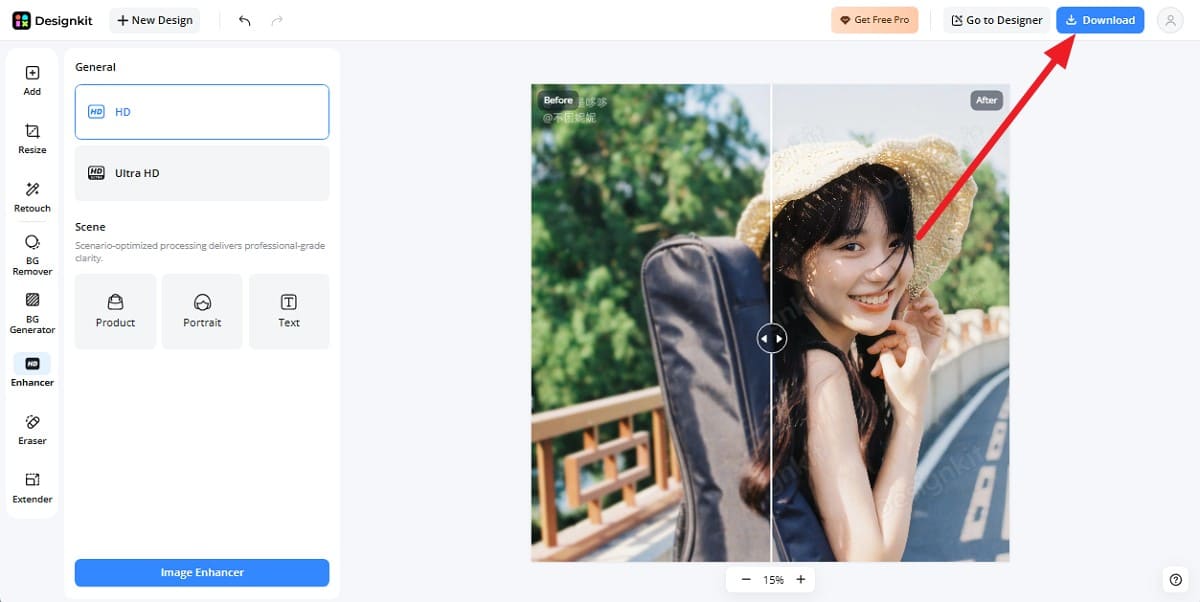
Tip:Compare the original and enhanced versions at 100% zoom, where one image pixel maps to one screen pixel. Download once the dimensions and the appearance both suit the intended use.
Upscaling vs Resizing: Which Preserves More Detail?
Both routes above are to improve image quality, which is only one of 3 things people reach for when an image is too small. Only one of the 3 adds meaningful detail, and the table below shows why:
|
Metric |
AI Upscaling |
Standard Resizing |
Sharpening |
|---|---|---|---|
|
Pixel Count |
Increases |
Increases when enlarged |
Unchanged |
|
Adds Detail |
Generates predicted detail |
No new captured detail |
No |
|
Edge Quality |
Often strong |
Can soften when enlarged |
Enhances edge contrast |
|
Texture Quality |
Can improve or invent texture |
Usually declines with enlargement |
Does not restore texture |
|
Best Enlargement Range |
Moderate to large |
Small to moderate |
None |
|
Artifact Risk |
False or invented detail |
Blur or jagged edges |
Halos or oversharpening |
|
Faces & Small Text |
Needs close inspection |
Often softens |
May create halos |
|
Processing Requirement |
Moderate to high |
Low |
Low |
|
Best For |
Low-resolution images |
Minor size changes |
Slightly soft images |
Sharpening can make a picture clearer by increasing edge contrast without changing its pixel count. However, blur from camera shake or missed focus needs different fixes. Our guide to making a blurry image clear covers those cases.
How Much Resolution Does Your Image Need?
Choosing the right method to make an image high resolution still leaves the question of how far to take it. Enough is defined by the output, not by a number that sounds impressive. Chasing maximum pixels for a social post wastes time and file size, so here are some suggestions:
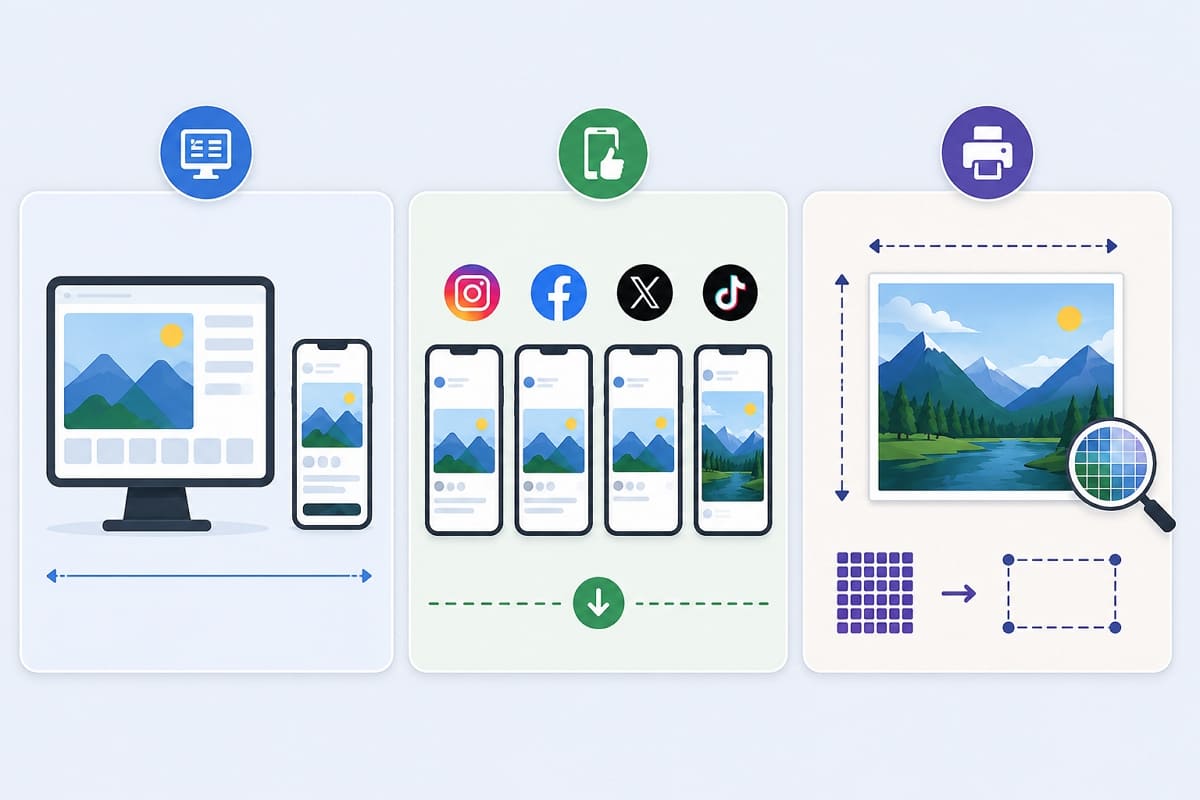
- Screens and Websites: Match the image dimensions to the display size instead of exporting a much larger file.
- Social Content: Follow each platform’s recommended dimensions, since oversized images may be resized or compressed during upload.
- Print: Pixel dimensions matter most here because they determine how large an image can print at a chosen PPI.
For print, the calculation is simple:
Pixels Needed = Print Size in Inches × PPI
An 8 × 10-inch print at 300 PPI needs 2,400 × 3,000 pixels. Adobe notes that a 600-dpi printer may only require a 150–300 PPI image for high-quality output. Treat 300 PPI as a common target, not a universal ceiling.
Note: Changing the PPI or DPI value alone changes how large the file prints, not how much detail it holds. Adobe is explicit that image data stays constant until you resample.
Common Mistakes When Increasing Image Resolution
Knowing how to improve image quality starts with protecting the source file. Try to avoid these 7 mistakes when you upscale the image with either method:
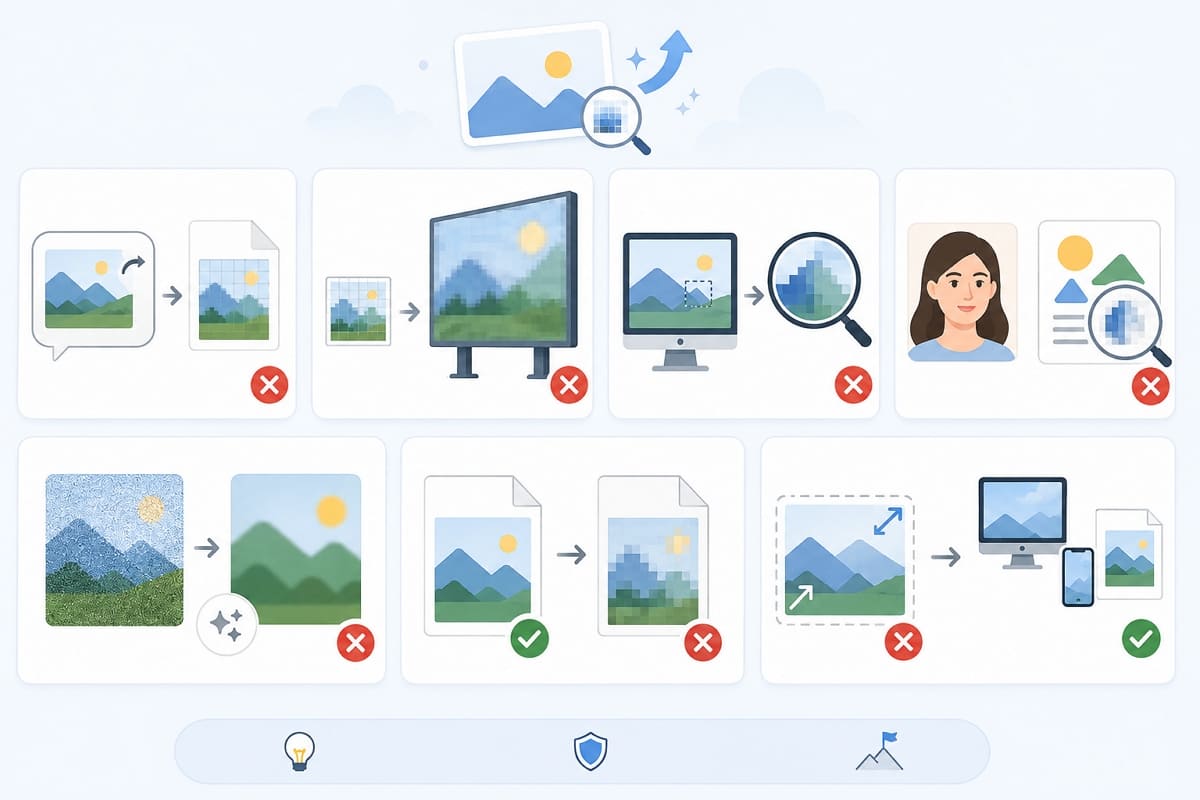
1. Starting from the Wrong Copy: A screenshot or a file forwarded through messaging apps has already lost data. Track down the highest-quality original before enlarging anything.
2. Pushing the Enlargement Too Far: A 400 by 300 image will not become a billboard. Enlarge in proportion to what the source holds, and accept a smaller final size when it holds little. Two moderate passes rarely beat one correctly sized pass.
3. Judging at the Wrong Zoom: A fit-to-screen view hides artifacts by shrinking them. Review at 100%, where the flaws appear at the scale viewers will meet them.
4. Ignoring Faces and Text: These are the first places invented detail looks wrong, because viewers know exactly what both should look like. Check eyes, teeth, lettering, and logos before anything else.
5. Over-Smoothing to Hide Noise: Heavy noise reduction removes grain and texture together, leaving skin, fabric, and foliage looking synthetic. Grain is usually less distracting than plastic.
6. Re-Compressing the Result: Saving the enhanced file as a low-quality JPEG reintroduces the artifacts you just spent effort removing. Use PNG, or a JPEG at the highest quality setting available.
7. Enlarging Before Knowing the Output: Deciding the final size first prevents both an insufficient result and a needlessly heavy file.
Conclusion
Tool choice dictates final quality. Select AI upscaling for major expansions, standard resizers for minor adjustments, and simple sharpening when size remains constant. For a fast workflow on how to increase image resolution, Designkit's Image Enhancer processes files directly in your browser. Always start with a clean source file, pick realistic target sizes, and inspect the result carefully.
Frequently Asked Questions
Does increasing image resolution improve image quality?
Can I increase the resolution of a JPEG image?
Yes, though JPEG compression makes it harder. Every save discards data and adds artifacts that get enlarged along with the picture. Start from the least-compressed copy you can find, and save the enhanced version as PNG or high-quality JPEG so you do not repeat the loss.
What is the difference between image resolution and image size?
Resolution describes pixel dimensions, such as 3,000 by 2,000. Image size can mean the file size in megabytes or the physical print size in inches. Pixel dimensions control how much detail exists, while file size only reflects how efficiently those pixels were stored.
Why does an image look blurry after I enlarge it?
If you are learning how to enhance photo quality, standard resizing calculates new pixels by averaging existing ones, so it spreads the same detail across a larger area. Nothing new is added, and the softness becomes more visible the further you enlarge. AI upscaling reduces this effect but cannot eliminate it entirely.
Can AI make a low-resolution image high resolution?
It can produce a larger, cleaner-looking version, and that is genuinely useful. What it cannot do is retrieve detail the camera never captured. The model predicts what belongs there based on learned patterns, so faces, small text, and fine patterns deserve a careful check.
Does changing DPI increase image resolution?
No, DPI and PPI describe how densely pixels are placed when printing, so changing that value alters the print size rather than the pixel count. Making a picture clearer requires resampling or upscaling, which actually changes the number of pixels in the file.
You May Also Like
Remove.bg Shutting Down Dec 1, 2026: What Users Are Saying

7 Best Remove.bg Alternatives in 2026: Free & Paid Tools

Instagram Carousel: What It Is, How to Post & Create One

Nano Banana Prompts: 20+ Examples for Better AI Images

Ideogram AI Review 2026: Features, Pricing & Alternatives

Free Mac Photo Editor: 5 Tools Compared for Mac Users

How to Crop a Photo Into a Circle Online (Keep Quality)

How to Make an Image Transparent Online (AI Guide)

Pixlr Background Remover Review 2026: Features, Pricing & Alternatives

How to Fix Overexposed Photos: Recover Highlights Fast

OpenArt AI Review 2026: Features, Pricing & Alternatives

Best AI Headshot Generator: 9 Tools Compared for 2026

Best Stencil Maker Tools 2026: Turn Photos Into Stencils

Pixelbin Watermark Remover Review: Image & Video Results Tested

How to Make a Sticker on iPhone: Easy Step by Step Guide

Best AI Logo Generator in 2026: 10 Tools Compared

How to Turn a Photo Into a Cartoon: A Beginner-Friendly Guide

Landscape vs Portrait: Key Differences & Best Uses in 2026

How to Remove Watermark From Photo: AI, Photoshop & More

How to Fix Pixelated Photos: Photoshop, AI Tools & Tips

Bing Image Creator: How It Works, Features, Uses & Alternatives

How to Remove People from Photos with AI: A Step-by-Step Guide

How to Increase Image Resolution: AI, Photoshop & PPI

How to Add Text to a Photo: 8 Tips for Better Results

How to Fix Grainy Photos: Easy Ways to Clear Images

Creative Profile Picture Ideas for Every Style and Platform

Evoto AI Review 2026: Features, Pricing, Pros & Cons

Pixlr Photo Editor Review: Features, Pricing & Alternatives

Best AI Image Extender Tools in 2026: Expand Photos with AI

How to Make a Collage on iPhone: Easy Guide for 2026

How to Sharpen an Image in Photoshop (Smart Sharpen and Unsharp Mask)

Best Image Background Remover Tools in 2026: AI Tools Compared

How to Make Transparent Background in Paint: Step-by-Step Guide

How to Resize an Image: Best Methods, Tools & Quality Tips

Best AI Image Generator Tools in 2026: Top AI Platforms Compared

Remove.bg Review 2026: Features, Pricing & Is It Worth It?

Luminar Neo Photo Editor Review 2026: AI Features, Price & Pros

How to Post Multiple Photos on Instagram (2026 Guide)

25 Facebook Cover Photo Ideas for Personal & Business Pages

What Is a PFP? Meaning, Examples & How to Create One

Can You Edit an Instagram Post After Posting?

11 Best Canva Alternatives in 2026 for AI Design & Marketing

8 Best Midjourney Alternatives in 2026: Features, Pricing & Comparison

How to Restore Old Photos: AI Tools, Tips & Best Methods

Pixelcut AI Review 2026: Features, Pricing, Pros, Cons & Alternatives

How to Apply Watermark to Photos: Methods, Tips & AI Tools

How to Remove a Background in Illustrator: 4 Easy Methods

How to Change Background Color on Instagram Story (Easy Guide)

8 Best AI Poster Generators in 2026: Create Posters Faster with AI

10 Best AI Image Enhancers in 2026: Tested & Compared

10 Best AI Image Editors in 2026: Features, Pricing & Comparison

7 Best AI Background Changer in 2026: Remove & Replace Photo Backgrounds

Luminar Neo vs Lightroom: Features, Pricing & Comparison 2026

Kittl Review 2026: Is It Worth It? Features & Pricing

How to Make a Blurry Image Clear: 5 AI & Manual Ways

How to Remove Background on iPhone: 5 Easy Methods (2026)

Photoroom Background Remover Review 2026: Features & Alternatives

How to Remove Background in Canva: A Step-by-Step Guide

How to Remove Background in GIMP: Beginner-Friendly Guide

Funny Dog Memes to Try: Doge Meaning and 10 Original Ideas

Back to School Checklist 2026: Supplies, Timeline, and Planning

Recraft AI Review 2026: Features, Pricing, Pros, Cons & Alternatives

How to Make an Image Transparent in Google Slides: Opacity & Background Removal

VanceAI Photo Enhancer Review: Features, Pricing & Alternatives in 2026

What Does Emojify Mean? Text, Photos, & Emoji Art Explained

Top 8 Online Background Removers for Ecommerce Photos (2026)

How to Remove Background in Photoshop: 7 Easy Methods

6 Best AI Image Upscalers 2026: Tools Tested & Compared

Project Indigo Review: Is It Better Than iPhone Camera?

How Big Is an 8x10 Photo? Size, Pixels & Frame Guide

How Big Is a 4x6 Photo? Dimensions, Pixels & Printing Tips

Picsart AI Review: Features, Pricing, Pros, Cons & Alternatives

Lovart AI Review: AI Design Agent Features, Pricing & Alternatives

Fotor AI Image Generator Review: Features, Pricing & Alternatives

How to Add Emoji to Photo Online for Free

Emoji Wallpaper Ideas & How to Make One Online (2026)

Minimalist Poster Design: How to Make a Clean Poster (2026)

How to Make a Custom Poster That Is Ready to Print

Instagram Image Size Guide 2026: Post, Reel, Story & Carousel Specs

LinkedIn Image Size Guide: Profile, Post & Banner Dimensions

YouTube Profile Image Size: Best Dimensions & Safe Area 2026

How to Edit Amazon Product Photos That Boost Sales Fast
Give Low-Resolution Images a Clearer Finish
Upscale low-resolution images in your browser with HD or Ultra HD enhancement. Improve edges and textures, compare the result, and download at the size you need.
