
T-Shirt Design Size and Placement Guide for POD Sellers
Find the right T-shirt design size for each print location. Compare placement ranges, garment adjustments, pixel requirements, and mockup checks before you export.

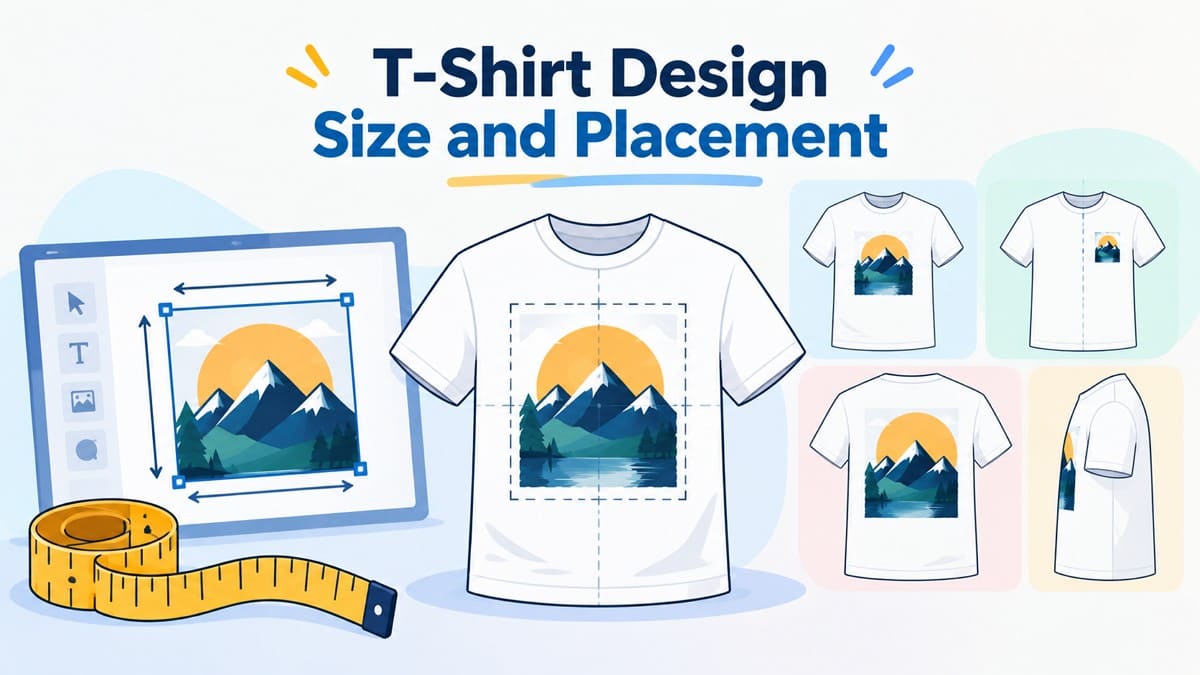
No single T-shirt design size works for every product or provider. The right dimensions depend on placement, garment type, and available print area. A left chest logo needs a different scale than a full back graphic, so using one standard size can lead to poor placement.
Treat the measurements below as starting ranges rather than fixed production specifications. Your provider's current product template remains the final reference. The guide compares common design sizes, placement options, garment adjustments, pixel requirements, and mockup checks.
T-Shirt Design Size Chart by Print Location
Use the T-shirt design size chart below as a practical starting point for adult tees. The listed measurements provide general sizing ranges rather than universal print specifications. Always check the exact print area in your POD provider’s product template before exporting the final design.
| Print Location | Starting Size Range | Placement Reference |
|---|---|---|
| Full Front | 10 to 12 in wide, 10 to 16 in high | About 3 to 4 in below the collar |
| Center Chest | 6 to 10 in wide, 6 to 8 in high | About 3 to 3.5 in below the collar |
| Left Chest or Pocket | 3 to 4 in wide, 3 to 4 in high | Wearer’s left, below the collar and inside the sleeve seam |
| Full Back | 10 to 12 in wide, 10 to 14 in high | About 3 to 4 in below the back neckline |
| Upper Back | 10 to 12 in wide, 3 to 4 in high | Centered across the upper back, below the neckline |
| Back Collar | 2 to 3 in wide, 2 to 3 in high | Centered shortly below the back neckline |
| Sleeve | 2 to 3.5 in wide, up to 3.5 in high | Centered in the provider’s sleeve print area |
How to Use These T-Shirt Design Sizes?
The measurements in the chart provide practical starting points, but they are not fixed rules for every shirt. Before finalizing the design size for shirts, consider these 5 important points:
Start with Adult T-Shirt Sizes
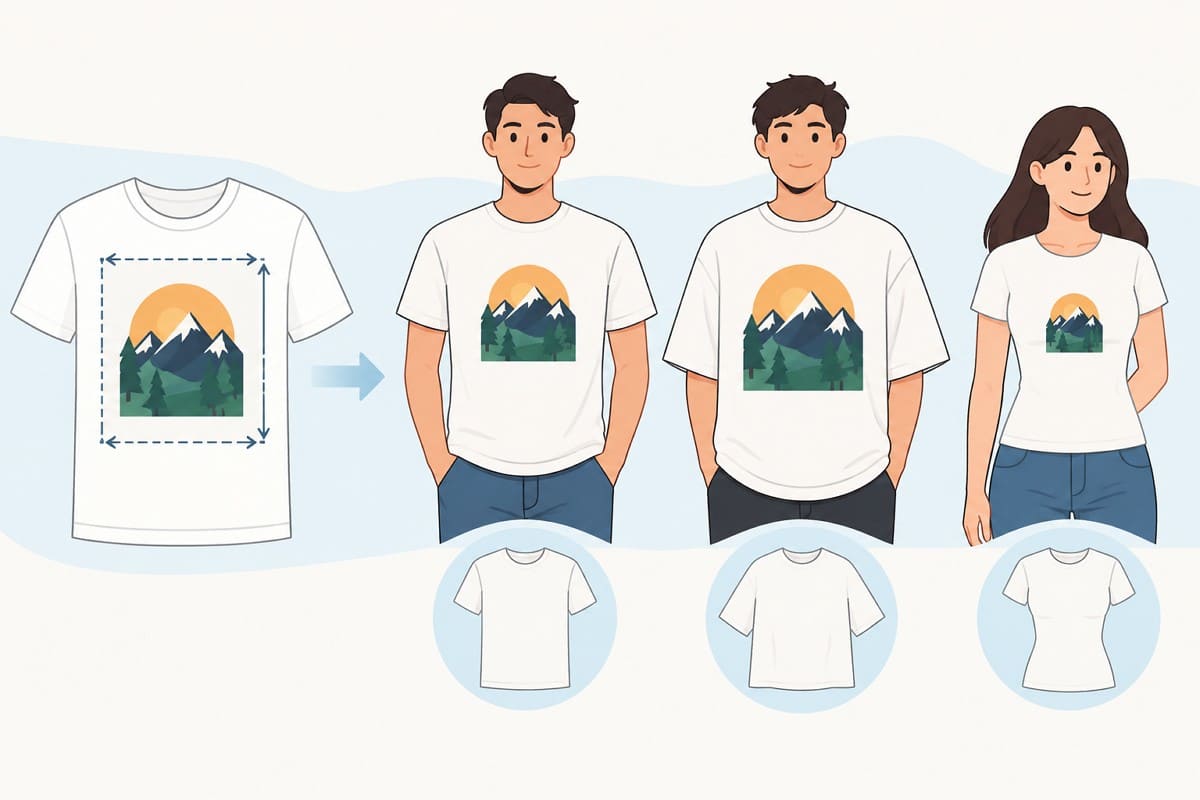
The ranges above provide practical starting points for adult T-shirts. They help you scale the artwork before checking the specific garment. Oversized tees, fitted cuts, and other shirt styles can change how the same T-shirt graphic size appears once printed.
Do Not Fill the Entire Print Area
A provider’s maximum print area sets the available boundary rather than the ideal design size. Artwork can remain smaller while still looking properly proportioned. The T-shirt logo size is especially important, as stretching a compact logo to fill the available space can make it appear oversized.
Let the Artwork Shape Guide the Dimensions
The artwork’s proportions influence its final size. A wide wordmark may require more width and less height, while a portrait-style illustration may suit a taller layout. Adjust T-shirt design dimensions according to the artwork’s aspect ratio rather than forcing every design into identical dimensions.
Follow the POD Provider's Product Template
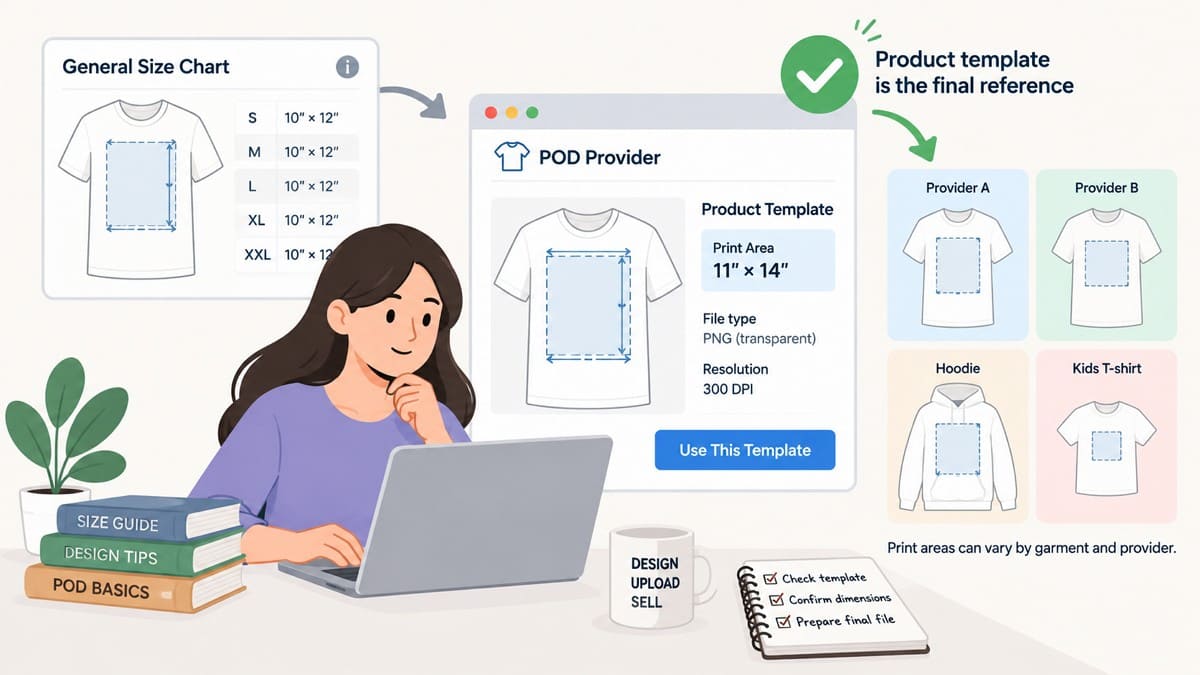
General sizing recommendations help with planning, but the provider’s current template remains the final reference for the available T-shirt print area. Print areas can vary by garment and provider, so use the product template whenever its dimensions differ from a general size chart.
Scale Designs Down for Youth and Toddler Shirts
Youth and toddler garments generally have less printable space than adult shirts, so the same artwork may need to be smaller. Don't simply shrink everything without checking the result. Check the design at its intended printed size rather than shrinking every element by the same percentage. Pay particular attention to small text, thin lines, and detailed graphics.
T-Shirt Design Placement Guide
One T-shirt design size may not work equally well across every product. Different shirt styles and sizes can have different printable areas, so artwork designed for an adult shirt may need adjustment for a smaller garment. Check the specific garment’s print area and file requirements before preparing separate versions.
Full Front and Center Chest Placement
The front carries most designs and offers 2 positions that differ more in scale than technique. A full front graphic covers the chest and upper torso, while a center chest design occupies the upper half. Align both with the shirt’s vertical centerline, using the collar midpoint rather than the side seams, which can shift between cuts. Measure down from the neckline rather than up from the hem, since hem length varies by size.
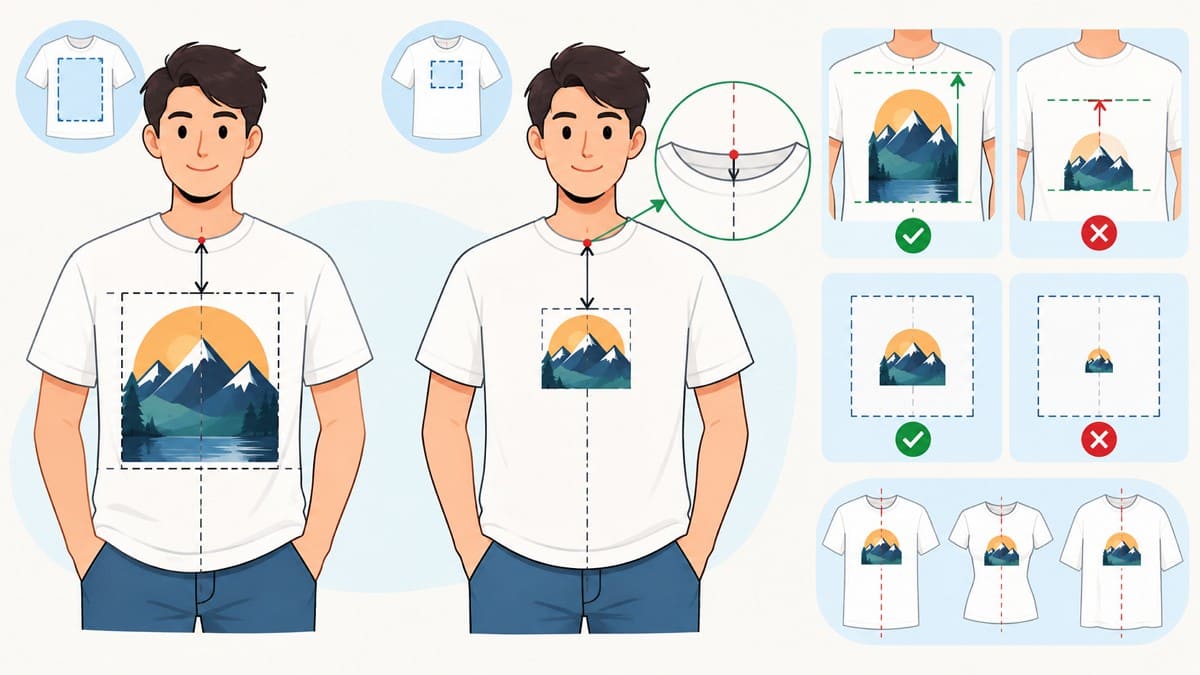
Artwork height helps determine the starting point. A tall graphic begins higher so its lower edge avoids the stomach, while a shorter one can sit lower. Keep the focal point in the upper chest and clear of the seams. A file can meet the maximum print dimensions yet still look undersized. Transparent space around a small central graphic counts toward those dimensions without adding anything visible.
Left Chest and Pocket Logo Placement
When you move from a chest graphic to a logo, the reference points change. Most guidance in a T-shirt logo placement guide applies here, since the left chest commonly carries brand marks. Left chest means the wearer’s left, which appears on the right in a flat mockup. Reversing the side is a common T-shirt logo placement error. Keep the mark below the collar and inside the sleeve seam.
Transfer Express’s guide recommends using the point where the collar meets the shoulder seam as a vertical reference. Treat the recommended T-shirt logo size as a starting range rather than a fixed measurement. Check small text at its intended size, then review the logo on the garment or mockup. Make sure it does not sit too close to the arm or drift toward the center.
Full Back, Upper Back, and Back Collar Placement
Front placements share one reference point, while the back has 3 distinct options. A full back supports a large graphic across the shoulder blades. An upper back suits wide artwork or short text, while a back collar carries a small mark. Design height helps determine the starting position for back-of-shirt design size decisions.
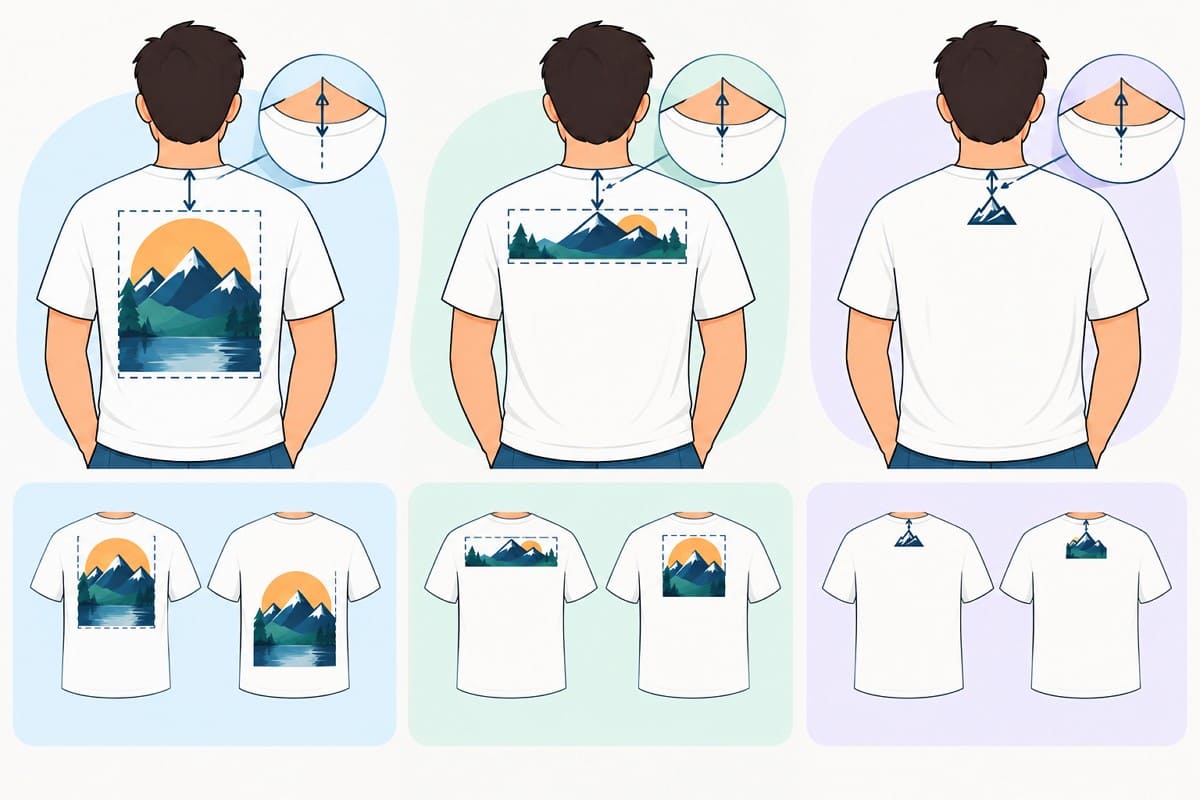
A tall full-back graphic that starts too low can sit on the lower back rather than between the shoulder blades. Starting roughly 3 to 4 inches below the neckline keeps it anchored. Upper back artwork is wide and shallow, so tall graphics do not suit that area. Back collar marks need simple details because intricate elements can become unreadable at two or three inches.
Sleeve Placement
Front and back panels sit flat, while sleeves curve around the arm. Sleeves carry smaller prints, so a sleeve design size must account for both scale and curvature. Follow the provider's sleeve print boundary rather than estimating from the seam. Keep artwork clear of unsupported seams, where fabric bends, and ink can distort. Check the reading direction because sleeves are viewed from the side. Center the artwork and keep it simple enough to remain legible.
Adjust Design Size for Different Shirts and Print Areas
Different shirts can require separate artwork versions because print areas and proportions vary. Proper T-shirt design size choices should account for these differences before production. Consider the following factors when adjusting artwork for different shirts and print areas:
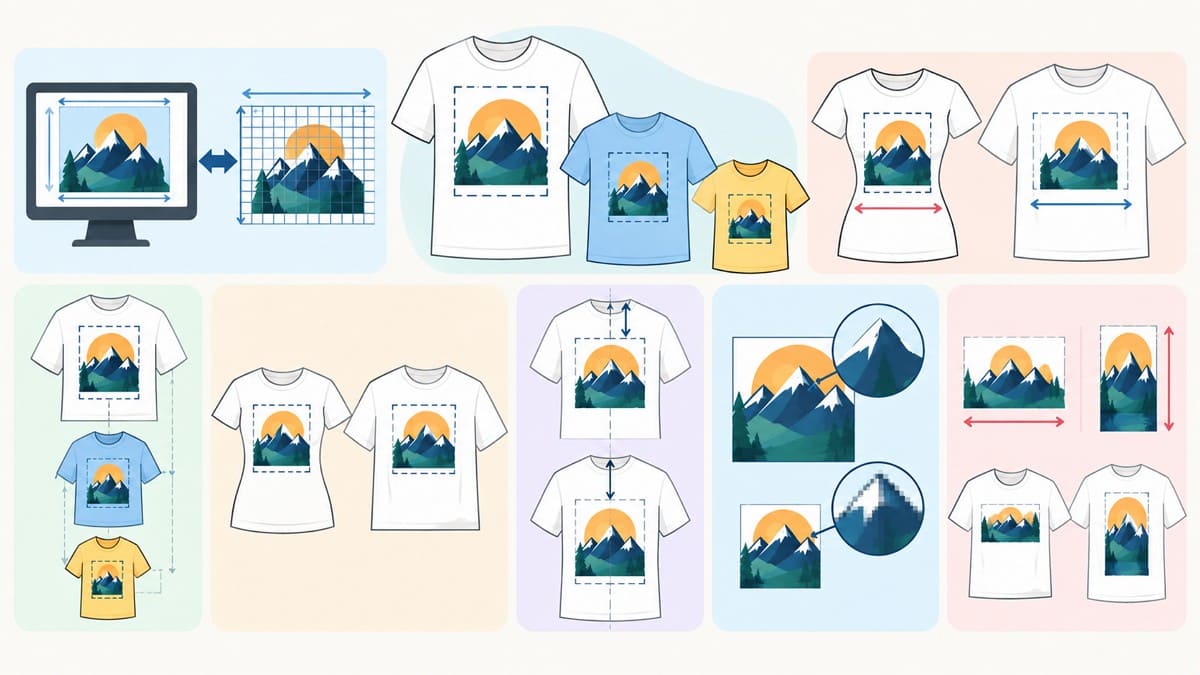
- Product Scaling: Adult, youth, and toddler shirts have different print areas, so artwork sized for an adult tee can overwhelm a smaller garment.
- Cut Differences: Garment cuts affect how artwork appears. A fitted women’s tee and a boxy unisex tee have different chest widths, changing the usable graphic width.
- Space Constraints: Do not enlarge artwork simply because extra space is available. Oversized prints can look unbalanced, while smaller designs may appear lost on larger shirts.
- Detail Reduction: Smaller formats require extra care because text, thin lines, and fine details may need simplification to remain clear at reduced sizes.
- Dimension Checks: Wide and tall graphics require different adjustments. Compare both height and width against the new print boundary instead of scaling every design by fixed proportions.
Save a product-specific copy for each variation instead of overwriting the master artwork. Use Designkit’s Image Resizer to prepare custom versions for the target T-shirt design dimensions. Review the visual composition afterward, since resizing alone does not determine the correct placement.
Convert T-Shirt Design Size to Pixels
Every size above is measured in inches, while the uploaded file is measured in pixels. Connecting the 2 is the final technical step before visual review. Inches describe the intended physical print size, while pixels describe the file’s digital dimensions. DPI connects both measurements by indicating how many dots are printed within each inch.
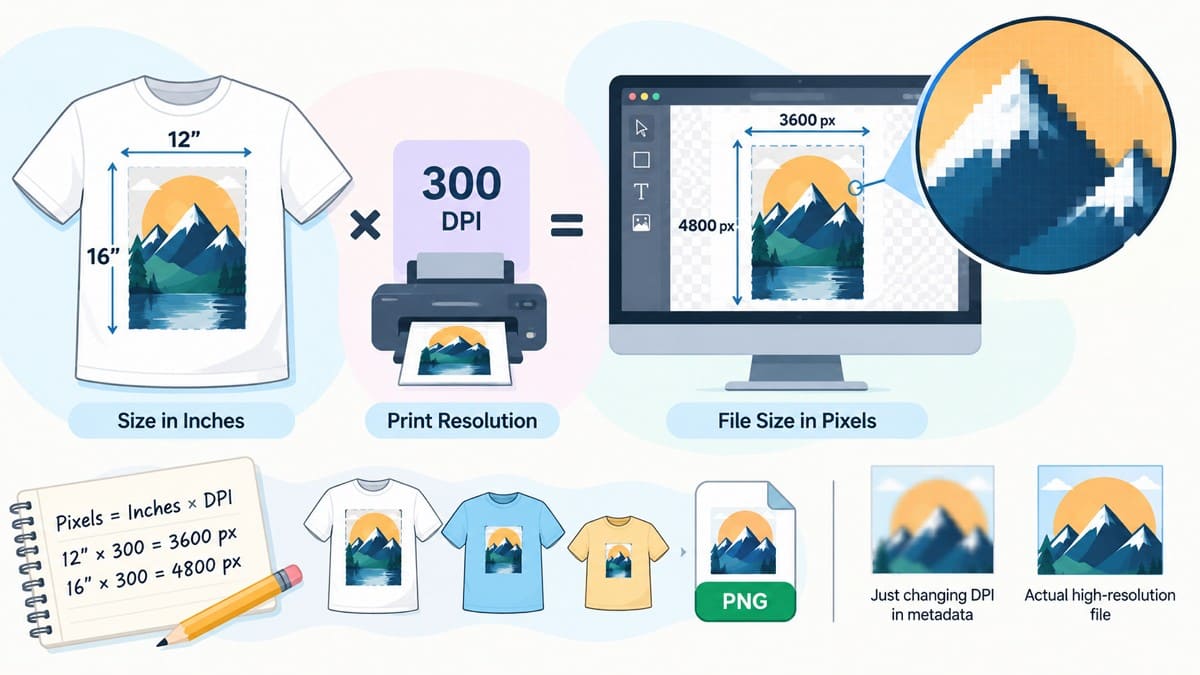
Required T-shirt design size pixels follow from a simple calculation. Multiply each print dimension in inches by the required DPI to determine the necessary pixel dimensions. A 12 by 16-inch design prepared at 300 DPI would require a 3,600 by 4,800-pixel file. Treat the calculation as an example rather than a universal upload requirement.
Your provider’s stated pixel and resolution requirements come first. Changing only the T-shirt design DPI metadata does not add image detail. Keep 2 additional points in mind when reviewing the artwork at its intended size:
- Enlarging a small source file can reveal blurry edges and soft text when printed at a larger size.
- A high pixel count does not guarantee sharp artwork, since an upscaled file can contain many pixels without gaining genuine detail.
Use Designkit’s Image Enhancer when an existing image is slightly too small or soft and needs higher resolution before review. It cannot fully restore details missing from the source. For file formats, transparent backgrounds, and the complete print-ready workflow, see our guide to creating print-on-demand designs .
Check the Size and Placement on a Product Mockup
Correct pixel dimensions show that the file meets technical requirements, but they do not guarantee proper placement. Measurements alone cannot show how artwork looks when the shirt is worn, making a reliable T-shirt logo placement guide useful. Even a design with accurate specifications can look awkward until you review it on a mockup.
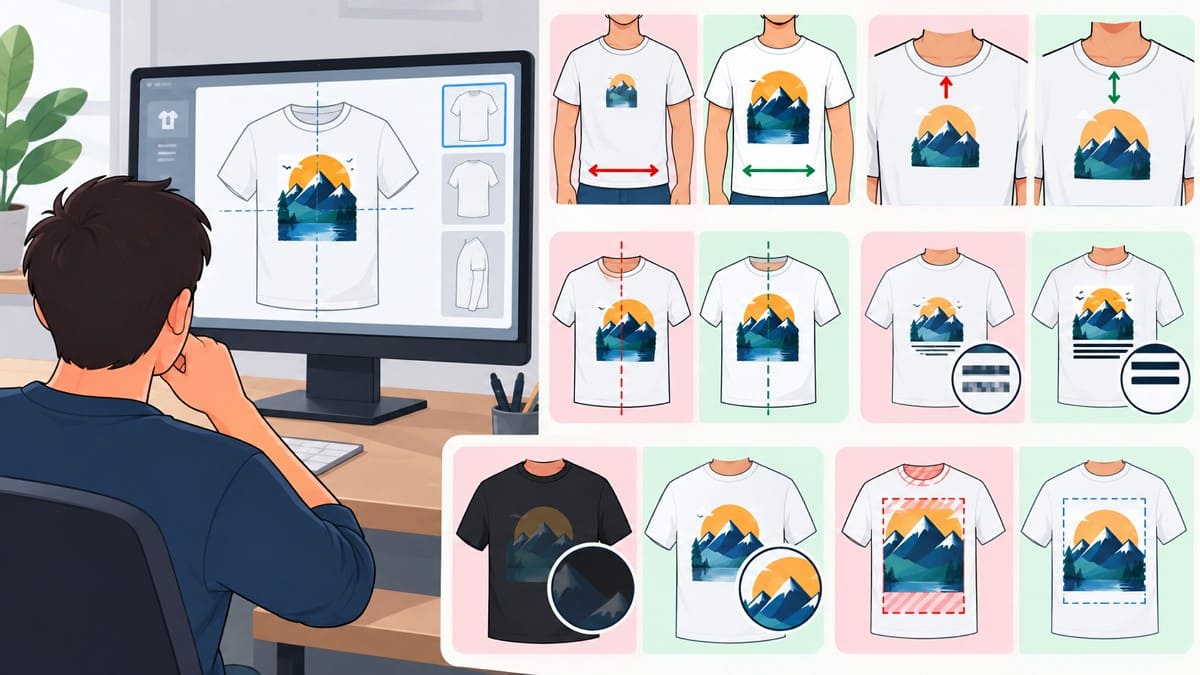
Place the design on a matching shirt at the intended print size, then review these 6 checks:
- Design Scale: Check whether the graphic appears too large or too small for the garment.
- Collar Distance: Make sure the design does not sit too close to the collar.
- Visual Alignment: Check whether a centered design looks visually aligned rather than relying only on measurements.
- Text Readability: Confirm that text remains readable at the intended print size.
- Color Contrast: Check whether the shirt color reduces the design’s contrast or visibility.
- Print Boundaries: Make sure no part of the design extends beyond the available printable area.
Not every design needs centering. Full front and center chest artwork usually follows the shirt’s centerline, while left chest and asymmetrical designs use different reference points. Judge these against the collar and shoulder seam instead. When a mockup reveals a problem, adjust the original artwork’s size or placement. Correcting only the listing image leaves the actual print unchanged.
Use Designkit's Mockup Generator to review the design on a matching shirt before preparing the final product image. A digital mockup supports visual review but does not replace the provider template. A physical sample remains the most reliable way to confirm print colors and placement.
Conclusion
Choosing the right T-shirt design size starts with the print location, but garment type, artwork shape, and available print area also affect the final dimensions. Provider templates should always remain the final reference when preparing artwork for production. Before you scale a full collection, make sure the shirt and niche are worth testing—see our print on demand product ideas on profits, products, and niches.
After selecting the size and placement, confirm the required pixel dimensions and review the artwork on a matching mockup. Following these checks helps create balanced, readable designs that fit the intended shirt and print area.
Frequently Asked Questions
What is the standard size for a T-shirt design?
Should a T-shirt design be the same size on every shirt?
Not always. Garment size, cut, and available print area can vary between products. Artwork created for an adult unisex tee may need a smaller version for youth shirts or a recomposed layout for fitted cuts.
How far below the collar should a T-shirt design be?
Front designs commonly start around 3 to 4 inches below the collar, though artwork height can affect the exact position. Full front and center chest designs generally follow the shirt’s centerline, while left chest and asymmetrical designs use different placement references.
What size should a left-chest logo be?
A left-chest logo commonly measures around 3 to 4 inches on its longest side for adult shirts. Left chest refers to the wearer’s left, which appears on the right in a flat mockup. Keep the logo simple enough to remain clear and legible at that size.
What size should a T-shirt design be in pixels?
The required pixel dimensions depend on the intended print size and the provider’s DPI requirement. Multiply each print dimension in inches by the required DPI, then compare the resulting pixel dimensions with your provider’s file requirements.
Do T-shirt designs always need to be 300 DPI?
No. 300 DPI is a common recommendation rather than a universal requirement. Appropriate resolution can vary with the printing method and viewing conditions. Always check the provider’s current file requirements for the specific product before exporting the final artwork.
You May Also Like
T-Shirt Design Size Guide: Placement, Dimensions, & DPI

How to Sell on Poshmark: A Complete Beginner's Guide
Zeely Reviews 2026: Features, Pricing, Pros, Cons & Alternatives
Create TikTok Ads From One Photo: An AI Product Launch Kit
Depop vs Poshmark: Which Is Better for Selling in 2026?
How to Create an Amazon Storefront: 4-Step Guide for New Sellers

How to Sell Books on Amazon in 2026: Beginner Guide

How to Sell on Amazon in 2026: A Complete Seller Guide
AI Product Photography: 7 Best Tools for Ecommerce in 2026

What Is a Hero Image? Definition, Examples & Design Tips

Pippit AI Review 2026: Features, Pricing, Pros & Cons
Back to School Ad: 7 Creative Ideas for Better Campaign Results
Top 7 Back-to-School Sales Ideas to Boost Retail Sales (2026)
How to Create a Complete World Cup Product Listing Image Set

How to Create Amazon Summer Sale Posters and Banners with AI
Amazon Summer Sale 2026: Listing Design Trends & Product Image Ideas
Ecommerce Video Ads: 7 Strategies That Drive Higher Conversions
How to Photograph Shoes for Your Ecommerce Store in 2026
Product Photography Ideas: Creative Tips & Techniques for Better Shots
Product Photography Pricing 2026: Full Cost Guide by Type
White Background Product Photography Guide & Tips 2026
Product Photography Starter Package: Gear Checklist 2026
Shopify Product Photography Guide with Tips & Setup
Amazon Main Image Requirements: Size, Guidelines & Tips
Shopify Image Size 2026: Complete Guide and Tips for Better Product Display
Studio Product Photography vs AI Product Photography in 2026
7 Product Photography Mistakes That Hurt Ecommerce Sales
Change Outfit Colors Online for Outfit Preview with AI Clothes Color Changer
How to Create Amazon Infographics: Boost Sales with Compelling Visuals

How to Create Outdoor Product Scenes Without a Photoshoot Using AI

Optimize Etsy Images for Mobile: Listing Photos That Convert
Amazon 7-Image Listing Strategy: Boost Sales by Optimizing Every Image
Etsy Thumbnail Optimization: Keep Your Product Fully Visible
The Etsy Thumbnail Formula That Drives More Clicks and Sales
How to Create Pro Amazon Listing Photos Without a Studio
10 High-Converting Lifestyle Product Images for Amazon Listings

How to Automate Your E-commerce Visuals with OpenClaw Workflow
Top 5 AI Tools to Generate Amazon Product Listing Images in 2026
How to Turn One Photo into 10 Etsy Listing Images Fast: Batch Workflow
Etsy Listing Photo Size Guide (2026): Mobile, Desktop & Shop View Specs
Turn White Background Images into Lifestyle Amazon Listings
Fix Etsy Image Cropping: Optimize Listing Photos for Every Device
Amazon Listing Images: Essential Shot List & Optimization Guide
How to Create Lifestyle Product Images Without a Studio
Lifestyle Product Photography Trends 2026: Authentic Looks at Scale
How to Master Lifestyle Product Photography in 2026

Amazon Listing Images Guide 2026: 7-Slot Strategy & Requirements
360 Product Photography Guide 2026: Setup, Shoot and Workflow
Beginner's Guide to Generate Product Photos from Different Angles
AI Product Photography: Create Ecommerce Images Without a Photoshoot

How to Create Realistic AI Product Photos: Step-by-Step Pro Guide
Keep AI Product Images Consistent Across SKUs: Lighting, Color, Background

How to Scale E-commerce with a Product Image Generator
How to Use AI for Spring Product Photography: 2026 Amazon Guide
How to Create a Budget Home Product Photography Setup with AI
How to Achieve Professional Product Photography Standards in 2026
How to Take Product Photos with Phone: Pro Guide for Amazon & AI

Best AI Product Image Generator 2026: Top Tools for Amazon Sales
Amazon Photography Service vs. AI Generator: Best Choice for Sales
What Is Product Photography? Angles, Lighting & Editing Guide
Amazon Spring Sale 2026: Create High-Converting Listing Images (Guide)
AI Agents Transform Amazon Product Photography in 2026
Amazon Photoshoot in 2026: Do You Still Need a Studio?

11 Must-Have Tools for Amazon Product Photography in 2026
2026 Amazon Image Trends Shaping Seller Success and Conversions
Amazon Product Photography Requirements & Best Practices 2026
Check Your T-Shirt Design Size on a Mockup
Resize artwork for the target print area in Designkit, then preview placement, scale, and readability on a matching shirt before you export the final file.
