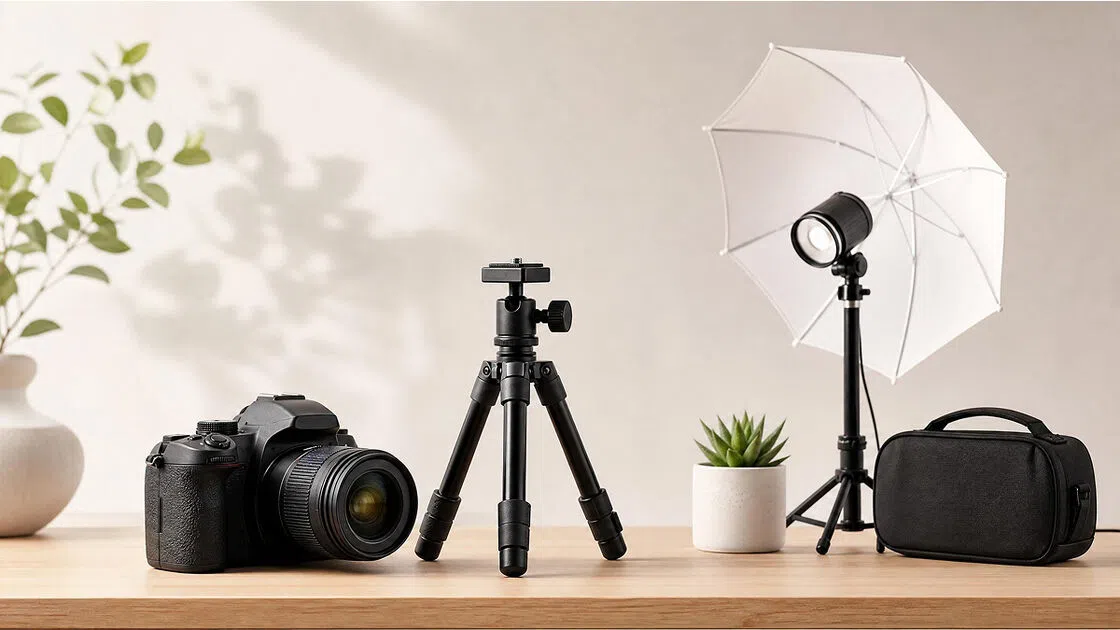
The Product Photographer's Starter Package (2026): Complete Gear Checklist & Workflow Guide
From camera to Capture One — your complete product photography starter package, gear by gear.

Most people starting out in product photography ask the wrong first question. Instead of "how do I shoot better," they ask "what do I need to buy?" — then get overwhelmed by endless forums and gear lists that assume an unlimited budget.
This guide cuts through that. Whether you're a DTC brand owner setting up your first in-house studio, an independent seller tired of paying for reshoots, or a content creator building a repeatable workflow, the goal here is the same: give you a prioritized, practical product photography starter package that matches how professionals actually work — not how gear manufacturers want you to spend.
We'll cover five core areas in order of impact: camera and lens selection, lighting, on-set rigging and prep tools, tethered shooting and digital workflow, and finally, where AI product photography tools fit into the picture — and when they make more financial sense than a full studio setup.
The Complete Product Photographer's Starter Package at a Glance
Before we go section by section, here's the full gear checklist in one place. Use it as a shopping reference or a pre-shoot inventory check.
| Category | Item | What it does | Budget level |
|---|---|---|---|
| 1 · Camera, lens & tripod | |||
| Camera body | Mirrorless / DSLR (24MP+) e.g. Sony a6400, Canon EOS R50 |
Captures the image. Must support tethered shooting via USB. | Starter |
| Lens | 50mm or 85mm prime 100mm macro for jewelry / detail |
Minimal distortion, natural product perspective. | Starter |
| Tripod | Sturdy tripod + ball head Quick-release plate + hotshoe bubble level |
Eliminates camera shake; enables overhead flat-lay shooting. | Starter |
| 2 · Lighting setup | |||
| Main light | Continuous LED (2-light kit) e.g. Godox SL60W |
Primary light source. What-you-see-is-what-you-get for beginners. | Starter |
| Main light | Strobe / flash head e.g. Godox AD400 Pro, Broncolor |
Higher power for reflective surfaces and high-volume commercial work. | Pro |
| Modifier | Large softbox (60×90cm or larger) | Diffuses and softens light. The single most impactful modifier to buy first. | Starter |
| Modifier | V-Flats (black/white) DIY alternative: white foam board |
White side bounces fill light; black side creates shadow separation. | Mid |
| Calibration | X-Rite ColorChecker | Generates a custom camera profile for accurate product color reproduction. | Mid |
| Monitor | Calibrated display e.g. BenQ SW series, Eizo |
Ensures what you see during editing matches final delivered output. | Pro |
| 3 · Rigging, styling & on-set prep | |||
| Stand | C-Stand with roller base | Heavy-duty adjustable stand for lights and flags; repositions without disassembly. | Mid |
| Rigging | Magic Arm + Spring Clamps | Positions reflectors and flags at precise angles without slipping. | Starter |
| Adhesive | Blu Tack / museum putty | Micro-adjusts product angle without leaving marks on packaging or surfaces. | Starter |
| Tape | Gaffer tape | Holds backgrounds flat, blocks light spill from modifiers. Leaves no residue. | Starter |
| Effect | Clear monofilament (fishing line) | Suspends products mid-air for floating/levitation shots; removed in post-production. | Optional |
| Cleaning | Anti-static gloves, rocket blower, microfiber cloths | Prevents fingerprints and removes dust before every shot cycle. | Starter |
| Steaming | Handheld clothes steamer | Removes wrinkles from apparel and soft goods before shooting. | Starter |
| Finishing | X-Acto knife / scissors | Trims loose threads, cuts background paper, removes product tags pre-shoot. | Starter |
| 4 · Tethered shooting & digital workflow | |||
| Tether cable | Tether Tools cable (USB-C / USB-A) | Locking connectors and shielding prevent signal dropout during live sessions. | Mid |
| Laptop stand | Articulating laptop tray / arm | Mounts laptop at eye level beside the camera; keeps the set clear and workflow fast. | Mid |
| Remote | Smartphone (app remote) e.g. Cascable, CamRanger |
Controls camera remotely and mirrors Capture One view for client review on set. | Optional |
| Capture software | Capture One | Industry-standard tethering, color grading, and session file management. | Mid |
| Retouching | Adobe Photoshop | Final retouching: cloning, frequency separation, Liquify, and background cleanup. | Mid |
| 5 · AI product photography (lightweight alternative) | |||
| AI tool | AI product photoshoot generator e.g. Designkit |
Generates white background images, lifestyle scenes, and batch variants from a single product photo — no studio setup required. | Starter |
Budget levels: Starter = under $500 total build · Mid = $500–$2,000 · Pro = $2,000+ · Optional = useful but not essential

Part 1. Camera, Lens, and Tripod: Your Non-Negotiable Foundation
1.1 Choosing a Camera for Product Photography
The single most important thing to understand about cameras for product photography: the gap between entry-level and professional bodies has narrowed dramatically. What used to require a $4,000 full-frame sensor can now be achieved with a $900 mirrorless body — if you understand what actually matters.
For product photography specifically, you need three things from a camera body:
- Resolution (24MP minimum): You're cropping, zooming in for detail review, and sometimes delivering high-res files for print. Resolution matters more here than in portrait work.
- Accurate color reproduction: Skin tones are forgiving. Product colors — especially in apparel, cosmetics, and food — are not. Clients will notice a 5% color shift.
- Tethering support: If the camera can't connect reliably to Capture One via USB, it will slow your workflow significantly. Most Sony, Canon, Nikon, and Fujifilm bodies support this — but verify before buying.
Budget recommendations:
- Starter ($600–$1,000): Sony a6400, Canon EOS R50 — both deliver 24MP+ sensors, solid color science, and tethering support.
- Mid-range ($1,500–$2,500): Sony A7 IV, Nikon Z6 III — full-frame sensors, better dynamic range, and improved tethering stability.
- Professional ($3,000+): Fujifilm GFX 50S II or Phase One — medium format territory, used when product quality demands absolute color fidelity at large print sizes.
One note worth making clearly: in product photography, lighting outweighs camera body. A $600 camera in a properly lit studio will produce images that outperform a $3,000 body under poor lighting conditions every time.

1.2 The Right Lens Makes More Difference Than You Think
Focal length determines how your product looks in the frame — not just how big it appears, but how much distortion it carries and how much background compression you get.
- 50mm (full-frame equivalent): The all-purpose option. Minimal distortion, natural perspective, works across most product categories.
- 85mm–100mm: Better compression, further from the product, ideal for cosmetics, packaged goods, and any product where you want a slightly "elevated" look.
- 100mm macro: Non-negotiable for jewelry, watches, electronics, or any product where texture and surface detail sell the item.
Skip kit zoom lenses for studio work — they introduce barrel distortion and have weaker color rendering at most focal lengths. A single 50mm or 85mm prime will serve you better.
For support: a sturdy tripod with a ball head and quick-release plate is essential. Look for one with a horizontal arm or reversible center column for overhead flat-lay shooting. A small bubble level on your hotshoe will save you from spending 20 minutes fixing a slightly tilted horizon in post.
Part 2. Product Photography Lighting Setup: The Gear That Actually Makes or Breaks Your Shot
2.1 Continuous Lights vs Strobes: Which to Start With
This is the question most beginner product photography equipment guides don't answer well, so here's a direct take:
Start with continuous LED lights if you're new to lighting. What you see on set is exactly what you get in camera. No sync issues, no guessing at power output, and they double as video lights if you create product demos alongside stills. Entry-level options from Godox or Nanlite run $150–$400 for a functional two-light setup.
Move to strobe lighting when you need more power — particularly for reflective surfaces (glass, metallic packaging, jewelry) where continuous lights often create unmanageable hotspots. Strobes also freeze motion cleanly, which matters if you're photographing liquids or products with moving components. Godox AD400 Pro is a widely used professional entry point. Broncolor represents the top tier of industrial-grade strobe equipment, used in high-volume commercial studios where repeatability and color consistency are non-negotiable across thousands of shots.
One practical tip: whatever lights you buy, buy the same brand. Mixing color temperatures across manufacturers creates white balance problems that are difficult to correct consistently in post.

2.2 Light Modifiers, Reflectors, and V-Flats
The light source itself is only half the equation. How you shape and control that light determines whether your product looks flat, dimensional, or professional.
- Softbox: The most important modifier in product photography. A medium-to-large softbox (60x90cm or larger) creates even, diffused light that wraps around the product and reduces harsh shadows. This is the first modifier you should buy.
- V-Flats: Large foldable panels with a white side (for bouncing light back onto the product) and a black side (for blocking light and creating shadow separation). Professional studios use these constantly. Budget alternative: large pieces of white foam board from an art supply store.
- Reflectors: Smaller, portable, and useful for filling in shadows on specific product areas without adding another full light.
- X-Rite ColorChecker: A color calibration target shot at the beginning of each session. When imported into Capture One or Lightroom, it creates a custom camera profile that ensures your product colors are accurate — not just close. Essential for any product category where color accuracy affects returns (apparel, cosmetics, paint).
- Calibrated monitor: Your editing work is only as reliable as what you see on screen. A photography-grade monitor (Eizo, BenQ SW series) or a calibrated consumer monitor using the X-Rite i1Display Studio will prevent hours of back-and-forth color corrections after delivery.
Part 3. Rigging, Styling, and On-Set Tools Pros Always Have
3.1 Positioning and Stabilization Essentials
Product photography is precision work. The difference between a shot that looks professional and one that looks amateur is often a 2mm tilt on the product, a slightly off-center label, or a background wrinkle that should have been caught before the shutter fired.
These tools address that:
- C-Stand (Century Stand) with roller base: The backbone of any professional product photography studio setup. Heavy, stable, and adjustable to positions a regular light stand can't reach. The roller base lets you reposition without fully disassembling.
- Magic Arm + Spring Clamps: For attaching reflectors, flags, or small lights at precise angles. The friction arm holds position without slipping.
- Clear fishing line (monofilament): Suspending products mid-air for floating/levitation shots. The line is removed in post — easier than it sounds, faster than building a custom rig.
- Blu Tack or museum putty: The most underrated tool in product photography. Used to micro-adjust the angle of a product without leaving marks. Works on packaging, bottles, and most hard goods.
- Hotshoe bubble level: Ensures your camera sensor plane is perfectly parallel to the product surface — critical for flat lays and overhead shots where even a slight tilt creates a compositional problem.

3.2 Cleaning and Prep: The Invisible Half of the Job
Experienced product photographers know that a significant portion of every shoot is preparation — not picture-taking. Dust, fingerprints, and fabric wrinkles that appear invisible to the naked eye become glaring at 100% zoom on a calibrated monitor.
- Anti-static gloves: Worn when handling products to prevent fingerprints on packaging, glass, and any reflective surface.
- Rocket air blower: For removing dust from product surfaces and props without contact. Faster and safer than a cloth for delicate items.
- Microfiber cloths: Multiple on hand — one for dry wiping, one dampened for surfaces that need more than air.
- Gaffer tape: Not masking tape, not duct tape. Gaffer tape leaves no residue, holds backgrounds flat, and can be used to flag unwanted light spill from a modifier. Every professional set has a roll within arm's reach.
- Handheld clothes steamer: Essential for apparel, soft goods, fabric-wrapped products, or any item that arrives wrinkled. A steamer takes 90 seconds and eliminates hours of retouching.
- X-Acto knife or scissors: Trimming loose threads, cutting background paper, removing product tags before shooting.

Part 4. Tethered Shooting and the Professional Digital Workflow
4.1 Why Tethered Shooting Is the Industry Standard
Tethered shooting — connecting your camera directly to a laptop so images appear on screen within seconds of capture — is not an advanced technique. It's the baseline for professional product photography work, and for good reason.
Reviewing images on a 15-inch calibrated monitor reveals focus issues, dust particles, lighting inconsistencies, and color problems that are simply invisible on a 3-inch camera LCD. For client work, tethering also lets stakeholders review and approve shots on set, eliminating the "can we redo this angle" email that arrives three days after the shoot.
The physical setup:
- Tether Tools cable: The bright orange professional tethering cables are not decorative — they're built with locking connectors that don't pull out under tension and shielding that prevents the signal dropout you get from standard USB cables. A dropped connection mid-session is a workflow-stopper.
- Laptop tethering stand (laptop tray with arm): A dedicated articulating arm that mounts to a light stand or C-stand and holds your laptop at eye level beside the camera. This keeps your workstation off the floor, out of the shooting area, and positioned where you can see both the set and the screen without walking. It's a small item that significantly changes how efficiently a shoot runs.
Smartphone as secondary monitor: Apps like Cascable or CamRanger let your phone mirror what Capture One sees in real time — useful when a client wants to review without crowding the workstation, or when you're shooting alone and need to check framing from a distance.
4.2 Capture One, Photoshop, and the Reality of Post-Production
Capture One has become the industry standard for tethered product photography for two reasons: its color handling is genuinely better than Lightroom for product work, and its tethering connection is more stable across most camera brands.
The core workflow:
- Tether and capture in Capture One with a custom camera profile generated from your ColorChecker shot.
- Cull and process selects in Capture One — exposure, white balance, lens corrections.
- Export to Photoshop for retouching: cloning out dust, surface corrections, background cleanup, and if needed, Liquify for subtle shape adjustments on products with inconsistent packaging.
- File management: Name files at export using a consistent convention — SKU_angle_version (e.g.,
SKU1042_front_v2.psd) — and maintain separate folders for RAW captures, working PSDs, and final exports.
A word of honest warning: post-production is where professional product photography's real time cost lives. The physical shoot might take three hours. The retouching, client feedback round, the "just one more small change," the final_FINAL_approved_v4.psd that appears at 5pm on a Friday — that's where the hours go. Factor it into your pricing and your timeline from day one.

Part 5. When AI Product Photography Makes More Sense Than a Full Studio
5.1 The Real Cost of a Traditional Product Photography Setup
A properly equipped product photography studio — not a makeshift corner setup, but a functional professional one — represents a significant capital investment:
- Camera body + lens: $900–$2,500
- Lighting (2-light strobe setup + modifiers): $800–$3,000
- Stands, rigging, V-flats: $300–$600
- Tethering equipment + laptop stand: $150–$300
- Software (Capture One annual subscription + Adobe CC): ~$600/year
- Cleaning and prep supplies: $100–$200
Realistic entry point: $3,000–$7,000 in equipment, plus ongoing software costs.
For a brand shooting 50+ SKUs monthly across multiple angles and lifestyle contexts, that investment pays off quickly. The per-image cost drops as volume increases, and having an in-house setup gives you control over turnaround time and creative direction.
But for a brand with 10 SKUs, a new product launch needing test images before committing to a full shoot, or a seller who needs white background and lifestyle images without the overhead — the math is different.
5.2 How AI Tools Like Designkit Replace Specific Parts of Your Workflow
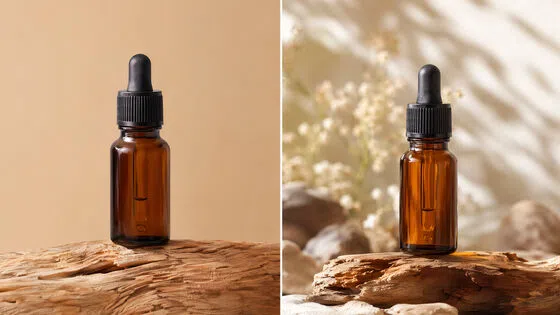
AI product photography tools have matured significantly. The current generation isn't generating artificial-looking composites — it's producing platform-ready white background images, contextual lifestyle scenes, and batch variants that meet Amazon, Shopify, and social media specifications.

What AI tools genuinely replace well:
- White background image generation: Upload a product shot, receive a clean white background version that meets marketplace requirements — without a sweep background, lights, or retouching.
- Lifestyle scene generation: Place your product in a kitchen, a bathroom shelf, an outdoor setting — without renting a location or building a set.
- Batch variant production: Generate multiple background colors, scene contexts, or seasonal variations from a single source image — significantly faster than reshooting.
What AI tools don't replace well (yet): highly tactile products where surface texture is the selling point, product categories requiring precise color matching under controlled light (paint, cosmetics with specific Pantone references), and anything requiring a human hand, model, or scale reference in frame.
Designkit is one tool in this category worth understanding. Upload your product image, select a scene style or background, and the AI generates ecommerce-ready images — a workflow that takes minutes rather than a half-day studio session. For new product launches, A/B testing different lifestyle contexts, or filling gaps between studio shoots, it's a practical complement to a traditional setup rather than a wholesale replacement.

Try AI Product Photography Free
The most practical approach for most ecommerce sellers in 2026: use AI tools to validate visual direction and cover low-complexity image needs, then invest in studio equipment as volume and SKU count justify it.
Conclusion
The most common mistake in building a product photography starter package is buying everything at once. The second most common mistake is buying cheap versions of everything at once, then replacing it all six months later.
A more useful framework, by budget:
- Under $500: Prioritize lighting first. A good two-light LED setup and a large softbox, shooting with a smartphone or entry-level camera you already own, will outperform an expensive camera under poor lighting. Add an AI product photography tool for white background and lifestyle images to cover gaps.
- $500–$2,000: Add a dedicated camera body (mirrorless, APS-C), a 50mm prime lens, and basic on-set tools. Begin building a tethered shooting workflow with Capture One.
- $2,000+: Invest in strobe lighting, a full rigging system (C-stands, V-flats), a calibrated monitor, and professional tethering cables. At this point you have a studio capable of handling commercial work.
Wherever you are in that progression, the underlying principle stays the same: understand what each piece of equipment actually does, buy it when it solves a problem you're already experiencing, and don't let a gear list be the thing standing between you and better product images.
If you're at the beginning of that journey and need platform-ready product images while your studio setup comes together, AI product photography tools offer a practical starting point — one that's worth understanding before deciding how much physical equipment your workflow actually requires.
Frequently Asked Questions
What's the minimum budget for a product photography starter kit?
Do I need a full-frame camera for product photography?
No. A crop-sensor camera (APS-C) like the Sony a6400 or Canon EOS R50 produces excellent results for ecommerce product photography. Full-frame sensors offer advantages in low-light shooting and dynamic range, but in a controlled studio environment with proper lighting, the practical difference in output is minimal at the price points most beginners are considering.
Can AI-generated product images replace real photos for Amazon listings?
For white background hero images, Amazon requires images to meet specific technical standards (pure white background, product filling at least 85% of the frame). AI-generated images can meet these requirements, provided the output is reviewed carefully for accuracy and detail. For lifestyle and secondary images, AI-generated content is widely used and accepted. For products where texture, finish, or exact color is a purchase decision factor, real photography remains more reliable.
Is Capture One worth it over Lightroom for product photography?
For tethered product photography specifically, most professionals prefer Capture One. Its tethering connection is more stable across more camera brands, and its color grading tools — particularly the Color Editor and skin tone targeting — offer more precise control for product color work. Lightroom is a capable alternative and may already be part of your Adobe CC subscription. If tethering stability and color accuracy are priorities, Capture One is worth the additional cost.
What's the single most impactful upgrade I can make to improve my product photos?
Lighting, with one specific recommendation: add a large softbox or upgrade to a more powerful light source before upgrading your camera body. In controlled product photography conditions, a $400 lighting upgrade will produce a more visible improvement in image quality than a $1,500 camera body upgrade. After lighting, a calibrated monitor is the next highest-impact investment — it changes how accurately you can evaluate and edit your work.
You May Also Like

What Is Product Photography? Angles, Lighting & Editing Guide

11 Must-Have Tools for Amazon Product Photography in 2026
Studio Product Photography vs AI Product Photography in 2026

How to Achieve Professional Product Photography Standards in 2026

AI Product Photography: Create Ecommerce Images Without a Photoshoot

Amazon Photography Service vs. AI Generator: Best Choice for Sales

Amazon Product Photography Requirements & Best Practices 2026
Skip the Setup. Get Ecommerce-Ready Product Images Today.
Not ready to invest in a full product photography studio setup? Designkit's AI product photoshoot generator creates white background images, lifestyle scenes, and batch variants from your existing product photos — in minutes, not half-days.