
How to Upload Instagram Posts, Stories, and Reels From Your Computer
Learn how to post on Instagram from desktop, upload Stories and Reels from your PC, and create high-quality visuals with a faster content workflow.


Running an active profile does not mean you have to squint at a phone screen for hours. Shifting your posting routine to a computer is a huge timesaver for busy brand owners and digital marketers. It keeps your heavy media folders highly organized and gives you a real keyboard for typing out those detailed captions. This guide breaks down the exact clicks needed to get your photos, vertical videos, and temporary updates live straight from your desktop setup. We will also cover a smart way to speed up your content creation process.
Key Takeaways
-
You can post on Instagram from a desktop browser without using the mobile app.
-
Instagram's web version supports uploading photos, videos, and carousel posts directly from your computer.
-
Meta Business Suite is useful for creators and businesses that need scheduling and content management features.
-
Posting from a PC makes it easier to manage high-quality images, longer captions, and organized content libraries.
-
AI-powered design tools can help prepare Instagram-ready visuals before uploading them.
Can I Post on Instagram from My Computer?
Yes, you absolutely can. Native uploads work directly through the official website or via Meta Business Suite. You do not need any risky third-party workaround tools to hit publish.
Moving your publishing process to a desktop eliminates the friction of emailing large media files to yourself just to get them on your phone. This approach protects your file quality and makes managing daily social media tasks much easier.
Posting Methods Decision Table
|
Method |
Best for |
Feed |
Reels |
Stories |
Schedule |
Account need |
|---|---|---|---|---|---|---|
|
Instagram.com |
Quick manual posts, single files |
Yes |
Yes |
No |
No |
Any account |
|
Meta Business Suite |
Brands managing content regularly |
Yes |
Yes |
Yes |
Yes |
Pro (Business/Creator) |
|
Browser mobile view (workaround) |
Users without Pro accounts |
No |
No |
Yes |
No |
Any account |
How to Post on Instagram from Desktop (Feed Posts & Reels)
Uploading content from a desktop feels very similar to the mobile app experience. The major advantage is working directly with your local hard drive files. This is a massive help for operators handling heavy image libraries or professionally edited marketing assets.
There are two common ways to post:
Method 1: Upload directly through Instagram's website
Method 2: Use Meta Business Suite for publishing and scheduling
Method 1: Post Through Instagram Web Browser
Using the main website is your quickest option for getting a single photo, video, or carousel live immediately. You do not have to install any apps or connect accounts, it just works seamlessly for straightforward publishing right from your Mac or PC.
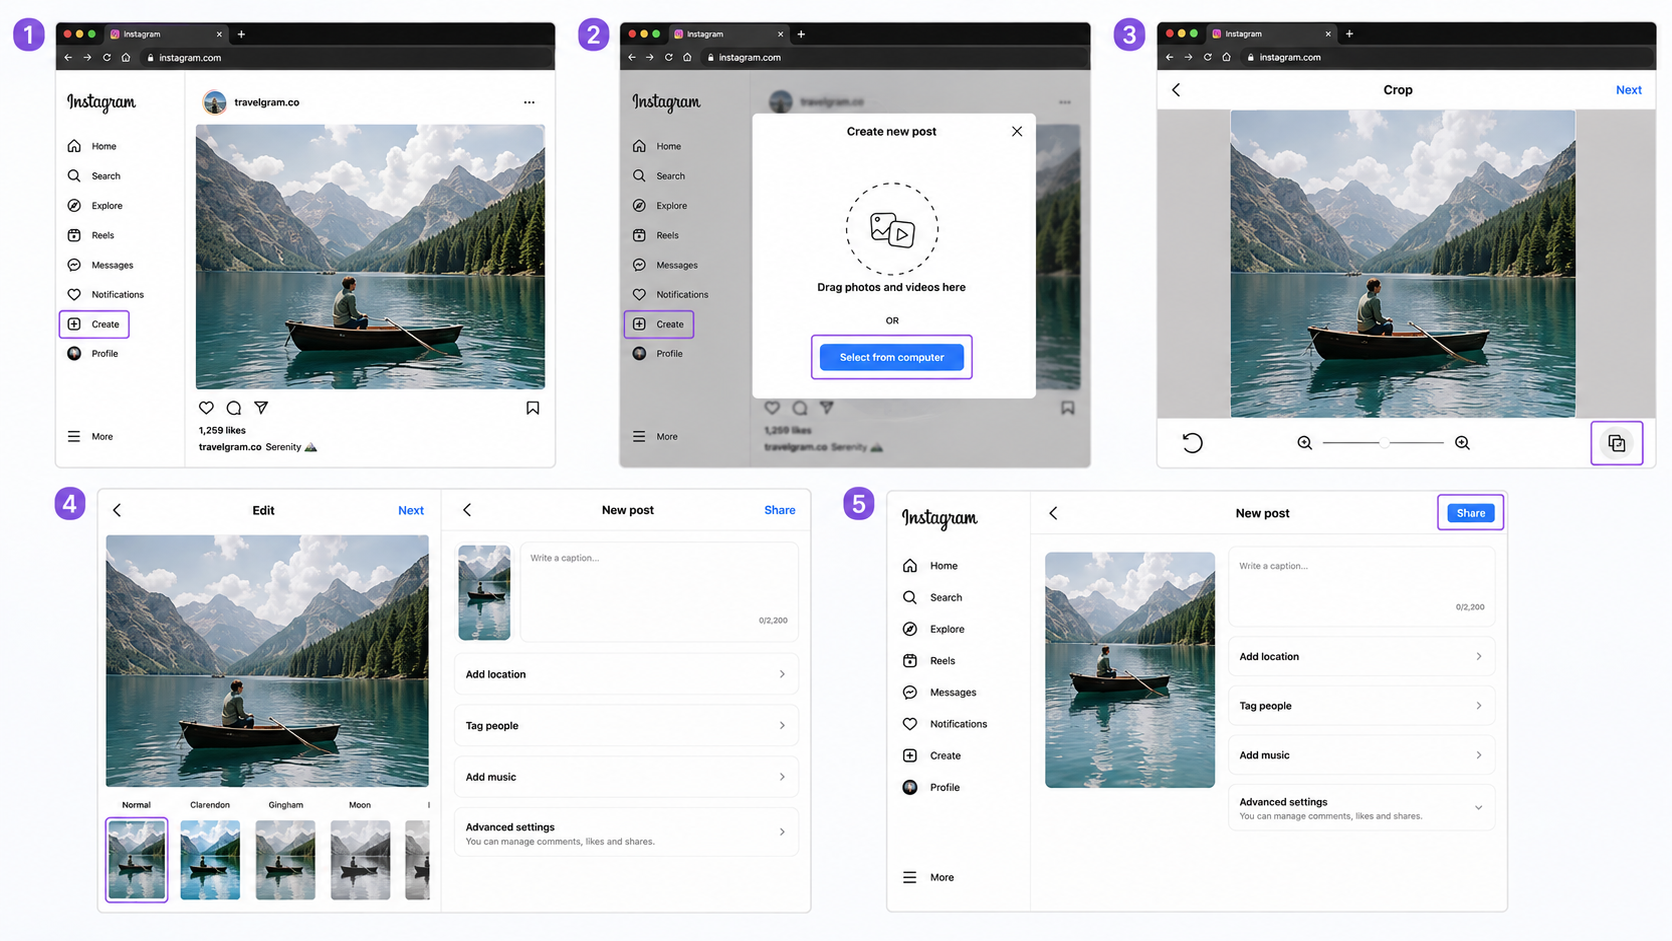
Step 1: Open the Platform on Your Desktop
Head over to the official website in your preferred browser and sign in. You will find all your main navigation options lined up neatly along the left sidebar.
Step 2: Click the Create Button
Find and click Create (look for the plus icon) in that left menu. This action triggers a pop-up window where you can easily drag and drop your media directly into the browser.
Step 3: Upload Your Photo or Video
Hit the Select from computer button to browse your local files, then choose the asset you want to post. Need to build a carousel? Just click the layered square icon in the bottom right corner of the preview screen to grab your extra files. This window is also where you can quickly tweak your crop ratios before moving forward.
Step 4: Add Captions and Post Details
Click Next to apply any standard platform filters or make manual adjustments to the brightness and contrast of your image. Click Next again to reach the final publishing screen. Type out your caption, add your hashtags, tag relevant accounts, and set a location.
Step 5: Publish Your Post
Review all your details one last time and click the Share button in the top right corner. Your post will go live instantly.
Method 2: Post Using Meta Business Suite
Prerequisites: Make sure your Professional account (whether it is Business or Creator) is properly connected to a Facebook Page where you hold admin rights. Standard personal profiles cannot access the Business Suite dashboard for publishing.
This platform is the absolute best choice for marketers and brands looking for a serious publishing workflow. It provides a robust dashboard where you can build posts, manage upcoming campaigns, and map out your content calendar weeks ahead of time.
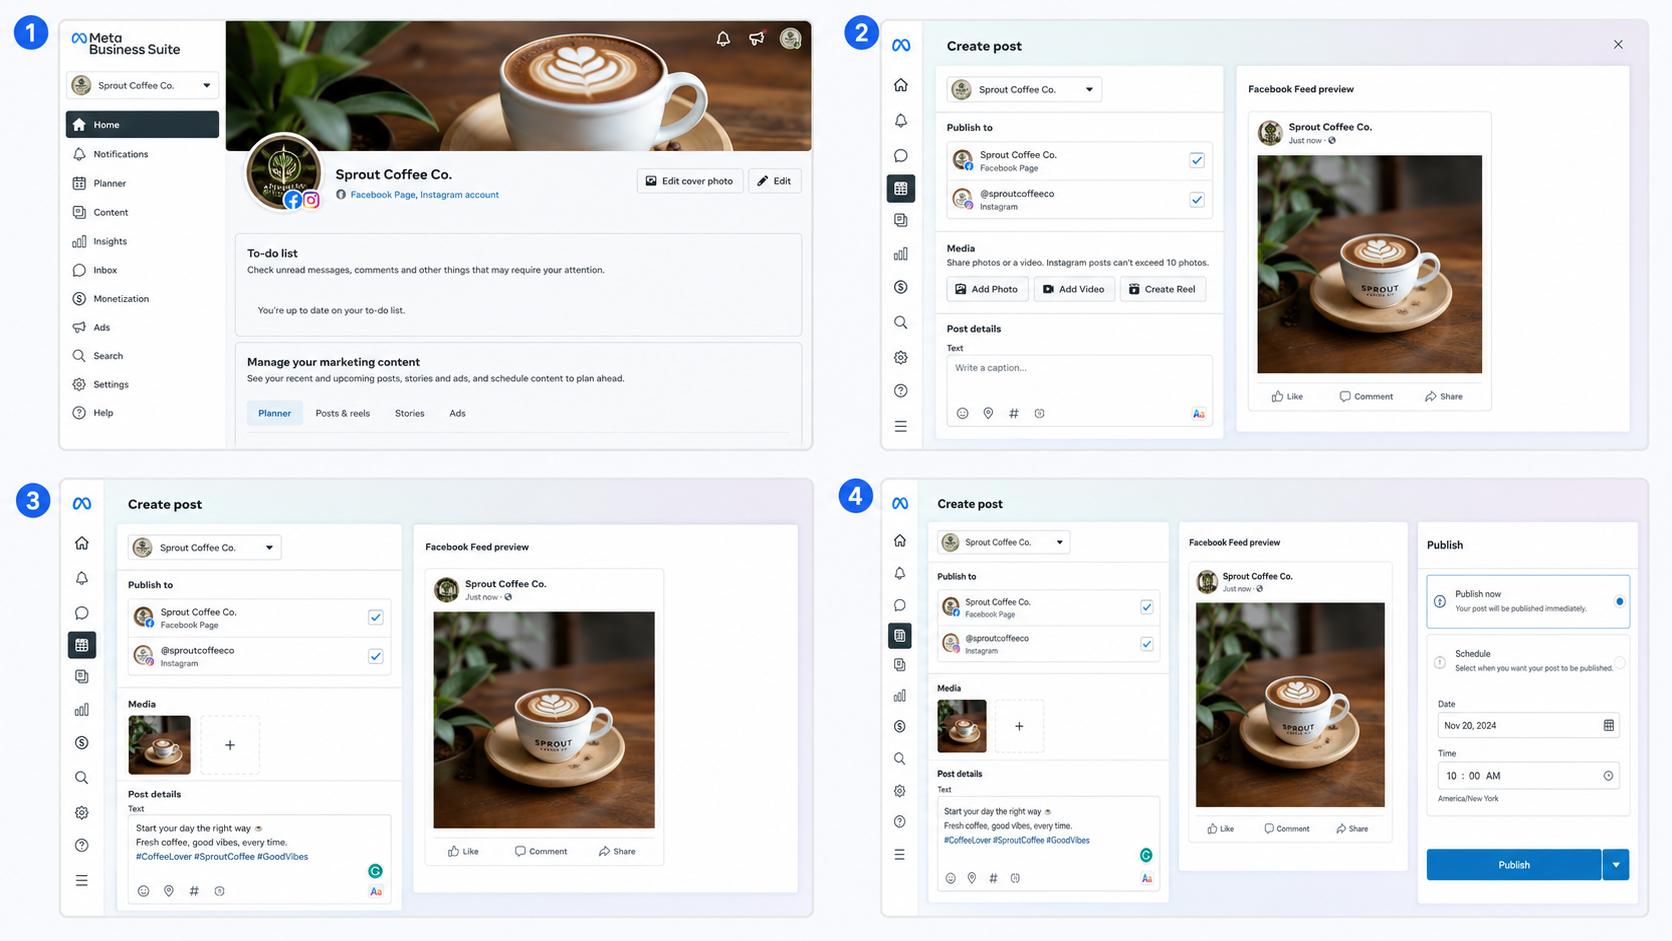
Step 1: Connect Your Accounts
Go to the Meta Business Suite website and log in. You must ensure your Professional account is linked securely to your main Facebook Page.
Step 2: Create a New Post
From the home dashboard, click the solid Create Post button. Check the box next to your platform handle at the top of the window so the post routes to the correct destination.
Step 3: Add Content Details
Click Add Photo or Add Video to upload your computer files. Type your caption into the text box provided on the left side. You will see a live visual preview of your post updating on the right side of your screen.
Step 4: Publish or Schedule
You can click Publish to push the post live right away. Alternatively, toggle the Schedule option to lock in a specific date and time for your content to go live later in the week.
How to Post Instagram Reels from Desktop
Publishing video content follows a nearly identical path, but focusing on the vertical format is critical. If you need help editing your video files before publishing, you can use an AI Instagram video generator to create polished vertical clips.
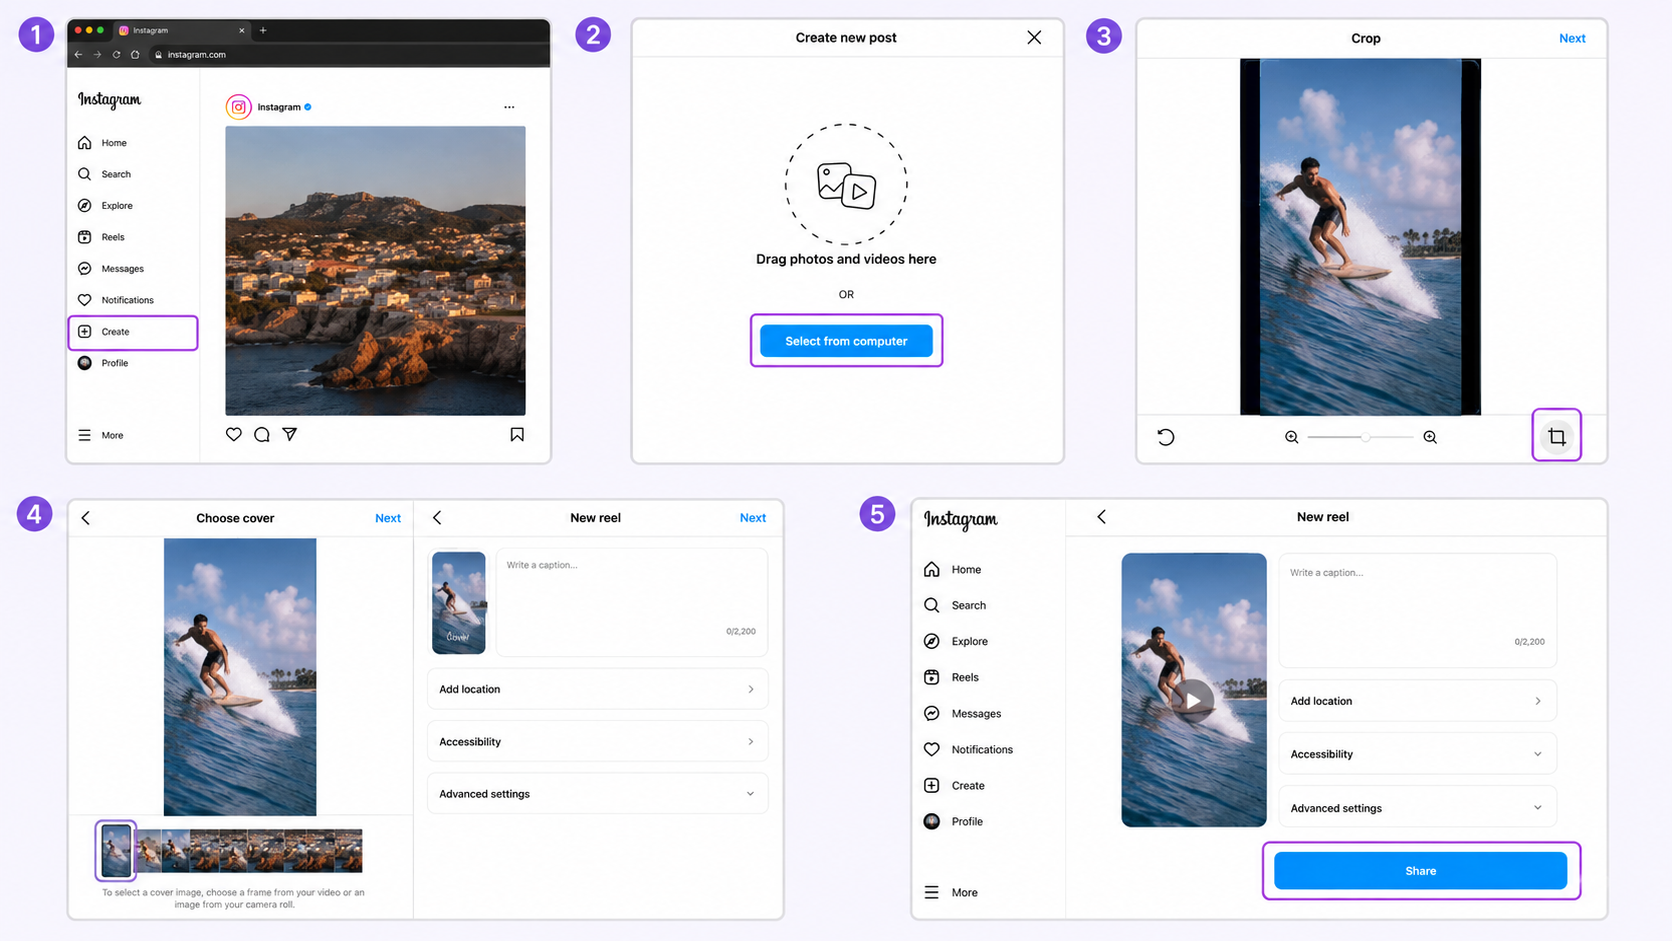
Step 1: Click the Create Button
Locate and click the Create option on the left menu of your desktop interface to get started.
Step 2: Choose Your Video File
Hit the Select from computer button to open your local folders, then find your finalized MP4 or video asset.
Step 3: Set Your Crop Ratio
Bring in your video file and hit the crop icon to secure that vertical 9:16 format.
Step 4: Select a Cover and Write Your Caption
Click Next so you can pick a solid cover photo right out of your video clip's frames. Click Next one more time to type out your caption and drop in any relevant tags.
Step 5: Share Your Reel
Give everything a quick look and click the Share button when you are ready to publish the Reel to your profile.
Note: Audio trending libraries and advanced AR effects are currently restricted on the desktop browser version. You will have a much smoother experience if you edit your audio into the video file before uploading.
How to Post Story on Instagram From PC
Uploading Stories takes a slightly different path than standard feed or Reel posts. Even with recent desktop updates, the default Create button on Instagram.com will not let you build a Story. Instead, you will need to rely on Meta Business Suite or a quick browser trick.
Working from a computer gives you a massive edge here. You get to pull fully edited graphics, branded layouts, and vertical videos straight from your local folders. This workflow is a lifesaver if you use professional design software to prep your visuals before they go live.
There are also two practical ways to post Story on Instagram from PC:
Method 1: Use Meta Business Suite for official desktop publishing
Method 2: Use Instagram's browser tools when available for additional access
Method 1: Upload Instagram Stories Using Meta Business Suite
Prerequisites: You must have an Instagram Professional (Business or Creator) account linked to a Facebook Page with the correct admin access. Personal accounts cannot use Meta Business Suite to publish IG Stories.
Meta Business Suite is the most reliable option for users who want to create and manage Stories from a computer. It is especially useful for business accounts that need a more organized publishing workflow.
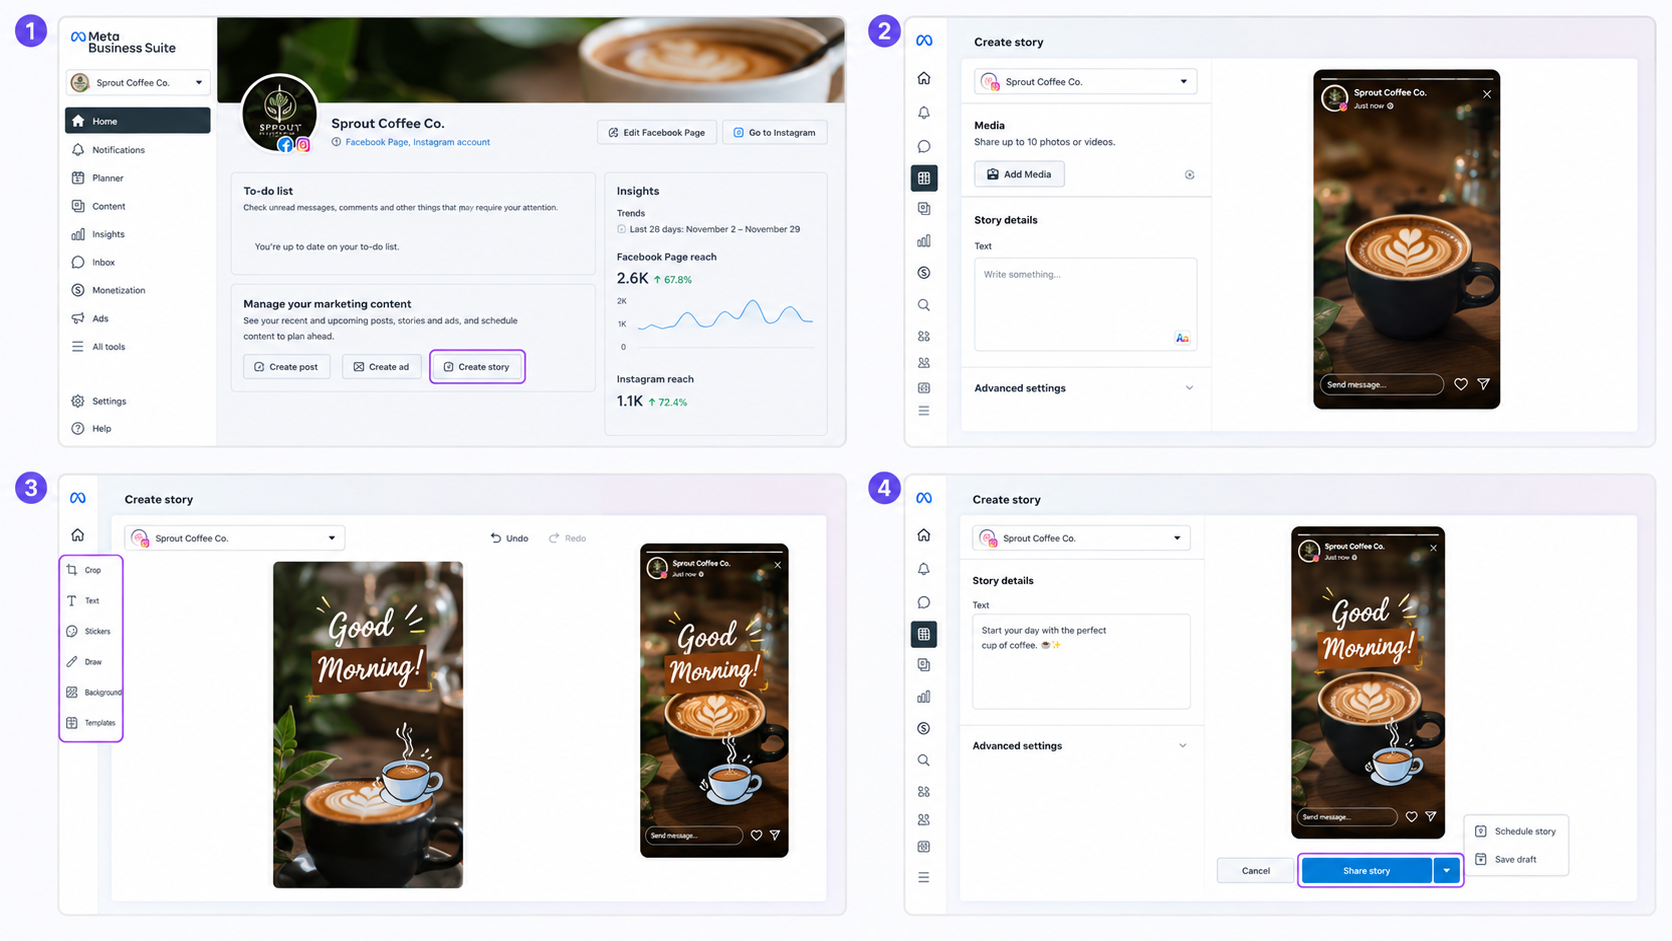
Step 1: Open the Business Dashboard
Log in to your Meta Business Suite homepage. Look for the main action block and click the Create Story button.
Step 2: Create Your Story
Select the correct account handle from the dropdown menu at the top. Click Add Media to upload up to 10 photos or videos directly from your hard drive.
Step 3: Adjust the Content
Use the creative tools located on the left side of the screen to crop your media, apply text overlays, or drop in digital stickers. The right panel will display a real time preview of how your Story will look on a mobile screen.
Step 4: Publish Your Story
Once your design looks exactly right, click Share Story to post it immediately. You can also click the small arrow next to the button to schedule the Story for a future date.
Method 2: Use Desktop Browser Features
If you cannot access Story uploading directly from Instagram's desktop interface, you can switch your browser into mobile view. This makes Instagram load a mobile-style layout where the Story upload option may appear. This method does not require installing extra software, but some Story features may be limited compared with the Instagram mobile app.
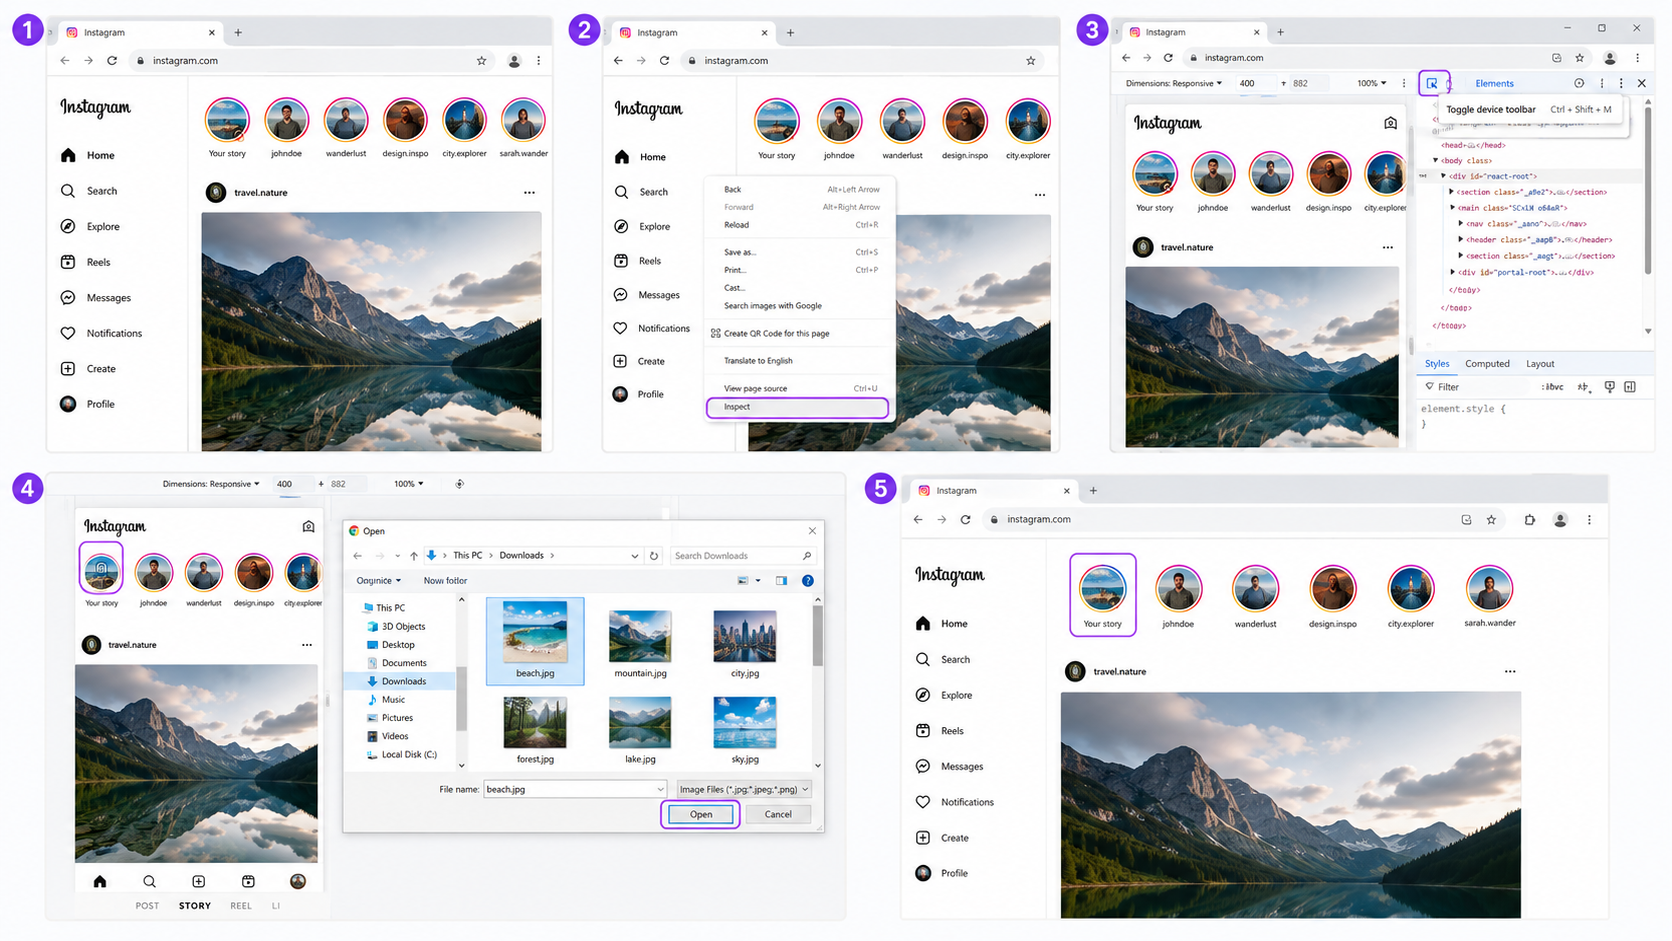
Step 1: Open the Platform on Your Browser
Navigate to the website using Google Chrome and log in.
Step 2: Open Browser Developer Tools
Right click anywhere on the blank background space of the page and select Inspect from the menu. A technical panel showing website code will slide open on the right side of your screen.
Step 3: Enable Mobile Device View
At the top edge of the inspector panel, click the Toggle device toolbar icon. It looks like a phone and tablet sitting next to each other. Refresh your web page entirely. Your browser will now display the interface exactly as it looks on a smartphone.
Step 4: Upload Your Story
Click the camera icon or the Your Story circle located in the top left corner. Your computer file explorer will open up. Select your intended image or video file and click Add to your story.
Step 5: Check Your Story after Publishing
Close the developer tools panel to snap your browser back to normal desktop viewing mode. Click your profile picture to verify the Story was published successfully to your audience.
Note: While this method can help you post a story on Instagram from PC, it does not always provide the full mobile experience. Some features may be unavailable, including:
-
Music stickers
-
Polls and quizzes
-
Advanced effects
-
Certain interactive stickers
-
Full editing options
If you frequently create professional Stories, Meta Business Suite may provide a more reliable workflow.
Optimize Your Instagram Desktop Workflow with Designkit
Once your posting process lives on a PC, you save massive amounts of time by generating and editing your visuals without touching your phone. Instead of waiting for a graphic design team to send you files, Designkit helps you generate high converting product layouts, marketing assets, and social graphics instantly. It bridges the gap between a raw desktop file and a scroll stopping asset ready for your feed.
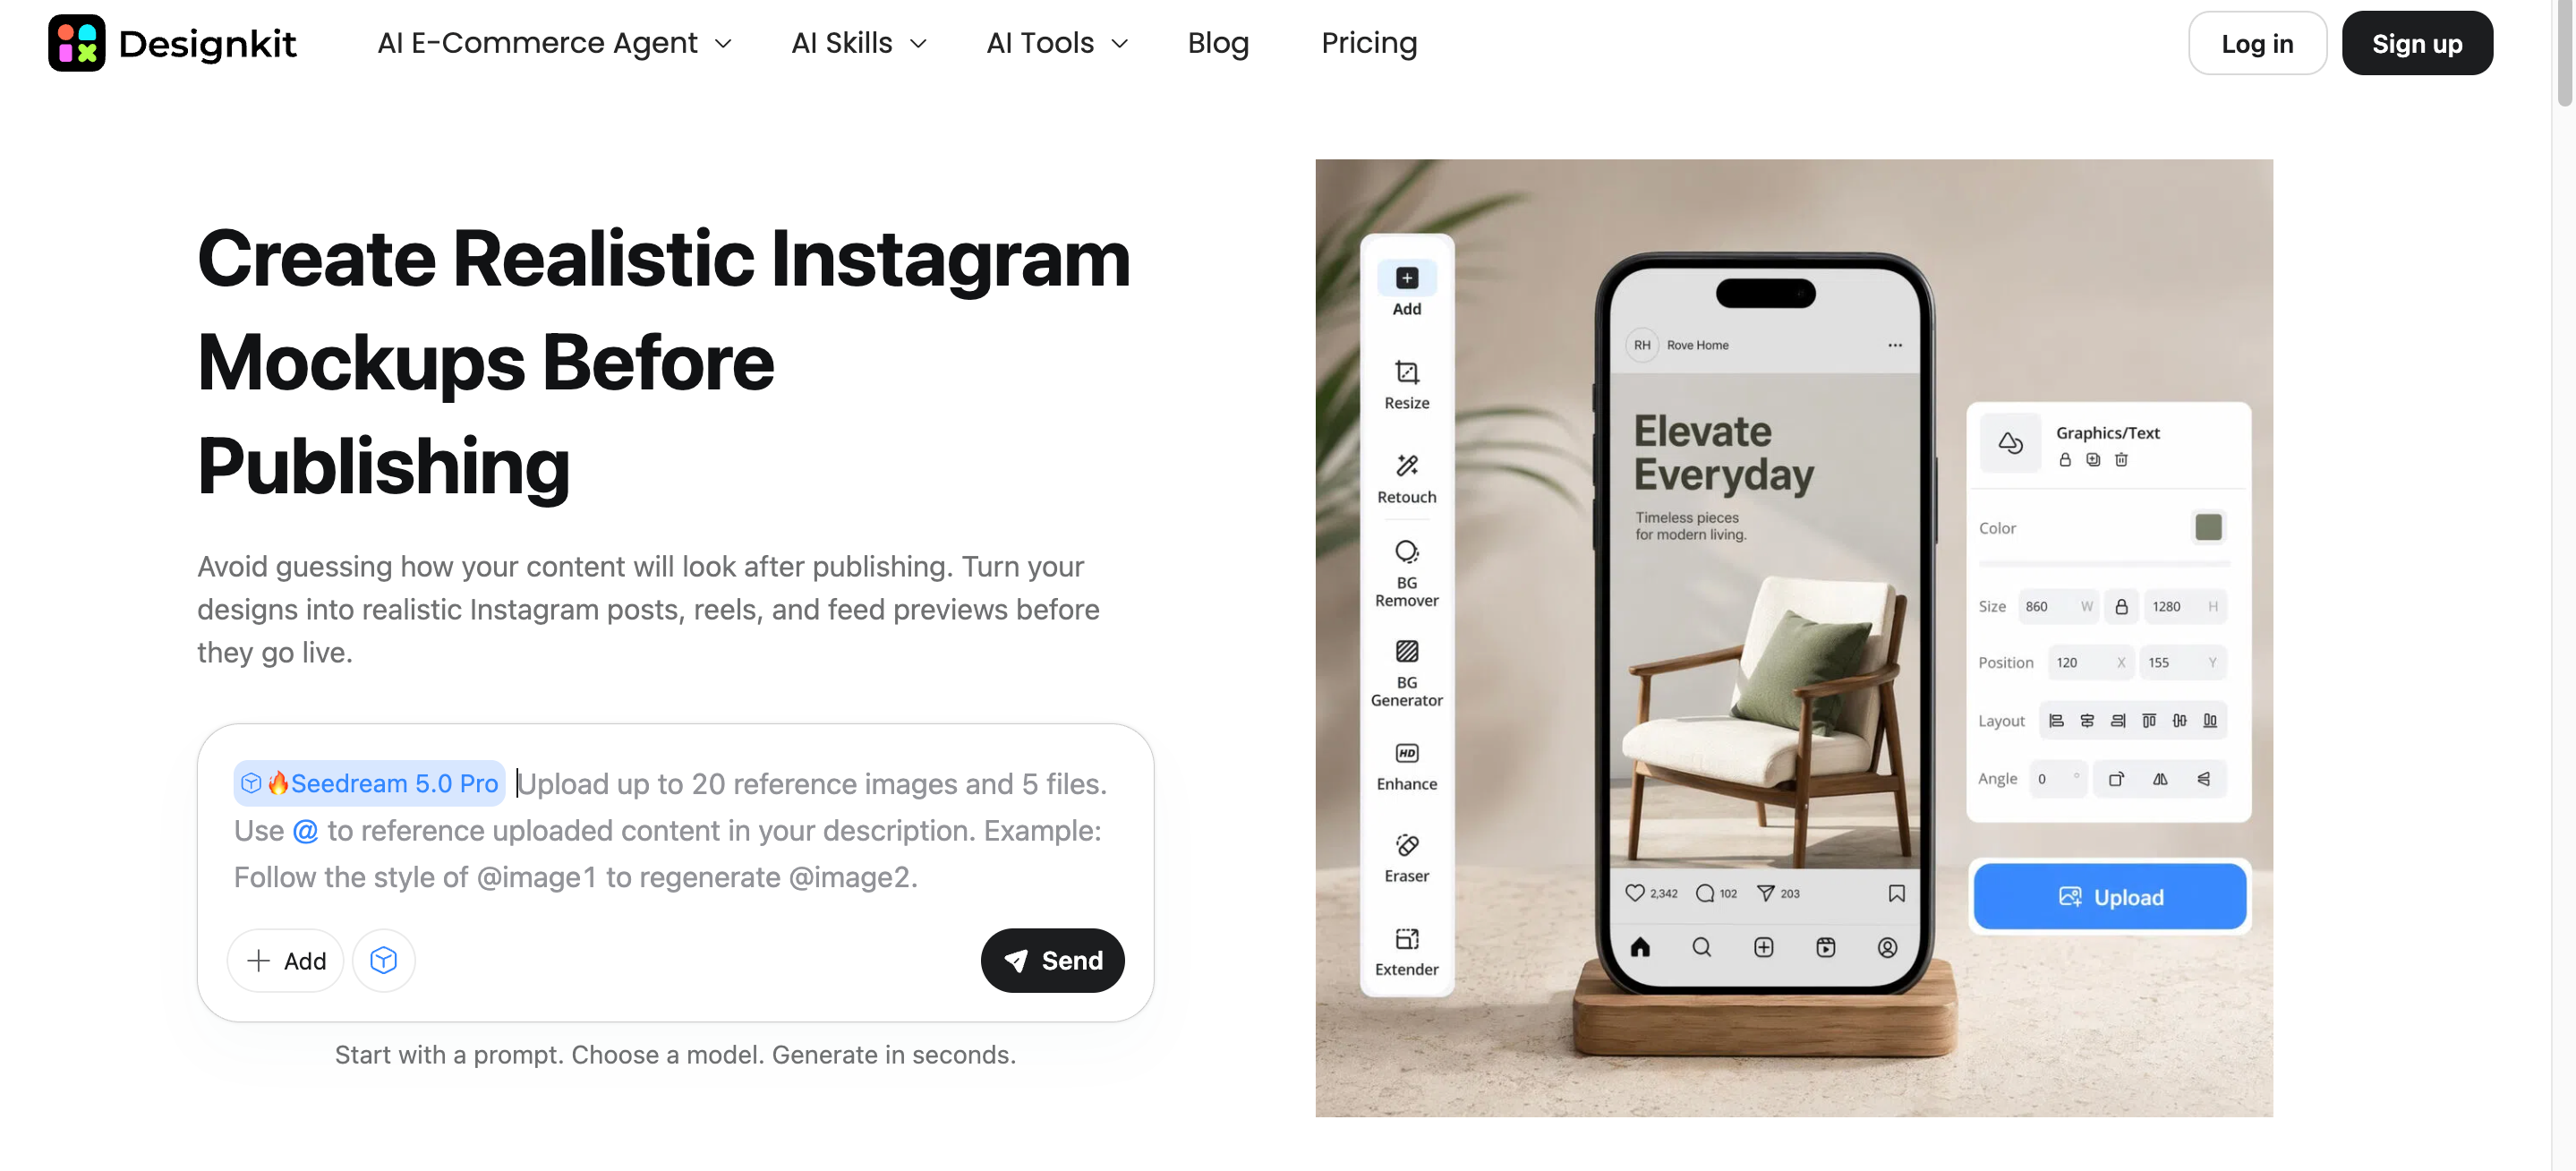
How to Create Instagram Visuals With Designkit in 3 Steps
Designkit helps simplify Instagram content creation by combining visual design and AI-assisted copy creation in one workflow. You can start with an idea, product image, or existing asset, then create Instagram-ready visuals and captions that match your content goal.
Step 1: Start with Your Idea, Product, or Brand Assets
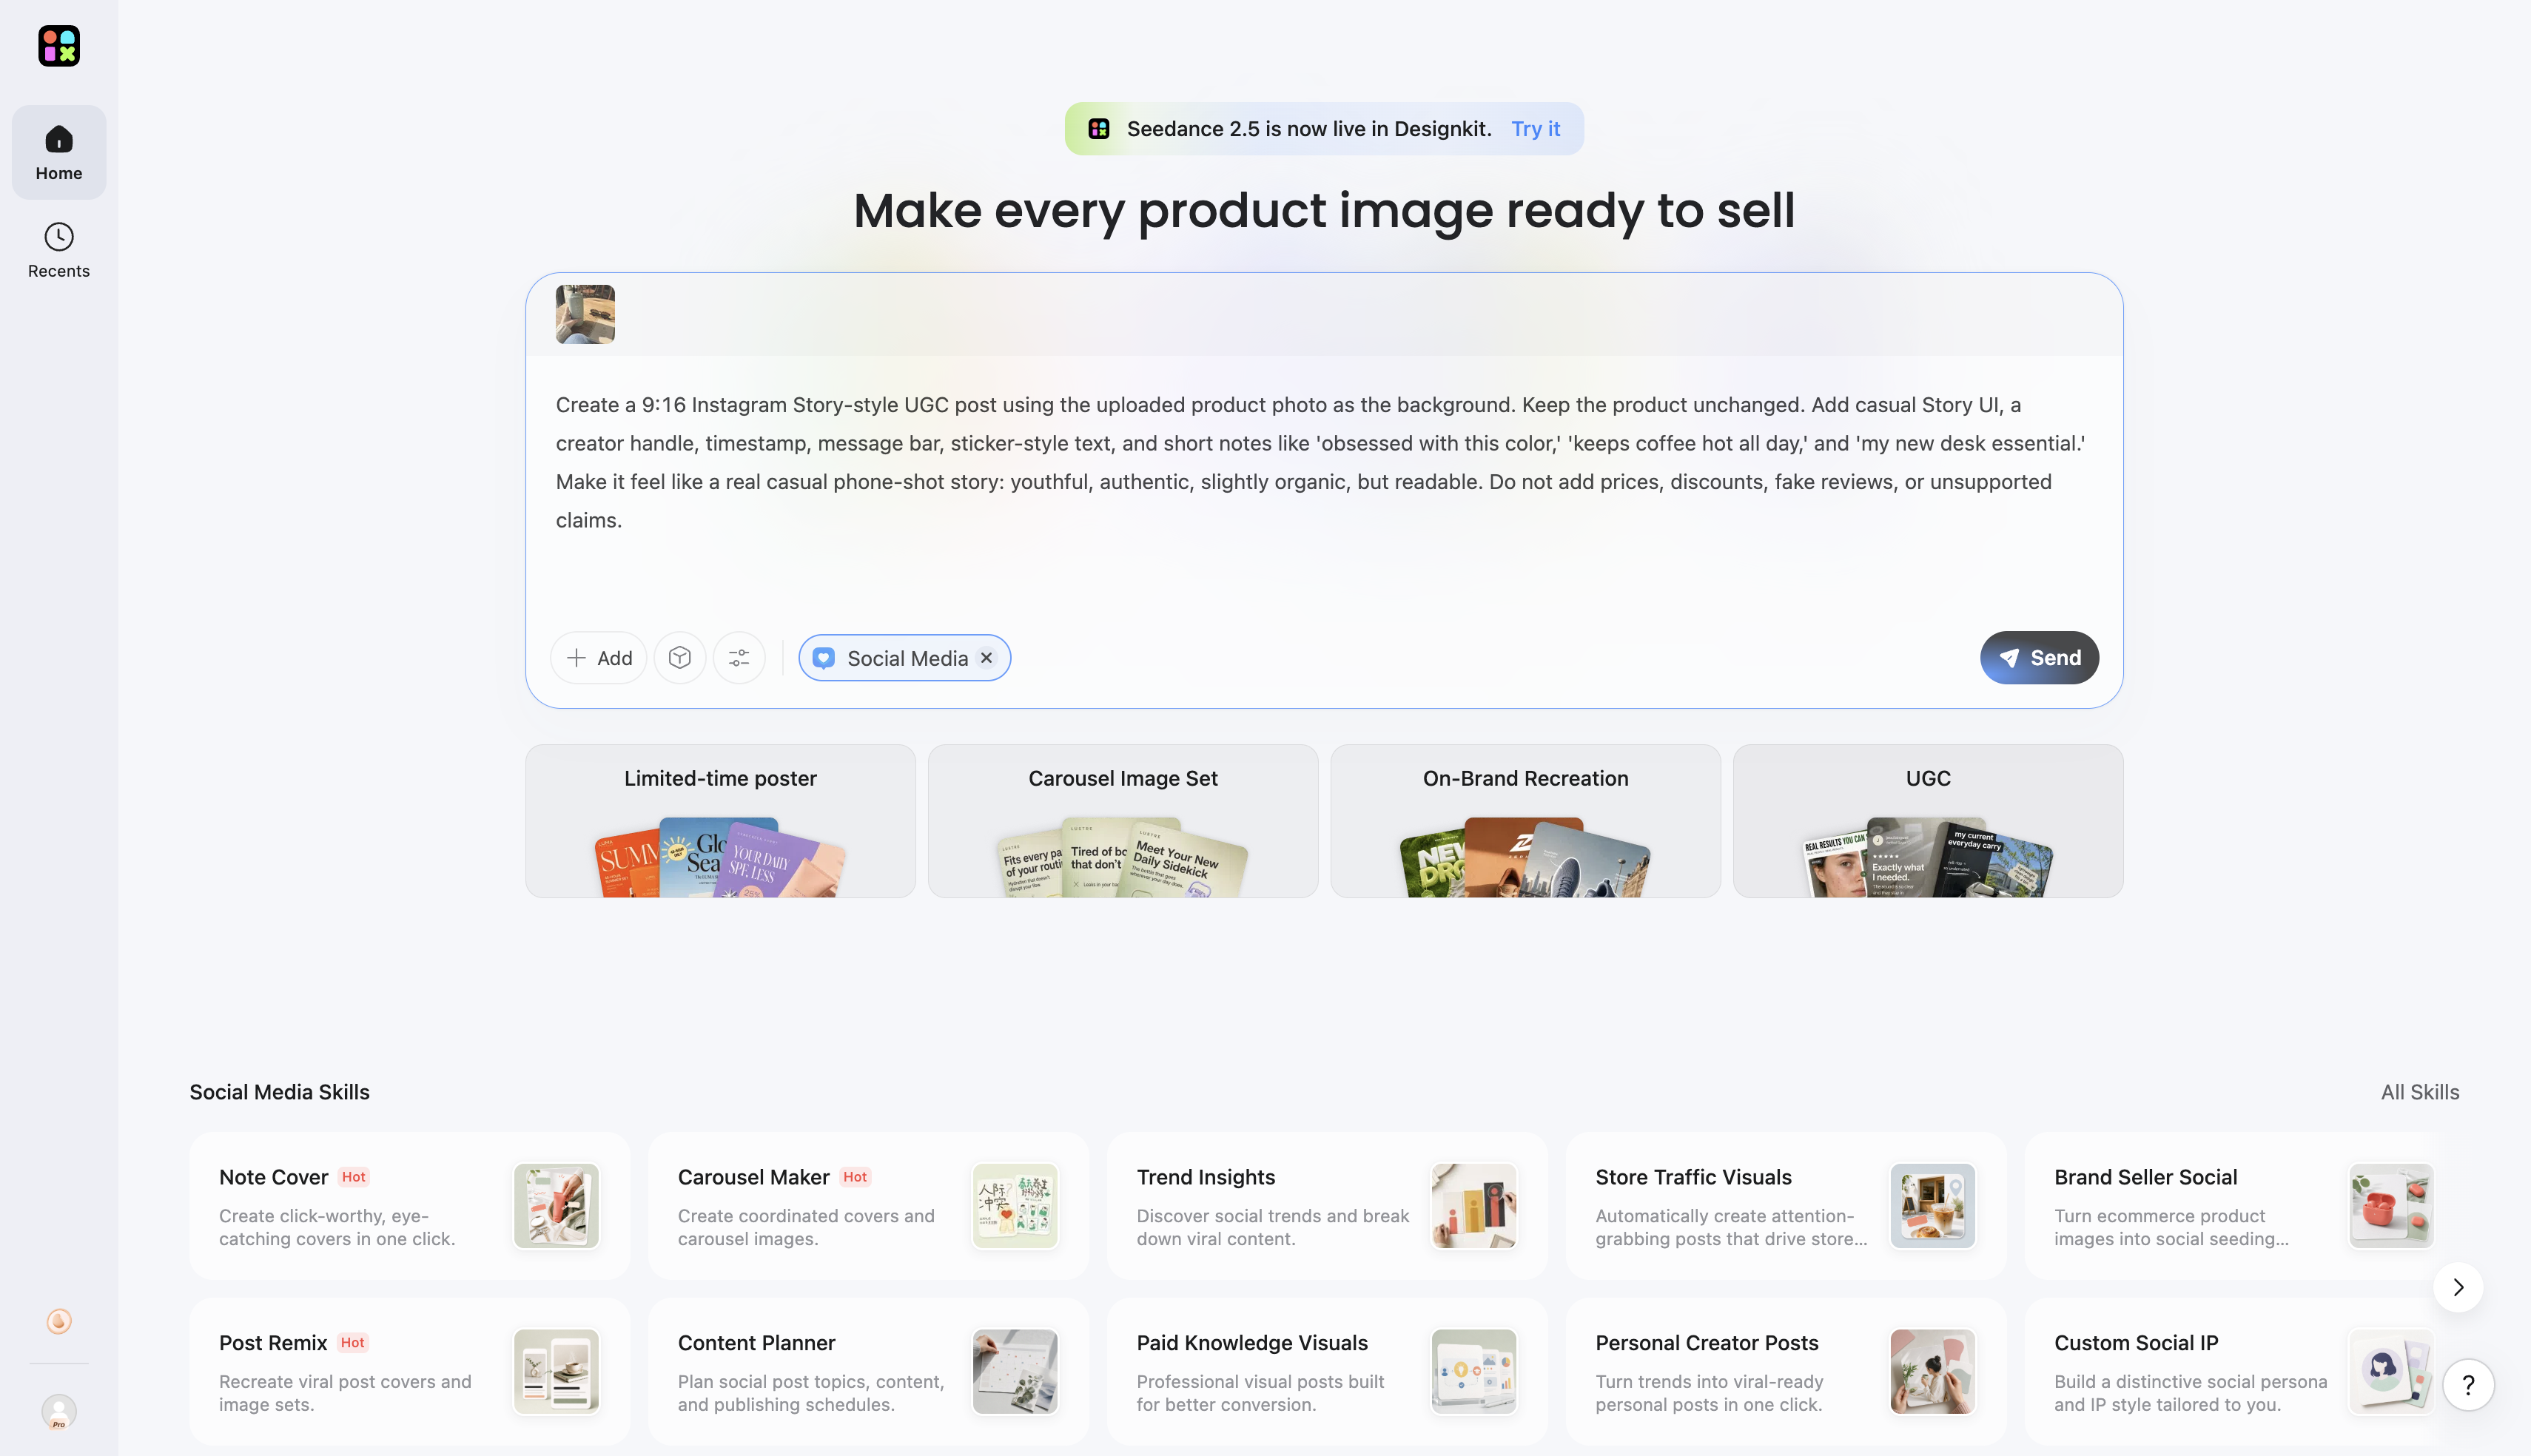
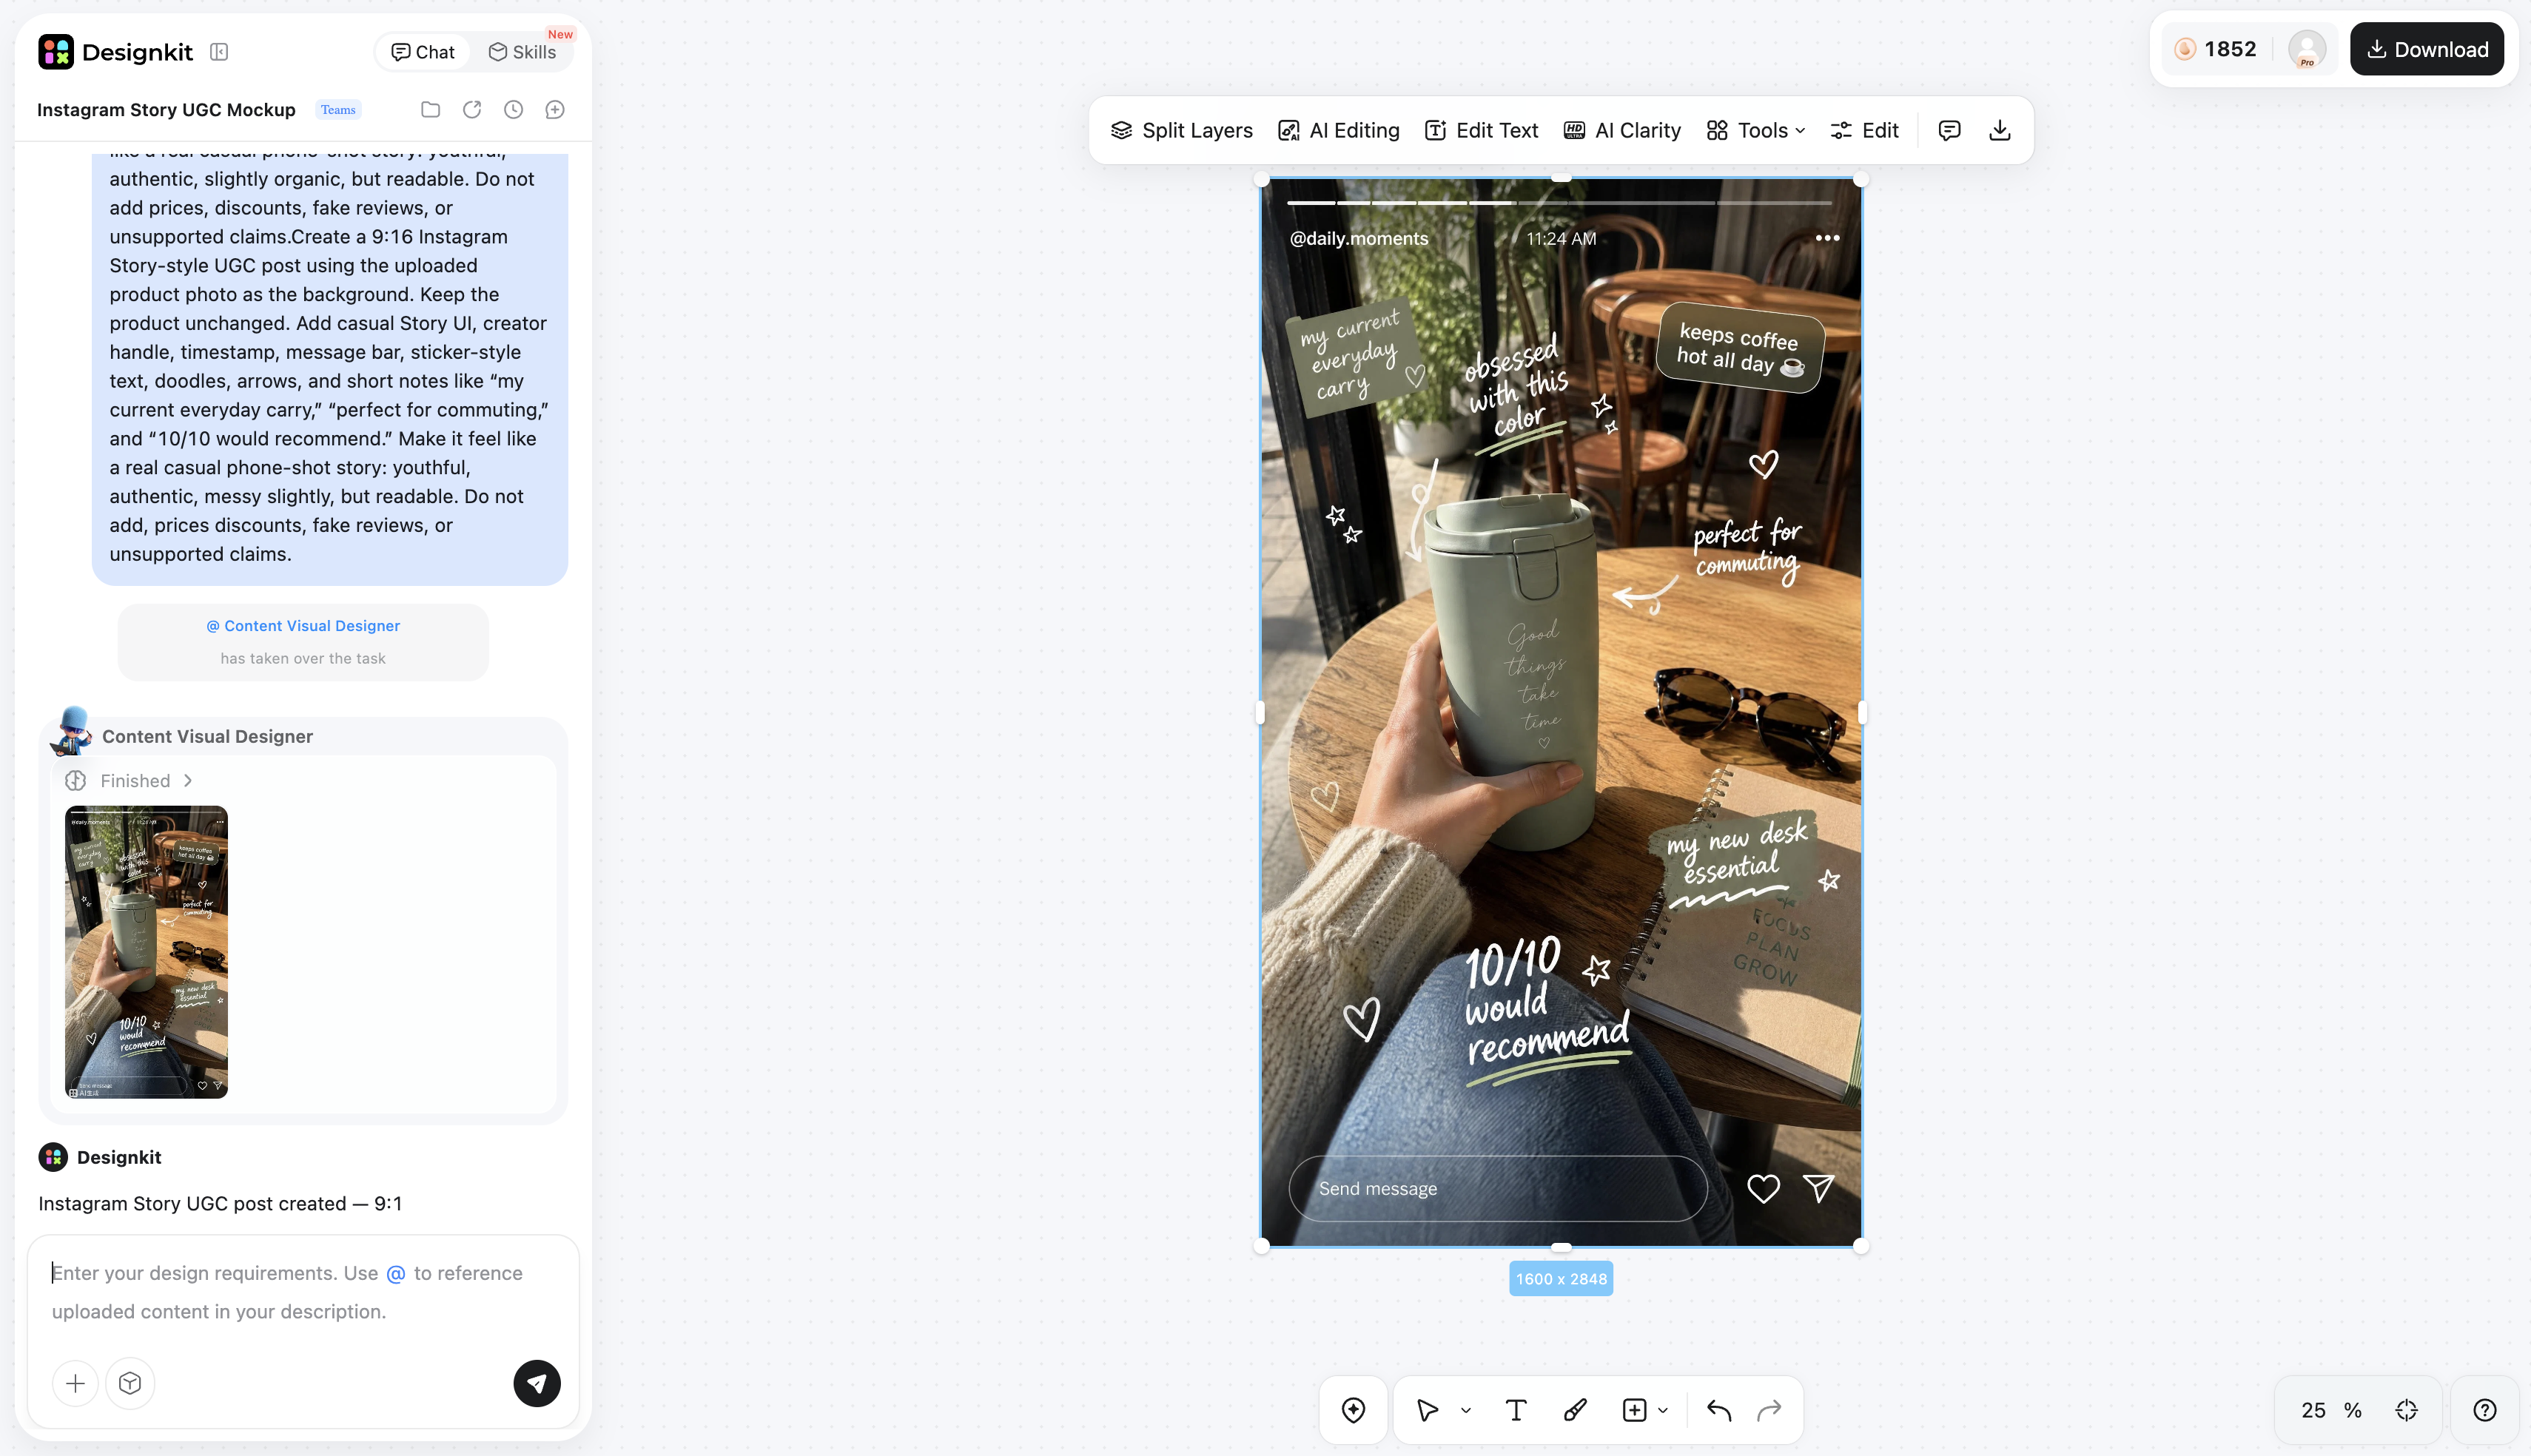
Upload your product image using the + Add button with the Social Media tag active. Choose one of the four quick layout styles, like On-Brand Recreation or UGC, and explore the Social Media Skills section below for specialized workflows like Note Cover or Content Planner. Type your creative concept into the prompt box and click Send.
Step 2: Create the Visual and Copy Together
The workspace transitions to a massive canvas while an AI agent team executes your project. Check the left-hand sidebar as the Content Visual Designer processes your constraints and builds your layouts, handling the heavy lifting by generating your copy and visuals right on the board.
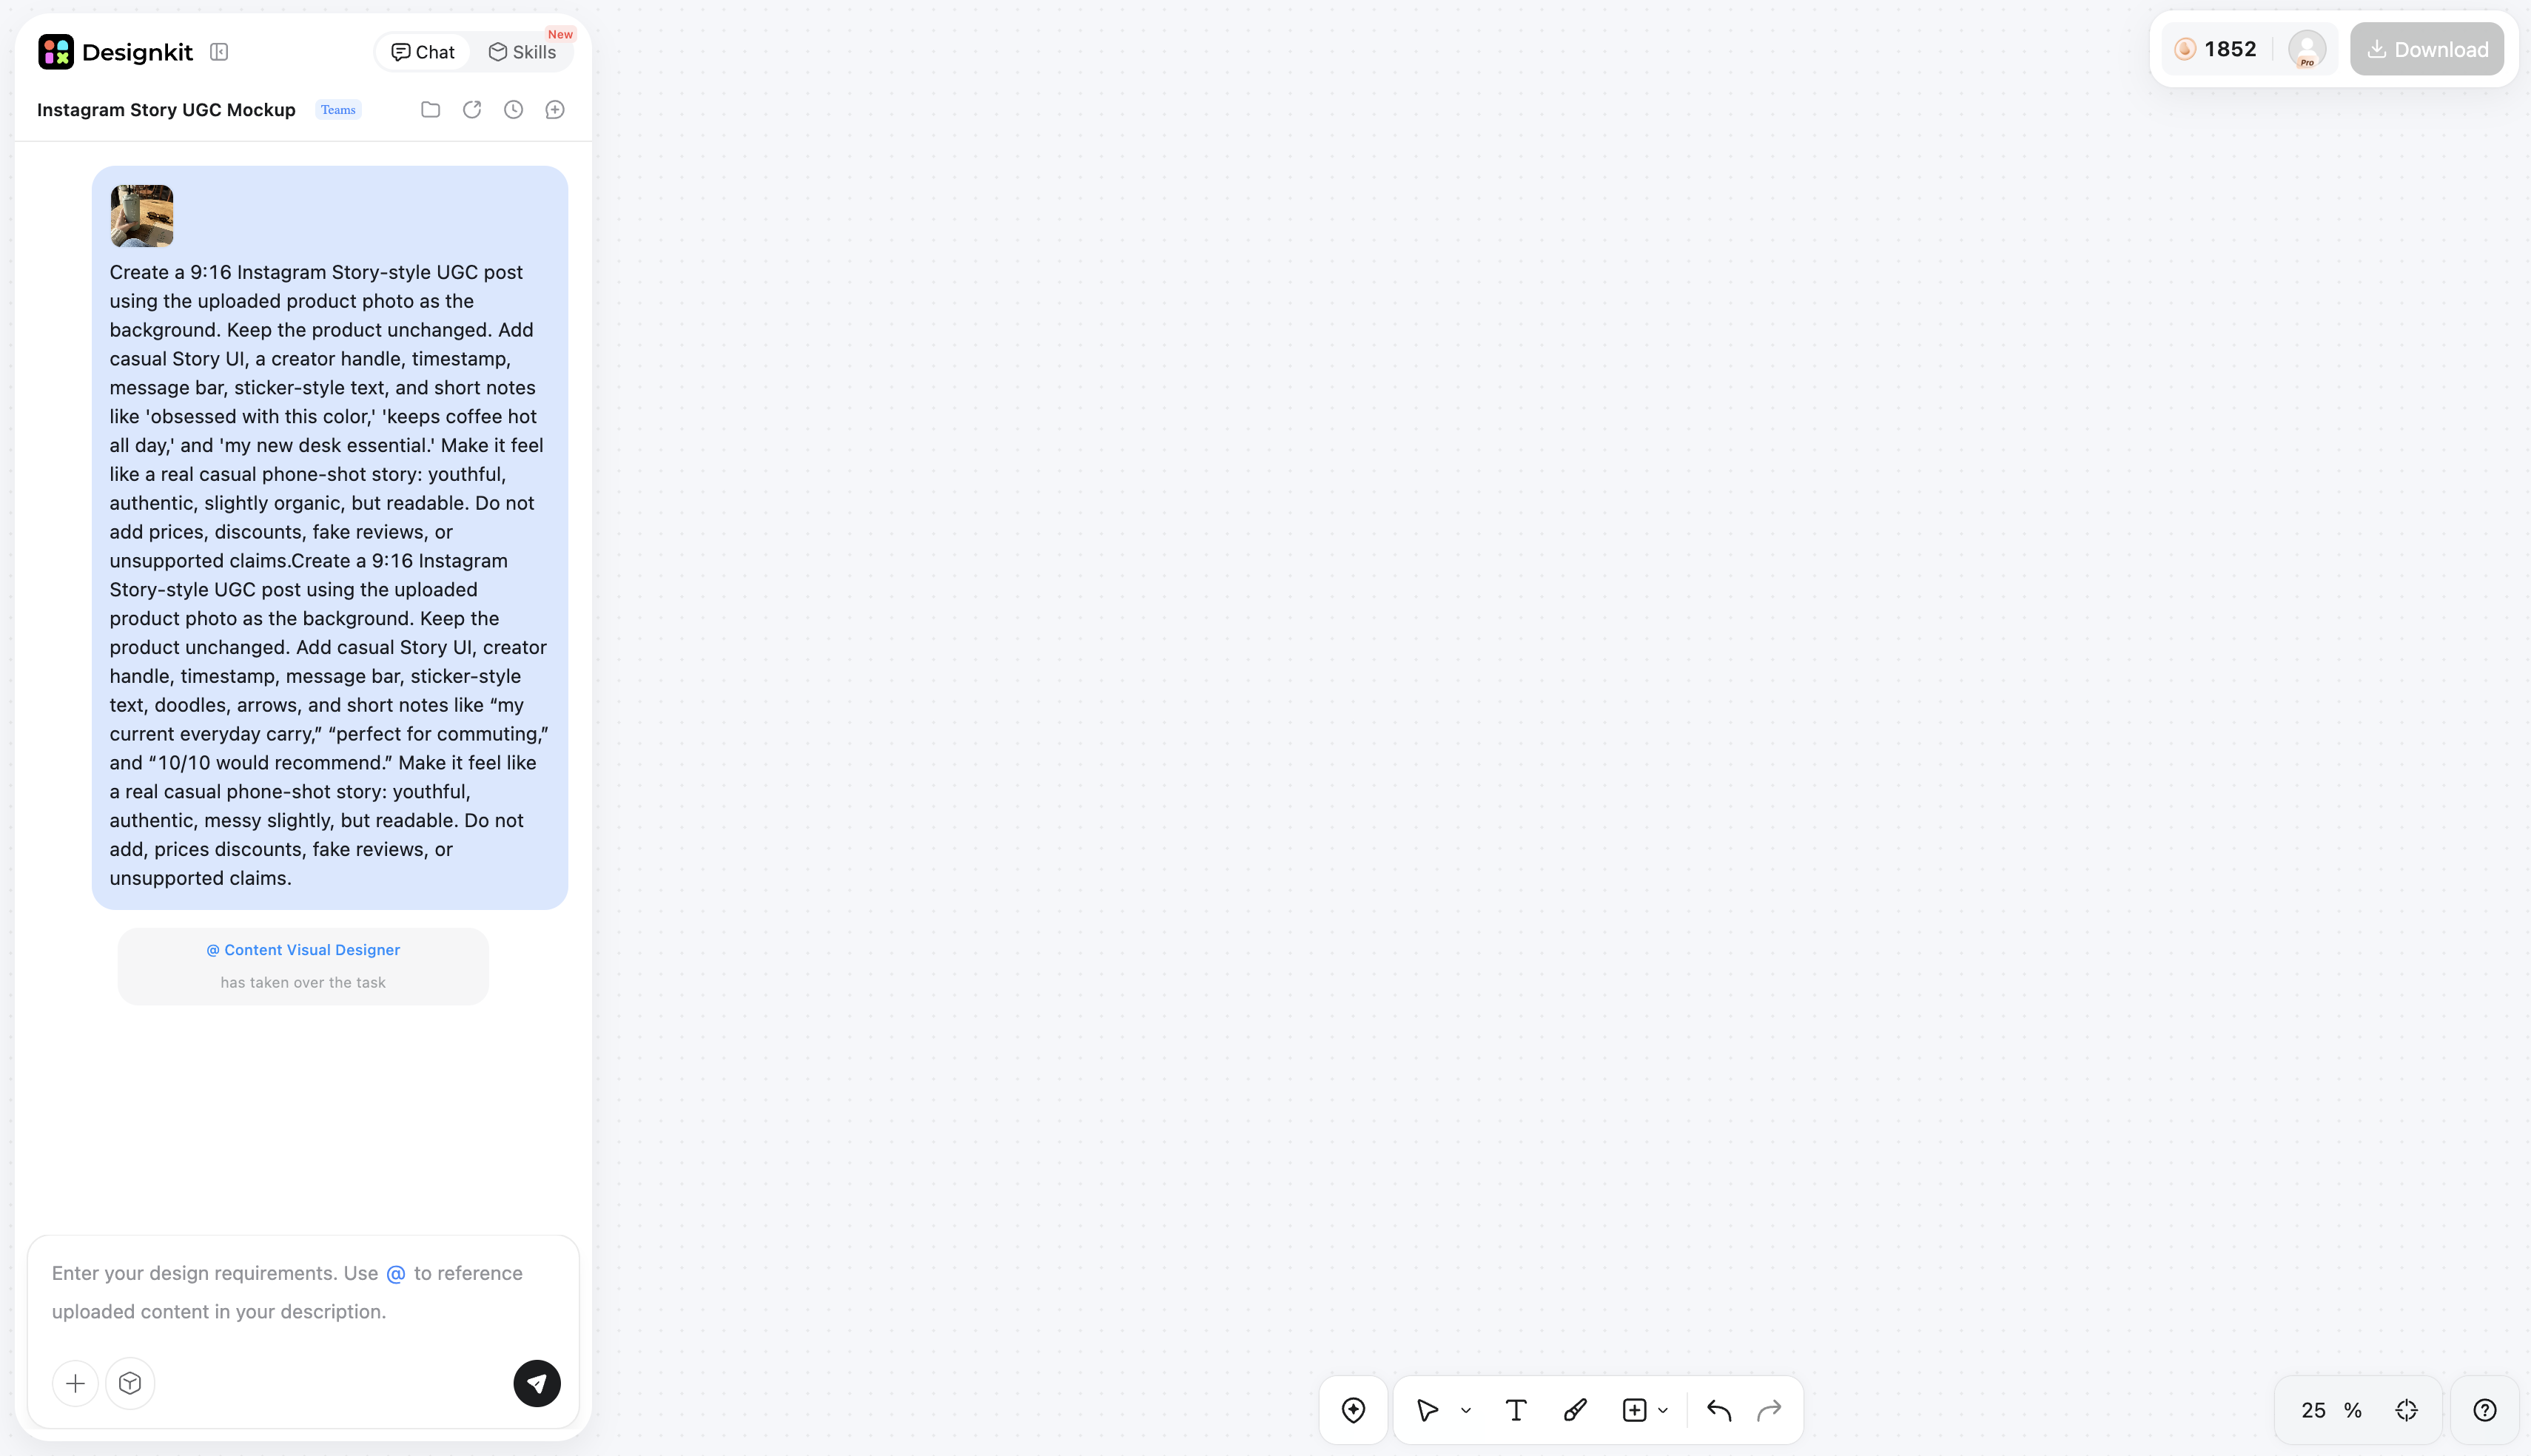
Step 3: Refine and Export Your Instagram Content
Review the finished post on your canvas and use the top toolbar options, such as Split Layers, AI Editing, or Edit Text, to make any precise adjustments needed. Once you are completely satisfied with the design, click the Download button in the top right corner to save your final creative for Instagram.
Designkit Features for Instagram Content Creation
Generate Multiple Visual Variations
Instantly produce 10 to 20 different creative hooks and layout options for a single campaign. This rapid output lets you run quick A/B tests to see what grabs attention before scaling your winning concepts.
Turn Raw Photos Into Social Media Assets
Use the product photography generator to instantly transform a basic flat lay product shot into a polished promotional banner. This removes the need for complex studio setups by automatically layering professional backgrounds and lighting onto your raw files.
Create Consistent Brand Content
Lock in your typography, styling, and brand colors, so every single post looks completely unified on your profile grid. Anyone on your team can use a built in image text editor to create fresh assets that perfectly match your established visual guidelines.
Prepare Content for Different Instagram Formats
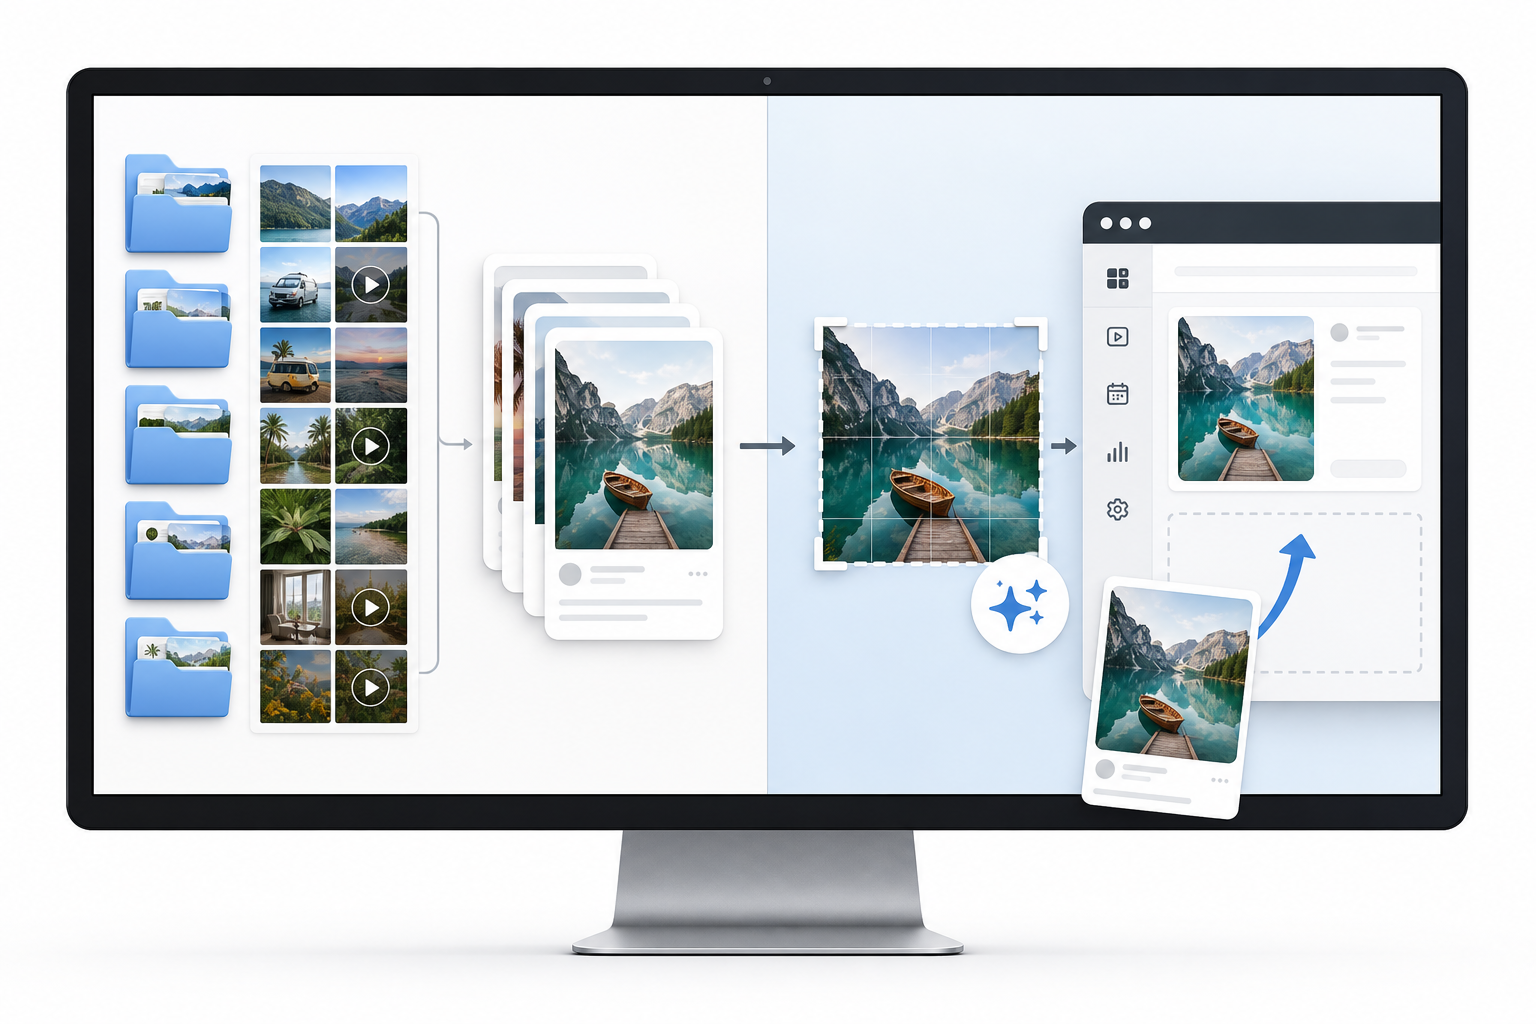
Automatically adjust your winning designs to fit the exact dimensions required for Posts, Stories, Reels & Carousels. Designkit lets you instantly resize image for Instagram, which eliminates manual cropping and ensures your media looks flawless across every placement.
Best Practices for a Desktop Instagram Workflow
Organize Your Content Library
Create specific folders on your hard drive for raw photography, edited graphics, and final export videos. Naming conventions like "Spring_Promo_Assets" keep your daily workflow completely tidy and prevent you from uploading the wrong draft file to your live feed.
Create Content in Batches
Use your desktop screen space efficiently. Dedicate a specific block of time to generating all your weekly visuals and writing out your captions in a master document. Then, use Meta Business Suite to schedule the entire week of content in one sitting.
Optimize Images Before Uploading
Heavy file sizes can compress poorly when pushed to social platforms, resulting in blurry uploads. Formatting your media to the ideal Instagram image size before exporting prevents this issue. Scaling your files to the exact required dimensions ensures your graphics always remain crisp and professional on high definition mobile screens.
Combine Creation and Publishing
Keep your design software tabs and your publishing dashboard open side by side. Generating an image, downloading the final version, and immediately dragging it into your web interface creates a highly productive, frictionless routine.
Final Thoughts
Publishing content from a desktop setup gives creators and businesses a remarkably faster way to manage campaigns, organize digital assets, and type out better captions. Using the built in web uploader or a robust dashboard like Meta Business Suite radically simplifies your daily social media operations. Understanding how to post on Instagram from desktop changes the speed at which you can execute marketing strategies.
For operators who also need to produce high volume visuals before publishing, integrating AI tools brings incredible value. Designkit offers a complete AI-powered creation workflow that helps turn raw ideas and simple images into polished, listing-ready content in minutes.
Frequently Asked Questions
Can I add music and stickers to Instagram Stories from a computer?
Why does Instagram look different on desktop compared with mobile?
The desktop interface is specifically optimized for wide computer screens and landscape navigation. The core features and actions remain the same, but the layout shifts to accommodate a mouse pointer and keyboard workflow rather than vertical thumb scrolling.
Can I schedule Instagram posts from my computer?
You can absolutely schedule your posts natively using Meta Business Suite. You simply need to ensure you have a Professional or Creator account properly linked to an active Facebook Page.
Why can't I see the Create button on Instagram desktop?
If the Create button is missing from your screen, you might be using an outdated browser version or an aggressive ad blocker is interfering with the website code. You should try clearing your browser cache, updating your browser software, or logging out and back in to refresh the interface.
Can I upload carousel posts to Instagram from a desktop?
You can upload up to 10 images or videos to create a single carousel post directly from the website. You just need to click the layered square icon during the initial upload step to select multiple files from your computer.
You May Also Like
Amazon Individual vs Professional Selling Plan

How to Create an Amazon Seller Account: Requirements and Steps
Amazon Product Video Requirements: Specs & Upload
Amazon Brand Registry Requirements: Trademark, Account & Cost

Amazon Global Selling: How to Open Multiple Marketplaces
How to Make an Event on Facebook: Complete Setup Guide (2026)

Amazon Sponsored Brands: What They Are and When to Use Them

Amazon Sponsored Products: How to Launch Your First Campaign

Amazon Vine Program for Sellers: Get Early Product Reviews

Amazon A+ Content Dimensions: Module Image Sizes
Print-On-Demand Designs: Create, Prepare, and Preview Your Work

Amazon A+ Content: What It Is and What to Build First
Is Print on Demand Profitable in 2026? Products and Niches
Amazon Brand Registry Application: How to Submit and Pass Review

How to Ship to Amazon FBA: Your First Shipment

What Is Amazon FBA? Should Beginners Use It in 2026

How to Get Ungated on Amazon: Restricted Category Approval Steps
Amazon Backend Keywords: Title, Bullets & Search Terms
What Is A/B Testing? A Practical Guide to Running Better Experiments

Best Time to Post on Instagram in 2026: Data & Tips
How to Get Verified on Instagram: Complete Guide

TikTok Monetization in 2026: Requirements & Ways to Earn

Instagram Desktop Posting Guide: Upload Posts, Stories & Reels

YouTube Shorts Monetization Requirements & Rules 2026
How Much Does YouTube Pay Per View? 1K, 100K & 1M Views

How to Make Money on Snapchat: 7 Ways to Earn

How to Get More Followers on Instagram in 2026

Best Time to Post on TikTok in 2026 for More Views
How to Repost on Instagram in 2026: A Simple Guide
Multichannel Marketing Guide: Strategy, Tools & Examples
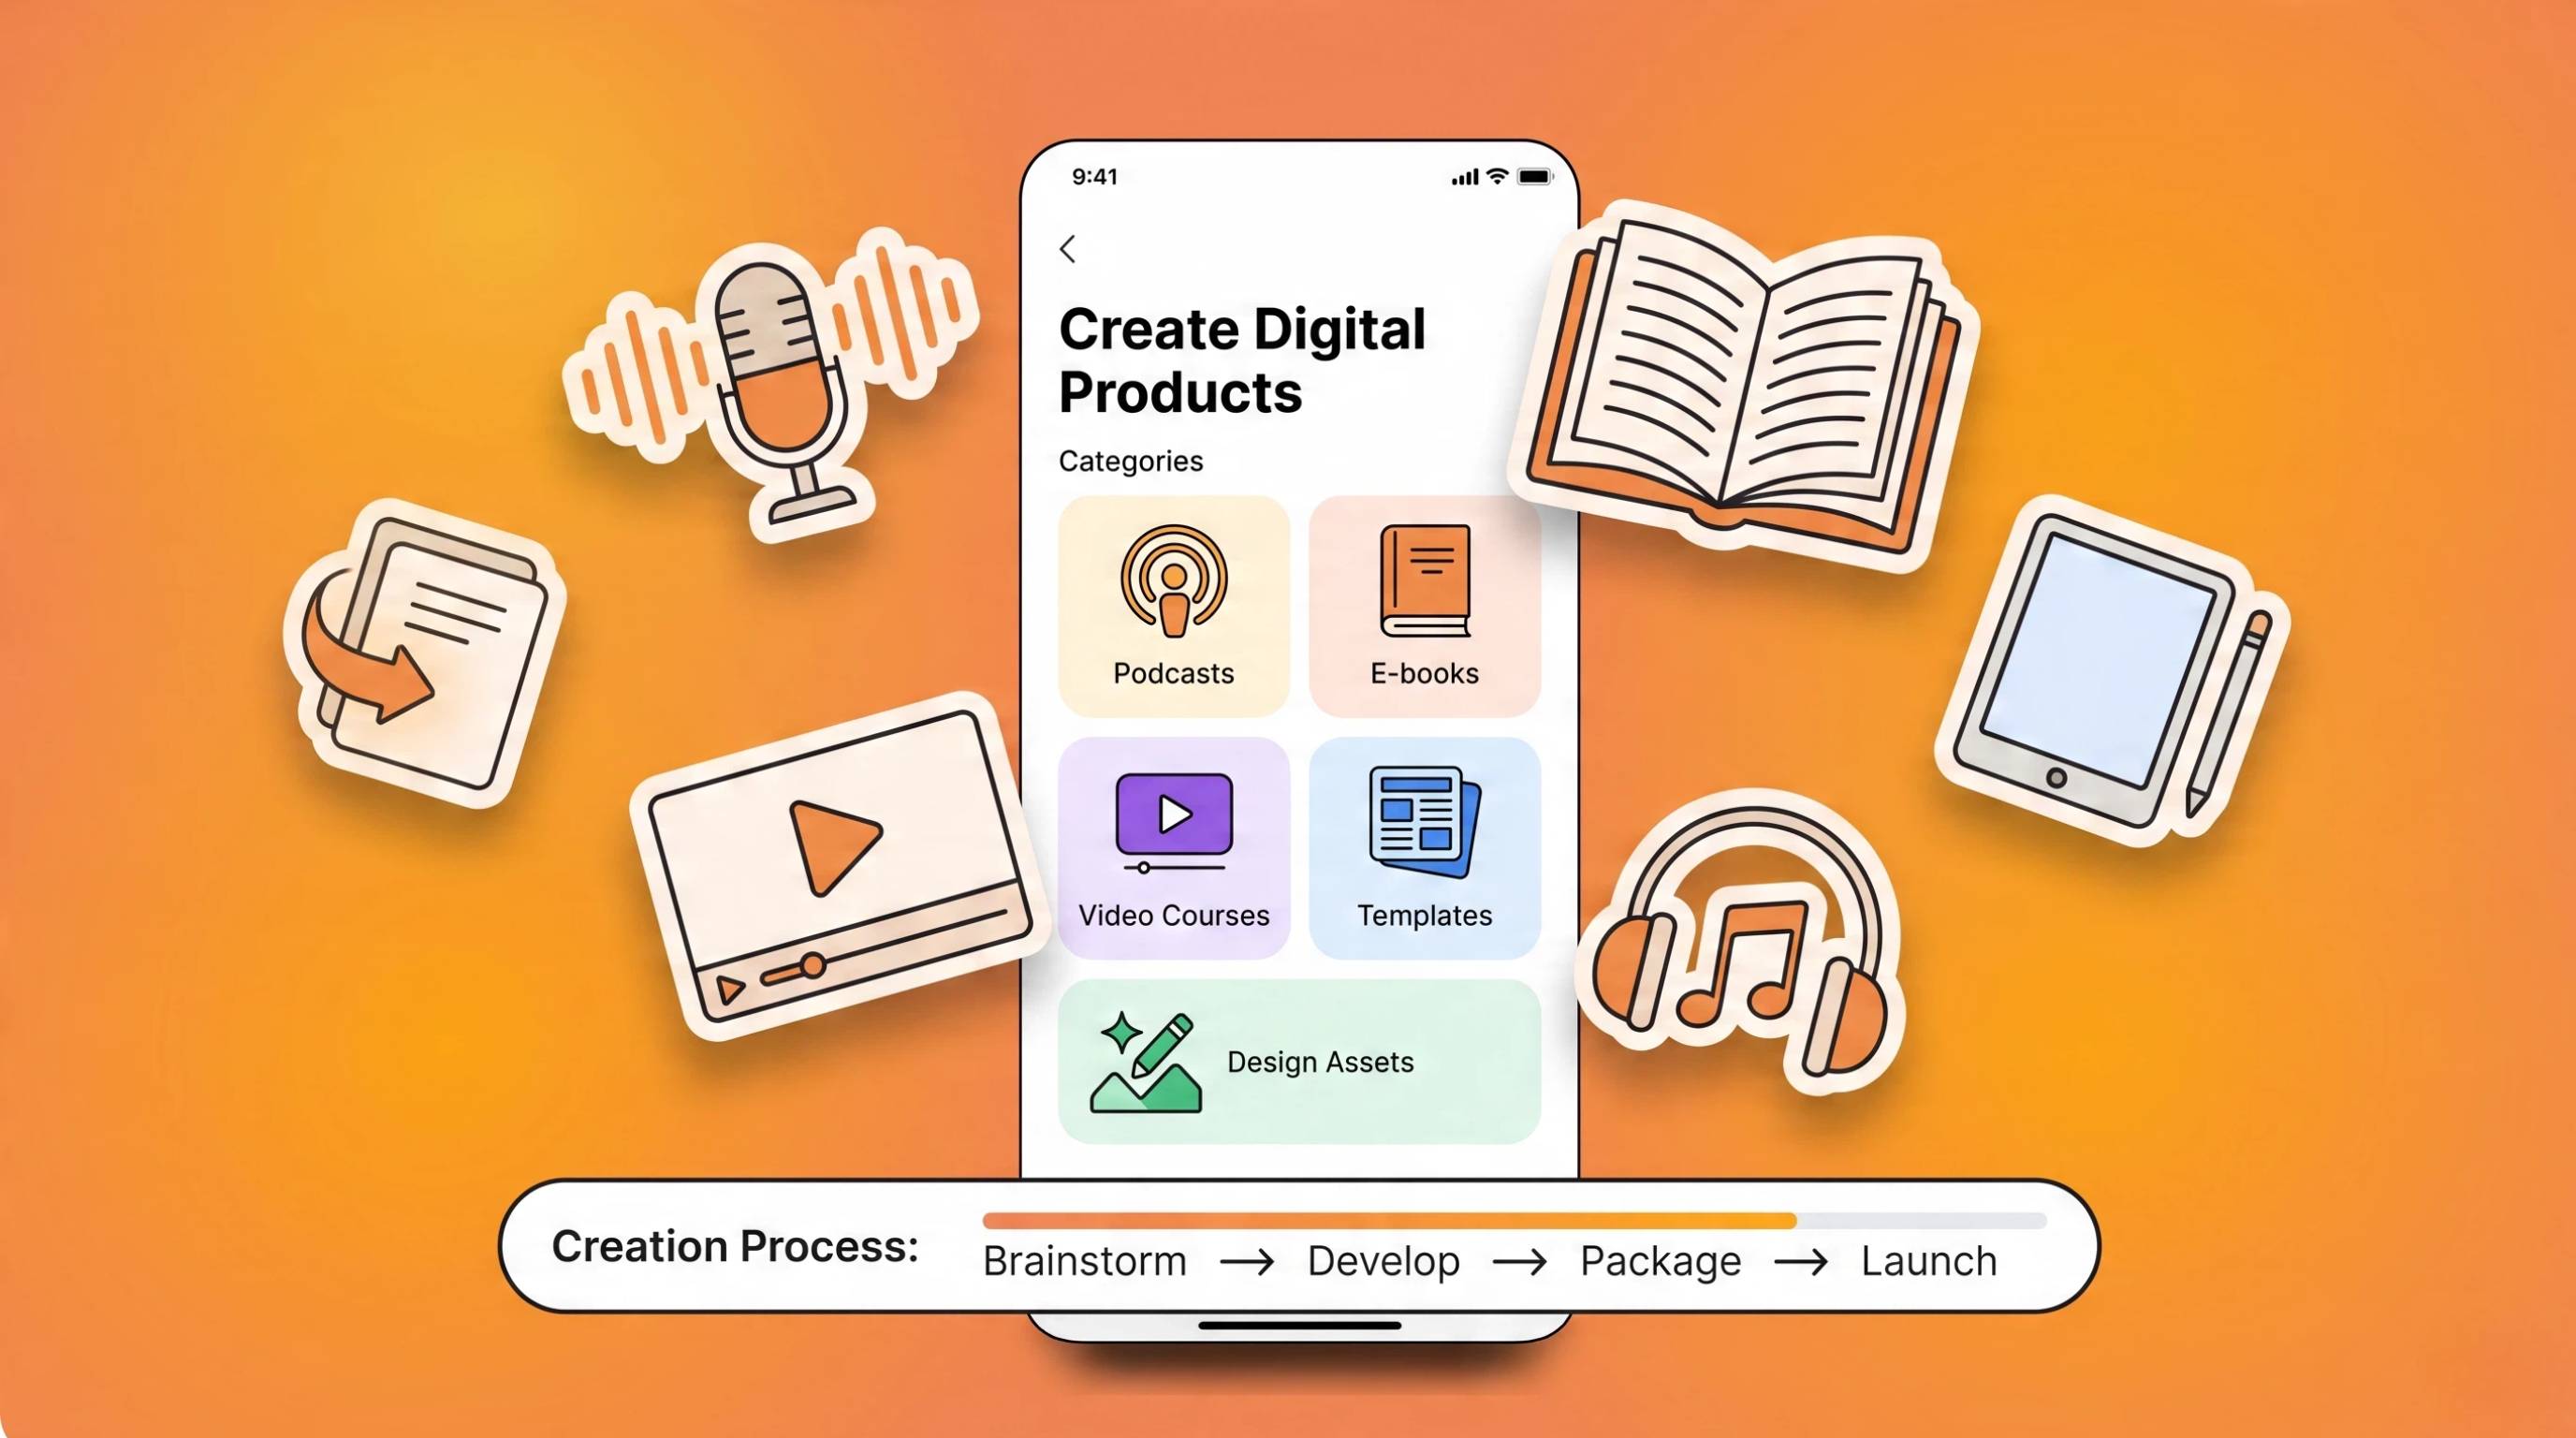
How to Create Digital Products That Sell in 2026

Cyber Monday Marketing Ideas & Strategies (2026 Guide)

Black Friday Marketing Ideas for Ecommerce Brands (2026)
Instagram Marketing Guide: Strategies, Tips & AI Tools in 2026
Influencer Marketing Guide: Strategy, Campaigns & Creator Tips

15 Best Things to Sell on Etsy in 2026 (Listing Tips Included)
WooCommerce vs Shopify 2026: Pricing, Features & Which Is Better

How to Sell on Facebook Marketplace: Beginner Guide (2026)
How to Use Pinterest for Business: Strategy, Tips & Growth Guide

How to Sell on Etsy in 2026: Setup, Listings & Growth Tips

What Is a Target Audience? Types, Examples & How to Find Yours

TikTok Marketing Guide 2026: Strategies, Ideas & AI Tools
Vibe Marketing Explained: Strategy, Examples & AI Tools
How to Sell on Depop: Beginner Guide to Getting Your First Sale

Online Advertising Guide: Types, Costs & Examples (2026)

Facebook Advertising Guide: Costs, Strategy & Tools 2026

What Are E-commerce Ads? Examples, Strategy & Tools (2026)

Where to Sell Handmade Items Online (2026): Etsy, Amazon, or Shopify?
Shopify vs Amazon (2026): Brand Store or Marketplace FBA?

Amazon Handmade vs Etsy (2026): Which Is Better for Makers?
Etsy vs eBay (2026): Handmade, Vintage, or Secondhand?

Selling on Amazon vs eBay (2026): Fees, Profit & Where to Sell
What Is Brand Awareness? Examples, Strategies & Tools 2026

10 Best Online Selling Platforms (2026): Pick by What You Sell

Shopify vs Etsy (2026): Which Is Better for Handmade Sellers?
YouTube Automation Step-by-Step AI Guide for Beginners

What Is Brand Identity? Examples, Elements & Strategy

AI Marketing Agent: How It Works, Benefits & E-Commerce Examples
What Is Personalized Advertising? Examples & How It Works
How to Build a Shopify Store That Actually Converts Visitors

Amazon Marketing Guide 2026: Strategies, Tips & Tools
Local Advertising: Strategies, Examples & Tools (2026)

What Is Branded Content? Examples, Strategy & Tools 2026

What Is Performance Marketing? Strategies & Examples 2026

Inbound Marketing: Strategies, Examples & Tools (2026)
Create Instagram Content without the Extra Steps
From generating visuals to preparing social media assets, Designkit helps creators and businesses build better Instagram content directly from their desktop workflow.


